Sign up for the Family Tree Newsletter Plus, you’ll receive our 10 Essential Genealogy Research Forms PDF as a special thank you!
Get Your Free Genealogy Forms
"*" indicates required fields
Open a box of family photographs and all types of pictures spill out: paper prints, cased images, tintypes, Polaroids, snapshots. Knowing when each type of photo was produced is one of the first steps in estimating when a picture was taken—a huge clue to who’s in those mystery pictures. A photo’s format also dictates the best ways to save it for posterity. Gather genealogy clues and preserve your family’s past by following our guide to historical photo formats.
Daguerreotypes: 1839 to mid-1860s
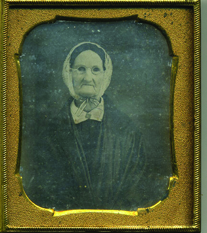
Characteristics: A daguerreotype is a copper plate coated with highly polished silver; chemicals including mercury vapor were used to develop the image. Early cameras produced reversed images, but later improvements created true pictures. In order to add realism to the black-and-white image, photo studios employed artists to add color, such as gold jewelry and pink cheeks and lips.
History: Throughout the 1820s and 1830s, Joseph-Nicéphore Niépce and Louis Daguerre worked to develop a process for creating permanent images on metal. They finally succeeded in 1839. For the first time, people could have their likenesses captured without the time and expense of a painted portrait. According to Robert Taft in Photography and the American Scene (Dover), studios in the 1850s took close to 3 million daguerreotypes annually.
François Gouraud, an emissary of Daguerre, traveled to several US cities in the fall of 1839, demonstrating the new process to packed audiences. Though most early daguerreotypes showed places or things, by early 1840, daguerreotype artists had opened portrait studios in major US cities. Studios in cities such as New York, Washington and Boston were lavishly decorated with image galleries and fancy furnishings for waiting customers. Sitting times were long, especially in the early days—from five minutes up to 30 minutes—so photographers used clamps to help subjects stay still. By the early 1860s, most studios had switched to different photographic methods.
Identification tips: Identifying a daguerreotype is simple: Because its surface is reflective, you must hold it at an angle to view the image. For protection, daguerreotypes were encased behind a glass cover and a mat. A thin brass strip called a preserver holds together the image “sandwich.”
Preservation tips: Never take apart the case. Daguerreotypes are fragile because the chemical salts sit on the surface of the image. If you want to make a copy, scan the image in the case using a good-quality photo scanner (I like the Epson Perfection line).
Keep each daguerreotype in its own reinforced archival storage box from a museum supplier such as Hollinger Metal Edge or Light Impressions. Label the outside of the box, or write on a slip of acid- and lignin-free paper stored with the image. Don’t glue or tape anything to the daguerreotype.
Calotypes: 1841 to early 1860s
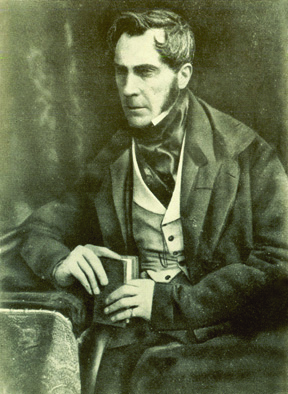
Characteristics: These first paper images were created using paper coated with silver iodide. A salted paper print, popular during the 1850s, is a kind of calotype made using silver chloride.
History: Paper images trace their roots to England. Around 1800, Englishman Thomas Wedgwood made “photograms” by placing objects on paper coated with silver nitrate, then exposing the paper to light. But he struggled to prevent the images from turning black over time. In 1841, William Henry Fox Talbot patented a way to “fix” an image on ordinary writing paper and called it a calotype. But because of the restrictive patent, it took a decade for paper photographs to reach the same level of popularity as daguerreotypes.
Under pressure from the Royal Society of London, Talbot began waiving licensing fees for amateur photographers in 1852. He sued several professional photographers to prevent them from using Frederick Scott Archer’s related ambrotype process (see below), which used collodion on a glass plate, but courts ruled in 1854 that the collodion process didn’t violate Talbot’s patent. Calotypes, sometimes called Talbotypes, were relatively rare in the United States because of Americans’ strong support for the daguerreotype.
Identification tips: Calotypes create fuzzy images because they’re printed with paper negatives. The salted-paper print produced clearer pictures. In both cases, the image appears to be embedded in the paper, and you might see a watermark if you hold the image up to light.
Preservation tips: Don’t display a calotype. Dark storage in acid- and lignin-free folders is recommended.
Ambrotypes: 1852 to early 1870s
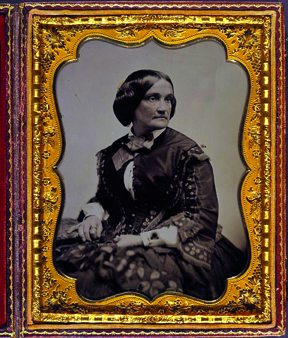 Characteristics: Ambrotypes are negative images developed on glass with a dark coating on the back.
History: Englishman Frederick Scott Archer announced in 1851 that he’d developed a method for creating images on glass. The glass was coated with a thin layer of light-sensitive collodion, then dipped in silver nitrate and exposed. When backed with a dark varnish, cloth or paper, the negative glass image would appear positive.
The name of the process derives from J. Ambrose Cutting, an American who patented Archer’s method in 1854. Patrons of ambrotype studios had to pose still for 30 seconds, held in place by metal braces. Ambrotype images were popular during the 1850s, but public interest in them declined once tintypes and paper prints became widely available.
Identification tips: When the dark backing of an ambrotype begins to deteriorate, you may be able to see through the image. The ambrotype was covered with another layer of glass for protection, then sealed behind a mat inside a metal case.
Preservation tips: Damage to ambrotypes may take the form of glass breakage, flaking of the dark backing or of the image layer, or fungus growth on the balsam resin used to seal the image. If you have a damaged ambrotype, a professional conservator can stabilize the damage and restore the appearance of the image. As with daguerreotypes, you should store ambrotypes in individual containers to prevent breakage.

Tintypes: mid-1850s to late 1800s

Characteristics: Also known as ferrotypes or melainotypes, tintypes weren’t actually on tin. Rather, an image was produced on a thin, blackened iron sheet coated with photo chemicals, then varnished to protect the image.
History: In 1853, Frenchman Adolphe Alexandre Martin presented his pictures on glass and metal to the French Académie des Sciences. Three years later, Hamilton L. Smith, an Ohio college professor, received a patent for the images on metal he’d developed with colleague Peter Neff. (Smith was probably unaware of Martin’s earlier discovery.) The patent explained how collodion could be applied to various surfaces such as leather, fabric or rubber. Some photographers in India and South America still use the process, and you occasionally can get tintypes at carnivals as novelties.
Inexpensive, readily available and “instantaneous” compared to other processes, tintypes were incredibly popular. Abraham Lincoln even used them in campaign buttons for the 1860 presidential election. Even the poor could afford tintypes, and during the Civil War, every family wanted an image of a loved one before he went off to fight. Unlike bulky cased images, a tintype pictures could be sent home in a letter.
Identification tips: Sizes ranged from full plates (8×10 inches) to tiny “gems” the size of a postage stamp. The image may be matted in a paper frame and/or encased, like ambrotypes. Spots of rust may give away the metal composition, but if you’re unsure, test the surface with a magnet: If it sticks, you have a tintype.
Preservation tips: Tintypes are relatively durable, but may be bent and dented. High humidity causes scratched or creased areas to rust. Unfortunately, the varnish meant to protect the image can darken, masking the picture. Store tintypes in an environment with a stable temperature and low humidity, in a sleeve of acid- and lignin-free cardstock. If the image is flaking off, seek a professional photographic conservator to repair the damage.
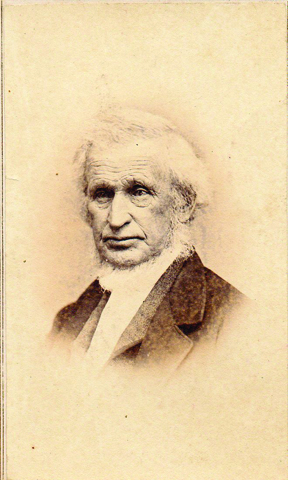
Albumen print: 1850 to early 1900s
Characteristics: These early paper photos came in several standard sizes and helped make photography a commercial enterprise.
History: The albumen print is another French innovation that caused a major shift in photography and elevated the egg to picture stardom. In 1850, Louis-Désiré Blanquart-Èvard, a photographer familiar with Archer’s collodion process, produce an image using a glass negative and paper coated with ammonium chloride and egg whites. As an added benefit, he could make multiple prints from a single negative. It was the death knell for daguerreotypes and ambrotypes.
Suddenly photography was a commodity. A common kind of albumen print is the 2 1/2 x 4-inch carte de visite (“visiting card”), introduced in France in 1854 and found in many photo collections today. Our ancestors present these small images when they met someone. By 1859, American photographers were offering them, too. The first patent for a photo album, designed primarily to hold these cards, was issued in 1864.
Young women collected mass-produced images of royalty and celebrities; men bought wartime scenes or portraits of Civil War generals (so don’t leap to conclusions of illustrious roots if such cards are in your collection). Photography also could be used to record medical conditions, document criminals, sell houses and educate children. Pictures had all sorts of uses.
Identification tips: Examine the surface of an albumen print and you can see the egg white. Identify a card photograph by its size and format, the clothing in the image and photographer’s imprint. Besides the carte de visite, you might find the larger cabinet cards (4.5×6.5 inches), introduced in 1866, or the Victoria (3.25×5 inches), introduced in 1870. Card photographs were so common that the government taxed them: A 2- or 3-cent revenue stamp on the back tells you the image originally cost 25 or 50 cents and was made between Aug. 1, 1864, and Aug. 1, 1866.
Preservation tips: Keep these paper prints in acid- and lignin-free archival storage and limit handling of them.
Characteristics: Two nearly identical images mounted side by side have a 3-D appearance when viewed through a special viewer called a stereoscope.
Stereographs: 1854 to 1938
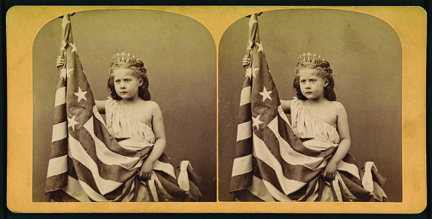 Characteristics: Two nearly identical images mounted side by side have a 3-D appearance when viewed through a special viewer called a stereoscope.
 History: Starting in 1854, a few companies produced “stereos” of travel, war, religious, comedic and other scenes. Rarely do these images depict people. If you have stereographs in your family collection, your relatives probably purchased them—which in itself reveals something about their interests.
Identification tips: Research the photographer or publisher, title and subject (usually printed on the back of the stereograph) to date the image.
Preservation tips: The first stereographs were daguerreotypes; later, they were card photographs. Follow the preservation advice for those types of images.
Black-and-white snapshots: late 1880s to present
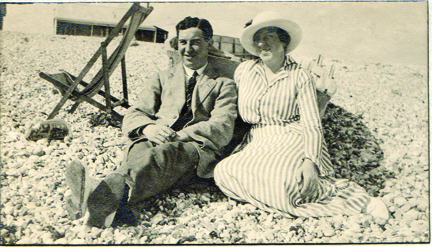
Characteristics: These were the first candid prints taken with cameras made for amateur photographers. Images appear in shades of gray or sepia.
History: George Eastman ushered in a new age of photography with box cameras that were so easy to operate, even a child could take a picture. The first Kodak cameras of the late 1880s came pre-loaded with roll film for 100 exposures; the operator returned the camera to the factory to obtain prints and more film. By 1900, when Kodak introduced the widely popular Brownie camera, most family photographers were using amateur cameras manufactured by Kodak or its competitors.
Identification tips: These small-format black-and-white prints were returned to shutterbugs mounted on cardstock. They came in a variety of sizes, depending on when they were taken and the size of the negative. Unfortunately, there’s no comprehensive source of picture sizes and years for identification purposes, so rely on clothing and other clues in the picture to estimate a date for the image. My book Uncovering Your Ancestry Through Family Photographs (Family Tree Books) explains in detail how to do this.
Preservation tips: Store these paper prints in acid- and lignin-free containers. Though black-and-white prints are relatively stable, fading may occur. Scan photos to preserve their images. To help prevent deterioration, display copies rather than originals.
Photo postcards: 1900 to present
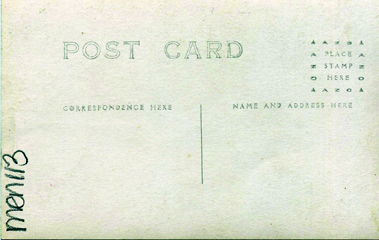
Characteristics: Photos were developed on paper with a postcard back, so the writer could easily send a quick message with his picture to a loved one.
History: Postcards existed before 1900, but they were printed using a publishing method, rather than a photographic one. “Real-photo” postcards were inexpensive and could be mailed to family and friends.
Identification tips: To distinguish a real-photo postcard from a regular postcard, examine the image with a magnifying glass. The picture on a regular postcard will look like it’s made of tiny dots; a real-photo postcard image appears solid. You can date the postcard using the stamp box and other design elements on the back. Find descriptions and examples from various manufacturers on Playle’s auction site.
Characteristics: The first permanent color photo process used dyed starch grains to create an image on a glass plate.

 Instant photos: 1947 to today
Preservation tips: As for all paper prints, you should store photo postcards in acid- and lignin-free boxes with reinforced corners.
Autochromes: 1904 to late 1930s
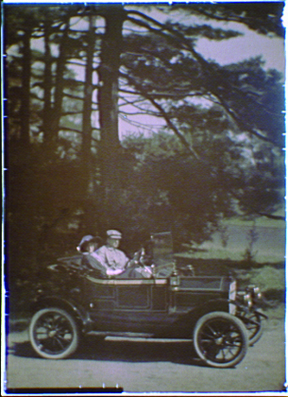 Characteristics: The first permanent color photo process used dyed starch grains to create an image on a glass plate.
History: In 1904 in Lyon, France, Auguste Marie Louis Nicolas Lumiére and his brother, Louis Jean, made the first commercially successful color pictures by using dyed vegetable starch on glass slides. A special viewing device was necessary to view the image. The general public didn’t embrace this expensive technology; rather, commercial photographers took most autochromes.
Identification tips: The dyed starch grains may be coarse, giving the image a hazy, “dreamy” quality. Stray grains of color may appear, especially in large light-colored areas such as skies.
Preservation tips: Store these glass autochrome plates on their edges in a reinforced box (avoid stacking the slides, which puts pressure on the ones at the bottom). Put a small number of slides in each box to keep from breaking the storage container.
Color paper prints: 1941 to present

Characteristics: These familiar color prints come in a range of sizes.
History: Kodak revolutionized amateur photography when it introduced Kodachrome 16mm movie film in 1935, and color prints and negatives in 1941. Kodak recently stopped manufacturing Kodachrome film due to the popularity of digital imaging. You can read more about color photography in the March 2010 Family Tree Magazine.
Identification tips: The size and format of 35mm film hasn’t changed since 1892, so the clothing and other image content will be most helpful in establishing a date. But you may be able to date prints or negatives from non-standard film based on size. Look up the print size in this Wikipedia chart, then see the type (or types) of film that produced prints this size, and the dates in use. For example, Kodak’s 126mm film was introduced in 1963; 110mm film, in 1972; and disc films, during the 1980s.
Preservation tips: Color images are particularly susceptible to fading and color shift. Scan these images to preserve them; you also can use photo-editing software to adjust the color. Make copies for display, keeping the original prints in dark storage.
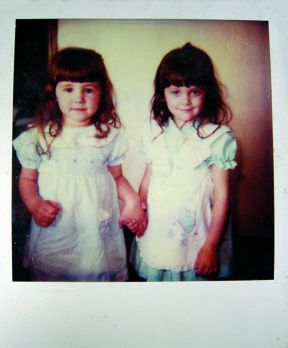 Instant photos: 1947 to today
Characteristics: An instant photo has a distinct white border and a glossy image. The photo has a thick and plastic feel; “Polaroid” may be printed on the back.
History: In 1947, Edwin Land patented an instant black-and-white image. Polaroid patented an instant color film 16 years later. Early on, the picture developed inside the camera, and the operator applied a fixing agent. Shutterbugs using later versions would take the picture, wait for it to develop, then peel off the backing to reveal the image. Modern instant film enclosed photo chemicals inside a plastic packet and required no action from the operator to develop the image. Polaroid stopped making instant film in 2008, but The Impossible Project purchased a Polaroid factory in the Netherlands and is selling film for traditional Polaroid cameras. Kodak and Fujifilm also produced instant film.
Identification tips: Again, what’s in the image will be most useful to you in establishing a date. You can give some Polaroids a date range based on their size using the Polaroid film list at <www.rwhirled.com/landlist/landfilm.htm>. For example, the image area (not including the white border) for Polaroid’s 600 Land Film series, introduced in the 1980s and 1990s, is 3.125×3.125 inches.
Preservation tips: Instant films tend to fade and discolor due to instability of the photo chemicals. The customer-applied fixing chemicals may cause early black-and-white Polaroids to deteriorate; the later images encased in plastic can crack. Your best approach is to scan these prints before the damage occurs, then keep the images in a dark, cool, low-humidity environment. Avoid cutting into a Polaroid; this may cause the layers to separate.
Tip: For more-detailed information on historical photo formats, see the Encyclopedia of Nineteenth-Century Photography edited by John Hannavy (Routledge).
Tip: To find a photo conservation expert, search the directory at the American Institute for Conservation of Historic and Artistic Works website.
More Online
Free Web Content
Photo Detective blog
Organizing your photos
Photo Detective blog
Organizing your photos
ADVERTISEMENT
