Sign up for the Family Tree Newsletter Plus, you’ll receive our 10 Essential Genealogy Research Forms PDF as a special thank you!
Get Your Free Genealogy Forms
"*" indicates required fields
The next time you snap a photograph, take a moment to thank France. Two of its citizens, Louis-Jacques-Mandé Daguerre and Joseph-Nicephore Niepce, produced the first lasting daguerreotype 175 years ago, after decades of experimentation. Daguerre is honored in the name of their photographic process.
The French government acquired the rights to their invention and made the process free to the world Aug. 19, 1839. It was a runaway success. The public clamored for more daguerreotypes and, following Daguerre’s published instructions, tinkerers began building their own daguerreotype cameras. For the first time, large numbers of people could freeze time in images of themselves and their loved ones—and today, those old images are ours to cherish. We celebrate the 175th anniversary of the daguerreotype with this identification and preservation guide.
Photography is born
Born in 1787 in Cormeille-en-Parisis, France, Daguerre was a painter, lithographer and mirror manufacturer. He painted panoramic views and theatrical illusions. In fact, before ushering in the age of photography, he invented the diorama painting. Viewers—sometimes more than 300 at a time—would stand on a rotating turntable to see a changing landscape painting enhanced with lighting and scenic effects. Daguerre developed eight such shows between 1822 and 1829, which were exhibited in Paris, London, Liverpool, Manchester, Dublin and Edinburgh.
Niepce, born in 1765, invented a photographic technique called heliography. The process used bitumen of Judea, a naturally occurring asphalt that hardened in proportion to light exposure. His earliest surviving image, taken out a window about 1826, required an estimated eight-hour exposure. Niepce didn’t live long enough to see his photographic experiments with Daguerre become successful, dying in 1833 of a stroke. Daguerre continued their research, combining Niepce’s work with heliography and his own use of the camera obscura, which projects an image of one’s surroundings onto a screen.
When he discovered that he could use chemicals to develop a faint “latent” image, produced by a relatively brief exposure, into a visible image, Daguerre said “I have seized the light—I have arrested its flight!” His first image believed to result from the completed daguerreotype process is L’Atelier de l’artiste (The Artist’s Studio), taken in 1837.
The first cameras were wooden boxes. Polished copper plates coated with silver were treated with iodine flakes until a chemical reaction created a layer of light-sensitive silver iodide. The photographer would cover a plate with a glass slide, place it in a plate holder and insert it into the camera. There was no shutter. The camera operator would aim the camera at the subject, remove the cover from the lens, and guess how long it would take to expose the image. Mercury was used to develop the photographic image on the plate, and common table salt stopped the process to fix the image. The plate, protected by a glass cover, was the photograph. The silver coating gives the daguerreotype its characteristic reflective surface.
There was no negative: The only way to produce a copy of a daguerreotype was to take another image. Later, some families had photo studios “copy” daguerreotypes by photographing them and producing paper prints.
The earliest daguerreotypes recorded a reversed image—right became left and left became right, and any words would appear backward—but in the 1840s, some photographers began using mirrors to correct this. Any movement would blur the image, so photographers used props and braces to hold subjects still—for up to 20 minutes in the early years. Landscape daguerreotypes appear to show deserted places because cameras couldn’t capture moving people and carriages.
Public demonstrations of the daguerreotype process in America and France fueled public fascination with the “mirror with a memory.” Early daguerreotypes are primarily of places, but it wasn’t long before practitioners began photographing individuals. Our ancestors no longer had to sit for painted portraits; they could visit a studio and go home with a realistic likeness of themselves for a relatively affordable price. By the 1850s, photography was a normal part of life.
Photographers competed for those customers and prices fell as entrepreneurs opened studios. Existing businesses sometimes added picture taking to their services. You could buy shoes, a sewing machine or sausages and have your picture taken while you waited. Initially, shutterbugs made their own plates, cases and other supplies, but before long, they could buy these items from local suppliers. Manufacturers quickly saw a market for ready-made plates, mats and cases. Studios and suppliers in photographic-related business appear in the 1850 US census special schedule of manufacturers. You can view more than 1,000 daguerreotypes and learn more about the photographic process on the Daguerreian Society website.
Daguerreotype dates
When I give lectures on identifying family photos, someone will usually approach with a small, cased photo and ask, “What is it?” The answer isn’t always a daguerreotype. The later ambrotypes (developed on glass) and tintypes (developed on iron plates) also were presented in cases.
So how do you know if you have a daguerreotype? The mirror-like surface sets it apart from other cased images. Daguerreotypes are best viewed at a 45-degree angle—otherwise, you’ll see your own reflection.
Once you’ve established your image is a daguerreotype, you’ve established that it was taken within roughly a 20-year time frame: Daguerreotypes were introduced to the United States in 1839 and remained common until the eve of the Civil War. To narrow the date for your image, you’ll use clues such as the clothing depicted, the materials and design used for the case and mat, and any photographer’s marks. See the Image Gallery for examples of dated daguerreotypes, consult my book Family Photo Detective (Family Tree Books) and consider these details when examining your image:
• Clothing and hair: In general, women’s fashions are more telling than men’s when it comes to dating photographs. For example, narrowly fitted, fan-pleated bodices are common in 1840s images, and large lace collars were popular in the 1850s. But a man’s facial hair, jacket and pants style, and neckwear also provide clues to date a photo. One of the best guides to clothing worn during these decades is My Likeness Taken: Daguerreian Portraits in America by Joan Severa (Kent State University Press).
• Materials and design: Turn the page for a look at the parts that make up a daguerreotype case. Early cases were made of leather-coated wood, sometimes inlaid with mother-of-pearl and often lined with velvet. A thermoplastic material of sawdust and varnish was introduced in 1856, recognizable by its smooth appearance and brass hinges joining the front and back. Cases made of this material are often called union cases.
Sizes of daguerreotype images range from ninth plates (2×2½ inches) to mammoth plates (6½x8½ inches or larger). Brass photo mats of the early 1840s had a pebbly or sandy texture and simple oval- or octagon-shaped openings for the photo. By the late 1850s, mats featured elaborate embossed designs and more-intricate photo openings with curved and scalloped edges. The book Nineteenth Century Photographic Cases and Wall Frames by Paul K. Berg (self-published) is an excellent resource to help you date daguerreotype mats and cases.
• Photographer’s marks: Check the brass mat and velvet pad of your daguerreotype case for an engraved or embossed photographer’s name. You can use city directories and the online Craig’s Daguerreian Registry to look up studios, case makers and other daguerreian-related businesses and determine their years of operation. The two-volume print publication Craig’s Daguerreian Registry (self-published) is more up-to-date than the online version.
Handle with care
The condition of your daguerreotype is a result of how it was stored and handled over its nearly 175-year lifespan. Typical problems include image tarnish and deterioration as the developing chemicals break down, cases that are broken or missing parts (such as the front cover or the preserver strip around the edge), and damage caused by amateur attempts to disassemble or clean the daguerreotype. Leave any cleaning or restoration to a reliable professional (find one through the American Institute for the Conservation of Historic and Artistic Works directory). The best thing you can do to preserve a daguerreotype is digitize it, store it properly and leave it alone. Follow these guidelines:
• Don’t take apart the daguerreotype case or separate the image layers. One touch of the photographic plate can harm the image.
• Don’t try to clean a daguerreotype.
• Digitize your daguerreotype to preserve the image and limit handling. These images can be tricky to scan because of the reflective surface and the glass layer on top of the image. If your photo scanner doesn’t work, try a camera set on a tripod. To prevent the camera from being reflected onto the image, cover it with black cardboard with a hole cut in the middle for the lens. • Store the photo wrapped in a clean, soft cloth (old t-shirt material works well) to protect the case. Write any details you know about the image (such as who’s depicted, when it was taken and who owned it before you) in pencil on acid- and lignin-free cardstock. Place this note in an archival-quality box along with the wrapped image.
• To slow deterioration, keep the daguerreotype in an environment away from light sources and with a stable temperature and humidity level. A dresser drawer in the living area of your home (not an attic or basement) is a good place.
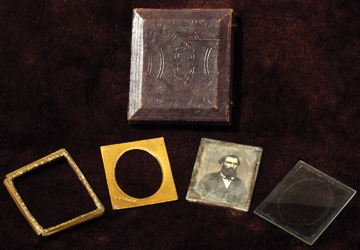
Anatomy of a Daguerreotype
1. A brass frame called a preserver, first used about 1847, holds together the image “sandwich.”
2. A brass mat frames the photo. Earlier mats feature simple textures; later mats have embossed designs.
3. A velvet pad on the inside of the case cover cushions the glass. It could be removed and replaced with another image.
4. The case might be wood (for earlier images) or thermoplastic composite (starting in the late 1850s).
5. The daguerreotype image is developed on a plate coated with silver and other chemicals.
6. The top layer in the image sandwich is a glass cover plate that protects the daguerreotype image.
Daguerreotype Gallery
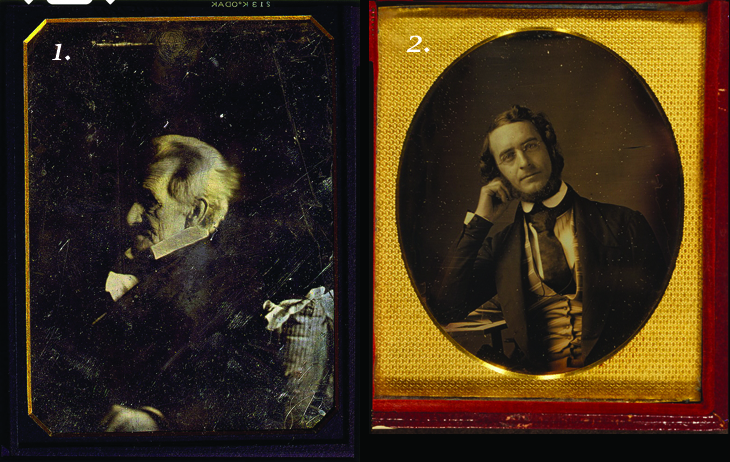
Left: Andrew Jackson, about 1845
1. This profile view is unusual for a daguerreotype; most people preferred to pose facing the camera. 2. The former US president wears a dignified outfit of jacket, shirt and stock (men’s formal neckwear worn beneath the chin and buckled behind the neck). 3. Jackson, about age 78 when this photo was taken, sits in a chair with a pillow behind him (you can see the ticking cloth).
Right: James Curtis Booth, about 1845 1. Posing with head on hand and elbow resting on a table helped this subject remain still. 2. The wide tie is unusual for a period when most men wore stocks. 3. Under-the-chin beards were common for men in the 1840s and 1850s. 4. The simple mat has an all-over decorative texture with an oval opening. 5. A handwritten note inside the case (not shown) identifies this man as Prof. Jas. C. Booth and the photographer as Mayall. According to daguerreian reference books, John Jabez Edwin Mayall operated a studio in Philadelphia in 1845 and 1846.
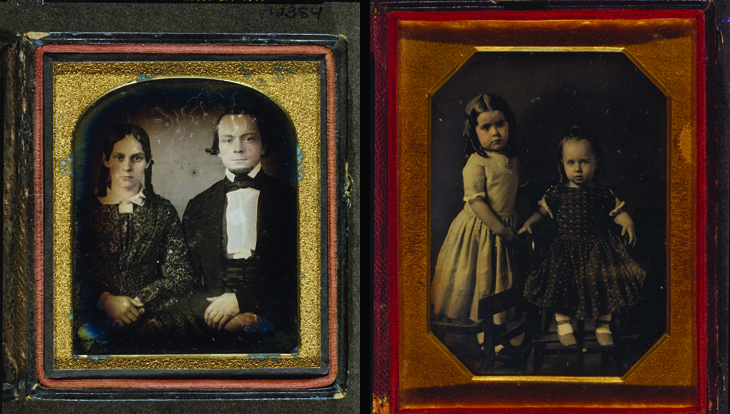
Left: Unidentified couple, about 1848 1. The fan-pleated bodice was popular on 1840s dresses. 2. Our ancestors often posed with their hands clasped in front of them. 3. This simple mat has the pebbly texture of 1840s daguerreotypes. 4. Typical for a well-dressed man of the period, he wears a stock, vest and jacket.
Right: Children of W.Y. McAllister, 1849 1. Ellen McAllister (left) stands on a chair next to her brother, John. In the late 1840s, toddler boys often sported long curls and dresses. 2. The plain octagonal mat with beveled edges is characteristic of an 1840s daguerreotype. 3. Boatneck dresses were common for children in the 1840s and ’50s. 4. The cotton fabric and short sleeves on both children’s dresses suggest warm weather. 5. “W. and F. Langenheim, Phila” is embossed on the velvet case liner (not shown in this image). This is the imprint of photographers William and Frederick Langenheim of Philadelphia.
Left: Benjamin Family, early 1850s 1. Stamped on the mat is “Whitney, Roch. N. Y.” Edward Tompkins Whitney operated a photography studio in Rochester, NY from 1845 to about 1856. 2. This family’s ages in the 1850 US census suggest that this photo was taken in the early 1850s. The children are arranged youngest to oldest; their parents are seated. 3. The photographer used the classical style column and books (the eldest daughter holds one and the son leans on another) as props. 4. The mother’s wide collar is typical for the early 1850s. 5. Both the son’s plaid pants and the youngest daughter’s plaid skirt (likely, taffeta) were a popular fabric choice. 6. Patterned and contrasting-color vests were popular for men in the 1850s. 7. The photo studio added touches of gold to the mother’s brooch and the eldest daughter’s necklace.
Right: Unidentified woman, about 1853 1. This woman may have taken her sewing machine to the photography studio, or a photographer may have brought equipment to her home or place of work. The machine may be a clue to her occupation. 2. Wide cloth or lace collars were common in the 1850s 3. Dresses of the era often had bell sleeves. White linen undersleeves fastened with ties above the elbow. 4. Hair worn puffed over the ears is characteristic of the mid-1850s. Drop earrings accent this woman’s hairdo.
Tip: Mats and cases for early daguerreotypes are relatively simply designed. The embossed patterns and the shape of the photo opening became more intricate as time went on.
Tip: Never take apart the “sandwiched” layers of a daguerreotype photograph. One touch can destroy the fragile image.

