Sign up for the Family Tree Newsletter Plus, you’ll receive our 10 Essential Genealogy Research Forms PDF as a special thank you!
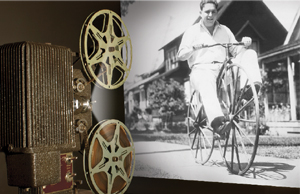
After home movie recording became possible in the 1920s, our relatives (and some of us) increasingly used handheld cameras loaded with film to capture special events and everyday life. Watching those homemade flicks involved sitting in the dark listening to the hiss and whir of a projector, perhaps with Dad narrating exactly how he reeled in that 12-pound bass. Family movie nights—complete with popcorn—allowed us to relive first steps, toothless grins, Christmas mornings and our awkward teenage years.
Instead of cringing with embarrassment, try to feel gratitude toward those family moviemakers for preserving genealogy one frame at a time. Dad was no Steven Spielberg and his shaky movies (that was before auto-stabilization) are full of bloopers, but the magic of his films is in the faces he captured. Each frame has the potential to be genealogical gold as important as your heritage photos.
In a box among footage of my childhood Sheltie, I have a movie of my maternal grandmother holding me on my first birthday. It’s a precious piece of family history—she died shortly after. It doesn’t have sound, but it doesn’t matter. My mother would play the clip for us, emotion flickering over her face as she relived those moments.
I know when that film was taken, but if I didn’t, our clothes and the kitchen furniture would point to a time frame. Just as with print photo detecting, deciphering clues in home movies involves studying details. The technology used, attire worn, and accessories shown, along with your family history research, provide the story line to the image. Follow these steps to decipher the clues in your old home movies and use them to bring your family’s story to life.
1. Take stock.
First, survey what’s in your film archive. Mixed in with family films may be commercial productions intended for family movie nights. (If you own any old professional movies, watch for nitrate film, a chemically unstable, flammable film used from 1898 until about 1950. It should be copied if desired and disposed of following local fire regulations. Fortunately, virtually no films manufactured for the home market are nitrate.) Don’t stop with your own collection; seek out home movies in your relatives’ holdings as well. Ask about them when you inquire about still pictures. You might be surprised by what you find.
Not all the movies of your relatives will be in family homes. Great Aunt May and Uncle Jerry could appear in films of their community events. If you’re lucky, a local archive or history buff has posted historical clips online on a site such as
YouTube. Try searching for the names of your ancestors’ community, local events, schools, workplaces, social clubs and more. Add the word history to narrow in on old movies.
Google has a video search feature, too. My dad lived near Saylesville, RI, when a textile labor strike took place in 1934. Using Saylesville strike as a search term, I found several news clips of the strike. Dad’s not in any, but it’s fascinating to watch a historical event that affected him. Also try searching with a family member’s name and a place as a qualifier, such as Joe Brown Providence 1954.
See how Family Tree Magazine contributing editor Sunny Jane Morton found footage of her husband’s great-grandfather and his dog here.
2. Look for a label.
Examine the boxes and film cans in your collection for labels with subjects, dates, names or places. If you’re lucky, your relatives had title frames with a title and date inserted into the film when it was developed. My mom never labeled her prints, but she did make sure that almost every box of film had at least a date on the outside. If your film boxes lack description, don’t despair. Try to identify a time frame for the film based on any information written on the outside of the box. I recognize my mother’s handwriting on my family film boxes noting who’s in the film (albeit first names only) and sometimes when it was taken. If there aren’t any clues on your containers, search online for the product and format. Most original film boxes contain the name of the film used, and the film’s size and sprockets can tell you what kind was used (see the next step for more details).
Label any unlabeled boxes with easy-to-spot dates using a soft lead pencil, and sort them in chronological order. If you can’t write on the can with pencil, you can use archival-quality adhesive labels. Store the films in acid- and lignin-free boxes or in their original cans.
3. Check the format.
Although motion picture cameras and projectors were available as early as the 1890s, initially cameras were expensive and affordable only to the well-to-do. During the Great Depression, a single roll of film cost $6 and the camera cost $100—well beyond the pocketbooks of an average American. Your family movie archive likely begins in the mid-20th century, when equipment costs dropped. Advertisements in newspapers and magazines promoted the message that you could produce your own screen worthy film. As with a still camera, once the movie was shot, the film had to be sent for developing.
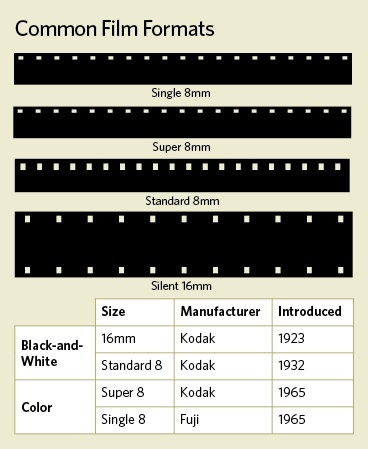
A variety of film formats and cameras characterize the history of home movies. From 35mm footage used in the turn-of-the-century studios to Super 8 mm from the 1960s, the type and size of the film can help you date your footage. Keep in mind, though, that a family might use a camera as long as film for it was available, even if that model was no longer in production. Color is a relative newcomer, with Eastman making its color motion picture film available in 1950.
16mm: In 1923, Eastman Kodak introduced the 16mm direct reversal film system and projectors, so-called because the film measured 16mm across. Though initially marketed for home use, professionals quickly took to it, especially when sound became possible. Silent 16mm has sprockets along both edges; sound 16mm has sprockets on one edge.
8mm: Standard 8 film (also called Regular 8) became available in 1932. It has a frame down the center and a single border with large sprockets. With cameras costing approximately $30 and advertisers selling the idea of documenting milestones, lots of amateur moviemakers started filming life’s moments. A December 1937 advertisement in the Dallas Morning News lists an Eastman movie camera for $34.50, with optional floodlights for night shoots.
Super 8: In 1963, Kodak announced this new 8mm film with cartridge loading, a larger frame size and smaller sprockets along one edge. For approximately $200, consumers bought a system including the camera, projector, movie light, camera case and a screen.
In 1965, Fuji unveiled a competing format called Single 8. The film had the same dimensions, so it could be played on Super 8 projectors, but it came in a double-reel cartridge.
Most home movies from this era are silent. Although Bell & Howell introduced a film system for amateurs consisting of a camera, tape recorder and projector in 1968, it wasn’t until 1973 that the Kodak Ektasound camera made it easier to record pictures along with sound on Super 8 film.
By the time film combined sound and pictures for amateurs, a new, cheaper medium that didn’t even require developing made home moviemaking possible in more households. Beta VCR and VHS tape, introduced in 1975 and 1976, changed our video habits. Kodak discontinued their Ektasound film camera 1979, about when VCRs and videocassettes became affordable.
Early filmmakers would be amazed by our ability today to record video on handheld phones and cameras with immediate playback.
4. Preserve the footage.
The content of the film will really help tell your family story. But don’t watch it just yet. Film conservators advise transferring old movies to new media before viewing them. Watching a fragile film—or even threading it through the projector—could destroy it.
Film shrinks and becomes brittle over time, and color film fades. If you must handle the film itself, touch only the edges, wearing nonlatex, powder-free medical gloves or white cotton gloves. Look for cracks, tears, brittleness and other deterioration. Your best bet is to copy the film onto a digital format, such as MPG. This gives you an easy-to-share copy to watch on your computer—no special equipment needed. Search Google or ask fellow genealogists to find a transfer service near you. Large-scale services that work by mail include YESvideo and ScanDigital.
Don’t dispose of the original, though—film actually is a relatively stable medium. Instead, store it in an archival-quality box or metal film storage can at a stable temperature and humidity. Don’t put other material, such as paper, inside the can or box with the film. The ideal storage environment is 50 degrees Fahrenheit and 50 percent relative humidity, but that’s not realistic for most homes, so aim for an area where the temperature and humidity are stable.
For particularly important films, such as Mom and Dad’s wedding, consult a professional film conservator to stop the deterioration.
Northeast Historic Film offers conservation in addition to a transfer service.
Videotape is a magnetic media; images are recorded on metal oxide-coated polyester tape. Each viewing wears away the metal oxides and degrades the image. You might notice blocking (the tape sticks together), dropout (missing magnetic material) and deterioration of the base tape. Tapes become unplayable within a decade. As for your films, you’ll want to have a digital copy made. Store videocassettes away from magnetic sources and watch them on a clean VCR.
Once your movies are digitized, you can edit them together and add narration with movie-editing apps such as iMovie (Mac), Movie Maker (Windows) or Pinnacle (Mac or Windows). Today’s family history software and most family tree websites, such as MyHeritage, let you upload movies to your tree.
You might have family videos and photos burned to DVDs, but don’t make this your only storage method. The stability of CDs and DVDs isn’t clearly established. Early discs lasted only about as long as videos, but some manufacturers now report that their products last 100 years. Who knows if the equipment will exist to play the discs by then? Just as with film and photographs, handle discs by their edges. Store them in disc storage envelopes in a cool, dry environment.
5. Find clues.
From a woman in the kitchen to her husband in the garage and kids playing with toys in the backyard, movies give you a chance to peek into the world of your ancestors. Each item in an image helps you place it in the context of a time frame and your family research. In particular, pay attention to these clues.
Fashion: Attire is among the most enlightening clues in a moving or still photo. This will be especially true of quickly changing trends for women in the second half of the 20th century. Not only could fashion help you date the image, but it can show you whether a relative was a rebel in his youth (did he wear a leather jacket a la James Dean?) or a more conservative dresser.
In the 1950s, television shows like “I Love Lucy” and “Dragnet” influenced fashion—think ladylike pencil skirts paired with sweaters and sportswear. The social changes of the 1960s and 1970s led to fashion trends like long hair for men, bell-bottom jeans and bold patterns and colors. Watch reruns of “That 70s Show” to spot clothing styles that show up in your movies and photos. For more details and examples, see
Men’s Fashion: The Complete Sourcebook or
Fashion Since 1900: The Complete Sourcebook, 2nd edition, both by John Peacock (Thames & Hudson). The Sears catalog, digitized and available with a subscription at
Ancestry.com, is another resource for discovering when particular items of clothing were available.
Household items: Movies shot inside a home are probably full of details that can date a film. Stop the film to study the background. Twentieth-century interior decoration ranged from the colorful Fiesta dishes of the 1940s to 1960s shag carpets and scoop chairs. Watch for kitchen appliances such as top-loading washing machines (introduced in 1947), the countertop standalone mixer (1950s) and percolator coffee pots (1972). Don’t look for a microwave in Grandma’s kitchen; they weren’t popular until the 1980s. Framed photos, books or magazines, calendars and clocks are clues to a time period. Look also for items other relatives might remember and heirlooms that might now be in a family member’s home.
Vehicles: An automobile—whether your relative’s or someone else’s—can give you the start of a date range for a home movie. Remember that families generally held on to cars for as long as a decade or more, so look for other clues to establish the end of your date range. In general, you’ll know a 1940s car for its broad grill, prominent rounded wheel wells and wrap-around bumpers. The late 1950s trends of tailfins and chrome trim continued into the early 1960s, a decade that saw increased safety features, “muscle cars” and the consolidation of the American auto industry into the “Big Three.” The iconic Volkswagen Beetle and van became a symbol of the late 1960s Counterculture movement. During the 1970s energy crisis, the Beetle and other small imports grew in popularity. While there’s no comprehensive guide to all the vehicles made, search online with the make or model and a decade to find ads and illustrations. As with household objects, ask relatives if they remember any of the cars shown in home movies.
6. Share and discuss.
Because most home movies date from the mid- to late-20th century, someone in your movie may still be alive. Watch the video with that person and ask the same questions you’d ask about still shots: What’s the occasion? When did it occur? Who are the people shown? What are your memories of this moment? The person may not remember the event until receiving the visual clue.
Talk with everyone you can, even those of your generation. Stories may have reached your cousins but not you. A fun way to do this is at a family movie night (if it’s hard to get the clan together, make it part of your holiday celebrations). As the footage runs, turn on a voice recorder to capture memories. That conversation can become the sound track, which you can have added to your digital copy.
7. Put the story together.
Every film collection is different based on the interests of the person behind the camera. Consider what your relatives filmed and why. Most filmed events were family oriented: weddings, graduations, vacations and birthday parties. In the days before homes had multiple televisions, families would often entertain themselves by putting on skits based on books or movies.
A film of a bridal or baby shower likely shows many women in your family. A vacation to the West Coast might include a visit to distant cousins. Compare the date of a movie and the estimated ages of unknown faces to data in your family tree. You might’ve found footage of relative you never met.
Be sure to record findings about your home movies, such as date, place, occasion, people shown and associated memories—feel free to use our half-sheet
Home Movie Cataloging Record form (download it as a PDF). Label each record to correspond with the filename of the digital copy and the label on the container of the original film, and keep the record in a binder with your research archive.
Toolkit
Tip: Missing a photo of a relative? You can make one from a video frame using software such as iMovie or Windows Movie Maker. For an easier (but lower-quality) option, stop the film on your computer screen and take a screenshot.
More Online
From the May/June 2016 Family Tree Magazine