Sign up for the Family Tree Newsletter Plus, you’ll receive our 10 Essential Genealogy Research Forms PDF as a special thank you!
Get Your Free Genealogy Forms
"*" indicates required fields

Written by Rick Crume, unless otherwise noted
Jump to:
What is a GEDCOM file?
How to open a GEDCOM file
Sharing a GEDCOM file
Can you merge files?
Other merging software
7 Steps for Downloading a GEDCOM file from Ancestry.com
How to Export Your Family Tree GEDCOM Multimedia Files from RootsMagic
Related Reads
You’ve seen it mentioned on your favorite websites and in practically every issue of our magazine. Thousands of family historians use it to save and swap their data. But for many roots researchers, it’s one of genealogy’s enduring mysteries. We’re talking about GEDCOM, of course—that ubiquitous acronym for GEnealogical Data COMmunications, the standard computer file format family historians use to exchange information.
Though most people have little trouble using their genealogy software to enter data and print reports, handling GEDCOMs can be intimidating. Fear not: Our primer provides step-by-step instructions for creating and using GEDCOM files.
We’ve explained what GEDCOM stands for—but what does it mean for your family history research?
If you think of computer file formats as languages, GEDCOM is the one that all genealogy software “speaks.” Each family tree program has its own default file format (called a proprietary format), which other software usually can’t “translate.” But every program can read and write GEDCOM files, too.
That means you can share your family information with your relatives, even if you use different programs. You also can contribute your work to online databases such as FamilySearch Memories, or download a fellow researcher’s data and add it to your own family file—without retyping anything.
The catch: Because those proprietary formats treat information differently than GEDCOM does, data doesn’t transfer perfectly. Some genealogy programs read Family Tree Maker (FTM), Personal Ancestral File (PAF) and other file formats directly—no GEDCOM conversion required. That can save time and produce more accurate results, so see if your software offers this option before using a GEDCOM file.
What is a GEDCOM file?
A: GEDCOM is a computer file format that lets genealogists swap information about their ancestors. The format’s compatible with all genealogy software, so no matter what program you use, you can open GEDCOMs created with another program — and other researchers can open your files.
You don’t have to buy a GEDCOM, but you do need a genealogy program to create or open one. You can’t use GEDCOMs in other types of software, such as word processors (Word) or web browsers (Google Chrome). You can get a GEDCOM file several ways:
- Create a GEDCOM file of your family data using genealogy software (this is the only way to get a GEDCOM file from your own family tree information). The process is easy, but varies slightly depending on your software. In general, you’d open up the program and pick Export GEDCOM (or a similar command) from a menu. Then you’d click through a few dialog boxes that ask you questions or give instructions.
- Download someone else’s GEDCOM file from the Internet. Genealogists post their GEDCOMs on websites such as RootsWeb WorldConnect. You can search these sites to find a match for one of your ancestors, and if you do, you can download the GEDCOM — with all the family information in the file; not just on the one matching person — to your computer. Then you’d use your genealogy software to “merge” the data from the GEDCOM into your own family file (after verifying it, of course).
- Share a GEDCOM file the same way you’d share any computer file — for example, by e-mailing it or saving it to a disk.
Answer provided by Allison Dolan, from the December 2004 issue of Family Tree Magazine.
How to open a GEDCOM file
Opening a GEDCOM file is simple. In Windows, just double-click on the file (GEDCOMs have the file extension .ged, as in smith.ged), and it should open with your genealogy software. Accept the default file name and location, and your program will “import” the file—basically, it creates a copy of the GEDCOM file in your software’s proprietary format.
Sharing a GEDCOM file
Just follow these 7 steps to share your GEDCOM file:
1. Locate the file.
Once you’ve downloaded a GEDCOM file or received one as an e-mail attachment, note its location on your computer’s hard drive or removable drive. You might want to save all your GEDCOM files in a folder named GEDCOM.
2. “Stamp” the records.
RootsMagic and Legacy Family Tree let you add a source (a person’s name, address and email address) to each fact in an incoming GEDCOM file so you know where the information came from. If you use a different program, Progeny Software’s GEDmark can mark the source information on each record in the GEDCOM file before you import it into your family file.
3. Select the file.
Start your genealogy software and select File>Import File. Locate and select the GEDCOM file, then click OK.
4. Import the file.
Most programs will now ask you if you want to add the data to your existing file or create a new one. We recommend viewing the new data in a separate file before adding it to your existing family file.
5. Link the multimedia files.
If the GEDCOM’s creator attached pictures, sound or video, you’ll have an extra step: Copy the picture files to your computer and make sure the links in your new family file still point to the pictures. Suppose the sender kept the images on drive C in a folder called Genealogy Pictures within the My Pictures folder. The links should work if you keep the pictures in an identically named folder at the same location.
6. If you click on a link to a picture in PAF and it can’t find the image, the program will prompt you to locate the file.
Then it will ask if you want to change the paths to all the multimedia links in the file to the new path you specified. Answer “yes.” As long as you kept all the images in the same folder, the links will be updated correctly.
7. For Family Tree Maker users, it’s better to share FTM files, not GEDCOMs
Family Tree Maker’s GEDCOMs don’t include multimedia links, and FTM can’t import the multimedia links in GEDCOM files created with other programs. But FTM does store multimedia files—not just links—within its own format. So if you’re sharing a file with another FTM user, it’s better to exchange FTM files, not GEDCOMs.
Can you merge files?
When you add a GEDCOM file from another researcher or from a pedigree database, you may end up with duplicate records for the same person. One record might show the person’s descendants and the other his or her ancestors, for instance. By merging those duplicate records, you’ll create a continuous family line from the person’s descendants to his or her ancestors. And as your family file grows, eliminating duplicate entries will help cut down on confusion.
Merging duplicate GEDCOM files in Family Tree Maker
From the People pull-down menu in Family Tree Maker (FTM), you can choose from two merge options: Use Merge Specific Individuals if you already know which individuals should be merged. Or select Merge Duplicate Individuals and the program will search for possible duplicates. Bypass the somewhat confusing Display Merge Report and go ahead and Merge Matching Information. FTM automatically finds pairs of potentially identical individuals, displays their information side by side and lets you choose which pairs to merge.
Keep in mind that if you merge two individuals with conflicting information (different birth dates or places of death, for example), the information from both individual records will usually be retained as alternate facts. A few facts, such as name, sex, address and phone number, don’t store alternates, however. Buttons appear next to these facts when they conflict so you can choose which version you want to keep.
After comparing the information for both names, click on either the Merge or Don’t Merge button and continue through the list of possible matches. If you make a mistake, you can undo all the merges at any time before you exit the program by selecting Undo File Merge from FTM’s Edit menu. When you finish merging, you may want to edit the individual records that you just merged and delete any incorrect facts. From the View menu, select Reports, then Alternate Facts to get a list of people who have conflicting facts.
Merging duplicate individuals manually
You can merge duplicate individuals manually in Generations, but the process goes much quicker with the program’s Match and Merge function. Select Match Merge from the Find pull-down menu in EasyTree. This option lets you find matches for the couple on the screen, marked people or everybody; you can then compare those matches with just marked people or every name in your file. You can also search on identical or similar names and specify the range of birth and death years for qualifying matches.
Click Match and the program will display a list of names at the top. When you click on a name, possible matches appear below. Three columns show each person’s date and place of birth and date of death, but you can click on the column headings to compare any piece of information, such as occupation, religion or burial place. Select the names you want to merge from the top and bottom portions of the screen, then click on Merge to combine the two records. No events, facts or notes are lost. For example, if one record has a birth date of Feb. 14, 1892, and the other one has a birth date of Feb. 14, 1894, the newly merged record will have separate birth fields for both dates. Once you’re done merging records, you may want to edit them to delete events or facts you know are wrong.
Other merging software
The internet has made swapping family tree files a snap. In fact, at sites such as WorldConnect and FamilySearch, it’s possible to add several generations to your pedigree just by downloading a few GEDCOM files (the universal family tree file format). The downside of internet genealogy is having to figure out which people in those GEDCOM files (if any) are actually related to you. Yes, the names may be the same, but names alone don’t make a match.
Before entering that data directly into your master file, it’s important to double-check it. But what’s a genealogist to do with a file containing hundreds of names? Enter two new programs designed to deal with that problem.
GENMatcher
This Windows-based program from MudCreek Software quickly compares two files for matches, or searches one file for duplicates. It can compare GEDCOMs as well as files generated by Personal Ancestral File, The Master Genealogist, Legacy Family Tree and Family Tree Maker. This makes the program especially useful if, say, you want to compare your Family Tree Maker file to your cousin’s Legacy file.
After you select two files for comparison, the program starts making matches. For each possible match, GENMatcher displays both files’ data on that ancestor side by side. Thanks to color-coding (which you can customize), it’s easy to see at a glance which items match up perfectly and which need further investigation—matches appear green, and nonmatches appear pale yellow.
If you’re not confident about a match, click on the Family, Pedigree and Descendants tabs. These views provide details on an individual’s spouse(s), children and ancestors, so you can make sure you have the right person.
Saving your GEDCOM file as a PDF
Want to print the results of your comparison before adding the new data to your master file? Use the Reports feature (under the File menu) to create a summary. To read the report later, save it as a PDF, HTML, Rich Text Format (RTF) or graphic file.
GENMatcher’s user-friendly interface and practical application make it an excellent choice for any genealogist. Not only is it simple to use, it’s a real timesaver, particularly for people who do a lot of file sharing.
You can download GENMatcher for http://www.mudcreeksoftware.com/.
GenMerge
This program from Pleiades Software Development takes file matching a step further by comparing data from multiple GEDCOM files and then merging the data into a new GEDCOM file. (It also eliminates duplicates in a single file.) In minutes, GenMerge can process up to 200,000 individuals at a time.
Although most full-fledged genealogy programs have a merge function, GenMerge goes a step further: It uses a record-linking method that compares not only an ancestor’s personal data, but also his family’s data, which helps to ensure accuracy. GenMerge even analyzes the people in your file with only a first or last name.
Unlike GENMatcher, GenMerge doesn’t color-code results, so the data’s harder to read at a glance. But the program does offer statistical reports with amazing depth. Before merging your GEDCOMs, GenMerge scours each file for duplicates and inconsistencies. It then generates a series of reports detailing the analysis. Because GenMerge doesn’t change your original files, you can make necessary corrections, then run the program again, review the results and (if needed) make further changes.
Once the files are clean, you can instruct the program to merge them. When it’s done, GenMerge will generate the same set of reports, so you can see the additions to your “main” file—a copy of your master file—as well as high-scoring failures (people who look like they should merge, but have conflicting parent or grandparent data). If you find problems with your data, just fix the master file and try again.
GenMerge can save hours of time you’d otherwise spend poring over potential matches and manually updating files. Once you’re happy with the GEDCOM created by GenMerge, you can make it your new master file. (I recommend keeping the old master file as a backup, just in case.)
You can download GenMerge from www.genmerge.com.
Nancy Hendrickson
See? GEDCOMs aren’t really that mystifying, after all. Once you’ve mastered these steps, you’ll become a GEDCOM guru—and be able to concentrate on solving your enduring research mysteries.
A version of this article appeared in the August 2005 issue of Family Tree Magazine.
7 Steps for Downloading a GEDCOM file from Ancestry.com
Your online family trees are valuable. Often you’ve invested untold hours of work and plenty of genealogy website subscription dollars to build them. Keeping a backup or master copy of your tree can give you peace of mind—and the opportunity to do other things with the data.
1. Log in
Log in to your Ancestry.com account.
2. Open the Trees tab
Under the Trees tab, select Create and Manage Trees.
3. See a list of your Ancestry.com trees
(You know you can create as many trees as you like, right?) Under the Tools column, select Manage Tree for the tree you’d like to download.
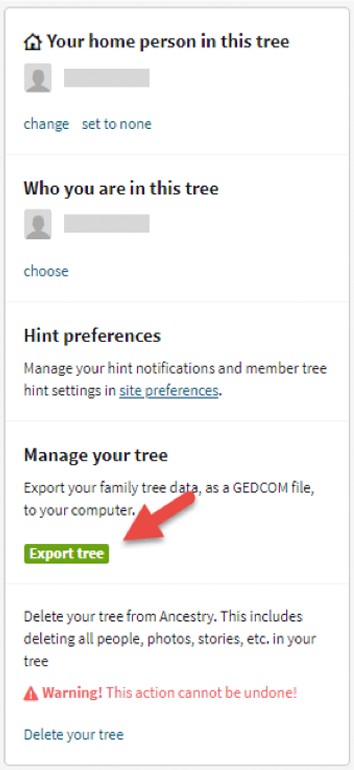
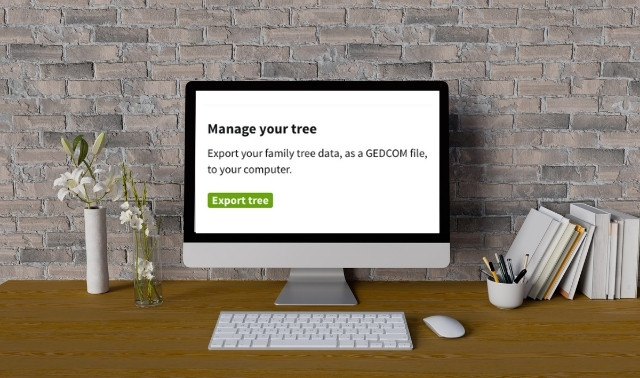
4. Go to Manage Your Tree
Scroll down on the page to where it says Manage Your Tree: click the button that says Export Tree, as shown here.
5. Ancestry.com will generate a GEDCOM file
Be patient while Ancestry.com generates a GEDCOM file from your tree data. GEDCOM files are universal file types that can be read by any family tree software or web platform. (Reunion software requires a little extra work.)
6. Click green button
Once your GEDCOM file is ready, a green button will appear labeled Download Your GEDCOM file. Click to start downloading. (You can also click on the Download Tips text if you need some help.)
7. Find in your computer’s Downloads file
Once the file is downloaded to your computer, right-click on it to see it in your Downloads folder. Rename it with a more useful name (“Johnson family tree from Ancestry”) and move it to your genealogy files on your computer so you can easily find it again.
Sunny Jane Morton
How to Export Your Family Tree GEDCOM Multimedia Files from RootsMagic
Sharing your RootsMagic family tree with another researcher is easy: Just select Export from the File menu to create a GEDCOM file that will work with most genealogy software. But remember: A GEDCOM file can include links to photos and document images, but it doesn’t include the actual multimedia files. You have to send them separately along with the GEDCOM file.
If you create a GEDCOM file with just one branch of your family tree, you probably want to include only the associated pictures and document images, not all the multimedia files for your whole family tree. One way to do that in RootsMagic is to create a Shareable CD for the same branch of your family. That will put copies of only the image files you need in a separate folder. Then you can share that folder along with the GEDCOM file. Here’s how:
1. Open your family file and select Export from the File menu.
If you don’t want to share your whole file, look under People to Export and click Select from List. Then find the person whose family, ancestors or descendants you want to share. To jump to the person’s name, type it with the surname first, like this: Morgan, Thomas. Or click the Find button to search on the surname, given names, date of birth and more. The Family Members pane on the right shows the highlighted person’s parents and siblings. To navigate to one of those relatives, highlight a name and click on Go to Selected Person. Once you find the right one, select the name by clicking the box beside it.
2. Click the Mark Group button to select relatives of the starting person.
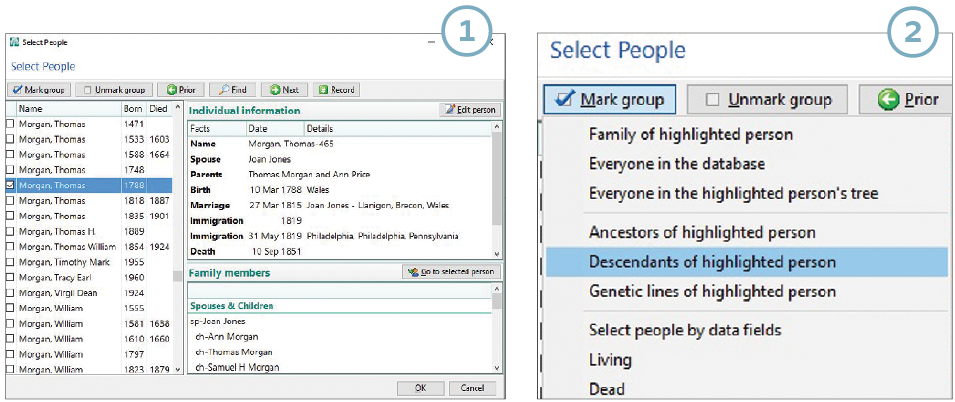
You can select just that person’s family or specify how many generations of ancestors or descendants to include. If you select ancestors, you can also include their other descendants for a certain number of generations. Selecting collateral lines includes everyone linked by blood or marriage for a specified number of generations. You can mark multiple groups, such as ancestors and descendants in different branches of your family. Once you’ve marked everyone you want to include in the GEDCOM file, click OK.
3. Select the data, such as notes and sources, you want to include.
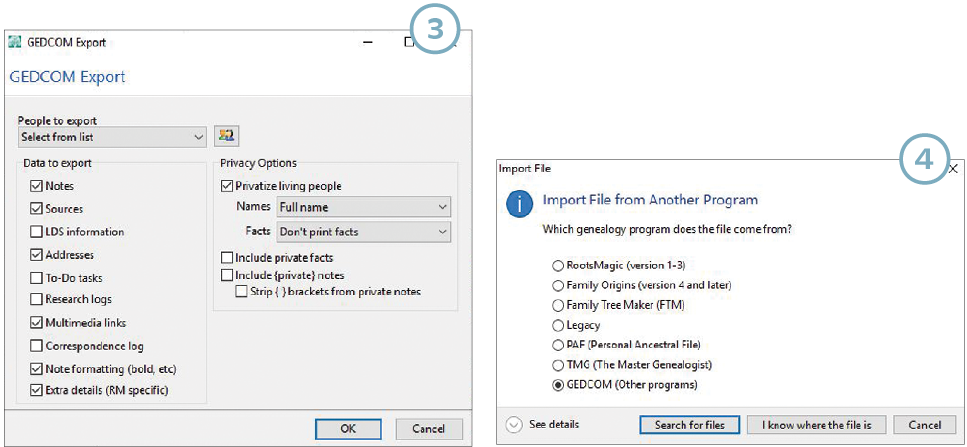
You also can specify information to include on living people, such as full names, facts, private notes and private facts. Click OK to create the GEDCOM file, give it a name and select the folder on your computer where you want to save it. Select Close from the File menu to close the family file.
4. Now you’ll create a new RootsMagic file from the GEDCOM file.
Select Import from the File menu and then GEDCOM. Click “I know where the file is” and navigate to it on your computer. Select the file and click Open. Give the new RootsMagic file a name (such as “Smith Tree 2”) and specify the folder where you’ll save it.
5. Now, make a Shareable CD from the new RootsMagic file.
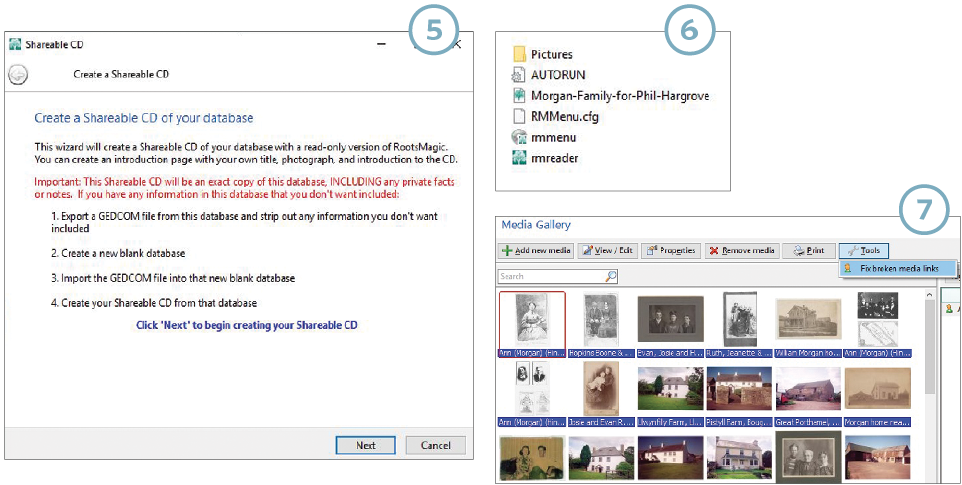
Open the family file you just created. Select Create a Shareable CD from the Tools menu and click Next. You can skip the title, introduction and photo options and click Next. Skip the contact information, too, and click Next again. A window will pop up that says, “Shareable CD is ready to burn. The files for your shareable CD have been created in the following folder … ” Your CD files will be saved in a folder called RMShareableCD in the same folder that holds your RootsMagic family file. Click on “I will burn it later.”
6. The Shareable CD files include your family file and pictures, along with a read-only version of RootsMagic.
This lets you share the files with someone who doesn’t have genealogy software. For now, since you’re sharing your family file for use with a genealogy program, the only files you need are the ones in the Pictures folder. Send that folder and the GEDCOM file to the other researcher attached to an email or on a CD or DVD.
7. The files’ recipient should import the GEDCOM file into a new family file in his genealogy software.
For example, using RootsMagic, select Import from the File menu. Copy the Pictures folder to his hard drive. To remap the paths in his family file to the pictures, he should select Media Gallery from the Lists Menu and then Fix Broken Links from the Tools menu. When it’s done, the links to photos and document images in the family file should work.
A version of this article appeared in the September 2016 issue of Family Tree Magazine.
Related Reads

ADVERTISEMENT