Sign up for the Family Tree Newsletter Plus, you’ll receive our 10 Essential Genealogy Research Forms PDF as a special thank you!
Get Your Free Genealogy Forms
"*" indicates required fields
You finally found elusive Aunt Lucy in the census and saved the image to your hard drive—but where? You’ve looked in what seems like a zillion folders and still can’t find it.
You’ve smacked up against a brick wall that torments every computer-using genealogist sooner or later: the disorganized hard drive. Our PCs don’t make it easy on us, either—Windows assigns downloads to obscure temporary folders by default; your files from scanners, digital cameras and even Ancestry.com get names made of meaningless strings of letters and numbers.
A dependable file-management system is critical to your long-term genealogical success. But luckily, this is a brick wall that’s easy to scale: All you need is a filing system that’s logical to you, and the will to stick to it. In this tutorial, I’ll walk you through the steps to organize your hard drive using a system that works well for me—you may want to adapt it to fit the way you think and work.
To get started, navigate to your hard drive. In Windows XP, open Windows Explorer, or in Vista, open Computer: You can access these from the Start menu, or look for an icon on your desktop. Then locate your C: drive or a different drive where you’d like to store your computer files. Mac users can organize files from a Finder window.
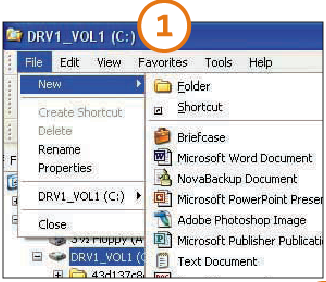
1. Create a new folder on your hard drive called Genealogy. Select the hard drive by clicking on it once. In XP, right-click, then choose File>New Folder from the pop-up menu. In Vista, right click the drive and select New>Folder. On a Mac, control-click within a Finder window and pick New Folder. The folder’s label will be highlighted so that you can name it—type Genealogy, then press Enter.
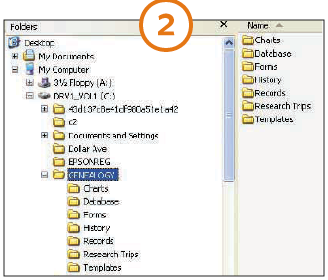
2. Within the Genealogy folder, create the following subfolders:
- Charts (a place to store your family tree charts)
- Database (where you’ll store your genealogy software files)
- Forms
- History (for background material pertinent to your research)
- Photos (see <familytreemagazine.com/article/organize-your-hard-drive-photos> for filing tips)
- Records
- Research Trips (maps, planning worksheets and to-do lists)
- Templates (see step 4)
- Timelines (chronologies you create to put your ancestors’ lives in context)
Be sure to click on the Genealogy folder first, otherwise the new folder will show up inside the folder you were last in. If you accidentally create a folder in the wrong location, just click on it and drag it to your Genealogy folder.
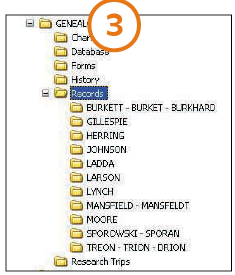
3. Select the Records folder and create a folder for each of the surnames you research most often. Don’t worry about adding a folder for every surname right now—you can add more as your research progresses.
If you’re researching someone else’s tree (such as your spouse’s), create separate folders inside the Records folder—perhaps My Tree and Spouse’s Tree—then continue to the next step.
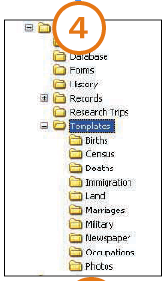
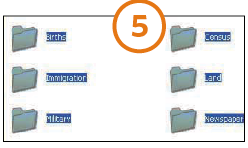
4. Click the Templates folder and create these record folders:
- Births
- Census
- Deaths
- Immigration
- Land
- Marriages
- Military Service
- Newspaper Articles
- Occupations
- Wills and Estates
5. Copy these record folders into each of the surname folders: First, select them all, then press Control+C to copy the folders. Paste them into the first surname folder in the list by clicking the folder and pressing Control+V. (Mac users will substitute the Command key for the Control key.) Repeat the process, pasting all of the record folders into each surname folder.
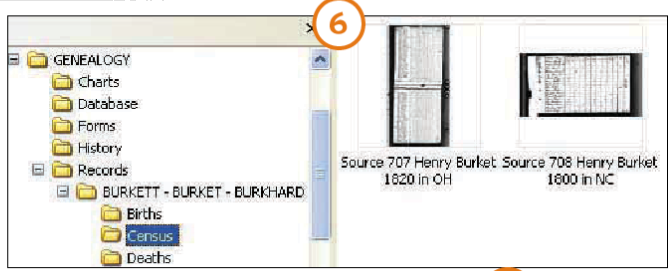
6. Filing your existing record files is as simple as clicking, dragging and dropping them into the appropriate Surname or Record folder. If you discover you need more record types, simply create them in the Templates folder and paste where appropriate.
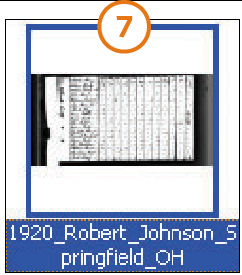
7. How should you save new files within this scheme? Let’s say you locate a 1920 census record for Robert Johnson. Record websites typically provide the option to save the record to your computer. Click the Save button to open the Save window and navigate your way to the appropriate folder on your hard drive: Genealogy>Records>My Tree>Johnson>Census. Name the file and click OK.
When saving, I recommend renaming your files with the year, family group and location—for example, “1920_Robert_Johnson_Springfield_OH.” That way, you can quickly spot the census record you’re looking for within the Johnson>Census folder.
Tip: Surname folders are ideal for filing men’s records, but what about women? Let the records lead the way. File records created prior to a woman’s marriage in the folder for her maiden name, and later records under her married name. File marriage records in both locations.
ADVERTISEMENT
