Sign up for the Family Tree Newsletter Plus, you’ll receive our 10 Essential Genealogy Research Forms PDF as a special thank you!
Get Your Free Genealogy Forms
"*" indicates required fields
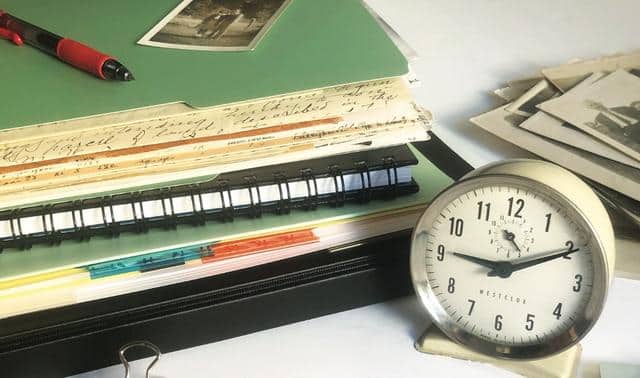
Every day, many genealogists encounter a worrisome condition: their growing genealogy files. It starts innocently enough — a printout here, an ancestor chart there, a handful of downloads at midnight. Then, before you know it, you’re bingeing on photocopies at the courthouse and library. Paper begins clogging every nook and cranny in your desk, spills over the edges of dining room chairs and threatens to overtake your entire home. But you can’t seem to stop hitting the Print key.

Initially, finding details about your ancestors will quicken your pulse and energize you, but if you can’t easily retrieve that data after you’ve already put it somewhere, I can assure you, you won’t feel that same endorphin rush as you try to track it down. You might even spend just as much time and energy finding it the second time around as you did the first time. What a waste!
You certainly can digitize your documents and store them on your hard drive, but you’re still left with reams of paper weight that slow down your research moves. Though the circular file can work well for some items, you’ll want to keep hard copies of records, charts, research plans and the like. Don’t suffer sluggish research any longer — now’s the time to get the lead out. We’ve got five easy weight-reduction filing plans for taking the battle out of your paper bulges.
1. A Basic Genealogy Filing System for Beginners
There are probably as many different fling systems as there are genealogists. But each has one thing in common: ancestors. We’re all collecting material on them, whether in the form of genealogical records, historical information about the era or a map of their hometown. This basic, straightforward plan is a good one to start with.
If you’re just beginning to climb your family tree, you don’t need to launch right into a detailed filing system. All you need to get going are some file folders and a plastic crate, or if you like using binders, a 2- to 3-inch three-ring binder with subject dividers. It doesn’t matter which you choose; what’s important is that your system is easy to use and — most important — to maintain.
Using File Folders
If you’re using file folders, label one for each different surname on your charts. Then file all papers pertaining to that surname in that file folder. Slide in bright-colored paper as dividers to separate different types of records, such as census pages, birth certificates and obituaries.
Using Binders
Prefer binders? Use one for each surname, then label subject dividers with the types of records and put copies of corresponding documents behind the divider.
This simple method will get you initially organized, but as you gather more papers and documents, you’ll find your file folders or binders are packing on the pounds. And it’s probably taking you longer and longer to find a needed document. At that point, consider subdividing what’s in your thickening surname files into smaller files or binders, or switching to another plan.
2. The Geographic Area Genealogy Filing System
If you tend to sample a few records in this state and a few more in that country, try this trim, aerodynamic filing system. You store documents according to surname and geographic locality, then subdivide them by record group.
For example, if the Atkins family lived in Accomack County, Va., for a time, you would label folders (or binders) “ATKINS: Accomack Co., Va.” To help with organizing and retrieving documents, add the date span the family was in the area, “ATKINS: Accomack Co., Va., 1687-1800.” Everything you gather for this family while they’re in this county goes into that file, organized by record group. Once the family migrates to St. Martin Parish, La., you create another folder, “ATKINS: St. Martin Parish, La.”
How to Put This System to Work
This system works especially well for history and general information about ancestral areas. I use it to keep working research files as I trace clients’ family trees. I label several file folders with the same locality name, then add a record type according to my research plan, for example: Accomack County, Va., Deeds; Accomack Co., Va., Wills; Accomack Co., Va., Internet Sources, and so on. I search for microfilm and books in an online library catalog, then file those printouts in the corresponding folder. As I do more research, I make notes on the printouts and file record photocopies along with them in the files.
My printouts have citation information on them, so I can easily document sources. If I’m typing notes onto my laptop, I make a printout to put in the file when I get home. Why the duplication? Because I might not always be with my computer, and a file folder is easier to carry around a repository as I browse shelves and move from one floor to another.
This system’s main problems are chunky files if the family stayed in a place for many generations, and remembering where the family lived at a particular time when you go to retrieve a document. If that’s causing your research progress to plateau, it might be time to move on.
3. The Surname Genealogy Filing System
Just like a comfy elastic waistband, this filing system is accommodating to growth and it adapts quite easily from filing strictly by surname, as in the basic plan. Here, you’ll sort the contents of your bulging surname files by making separate file folders for the surname and type of record, such as “SIMMONS: Census,” “SIMMONS: Naturalization Records,” “SIMMONS: Passenger Lists.”
Arrange these folders alphabetically by surname, then by type of record. When I’m looking for my copy of a census page showing Richard Simmons, for example, I merely need to go to the file labeled “SIMMONS: Census.” It’s easy to customize this system to each family. For instance, you wouldn’t need a “SIMMONS: Military Records” file if no one in the Simmons family served in the military or you don’t have those records yet.
How to Put This System to Work
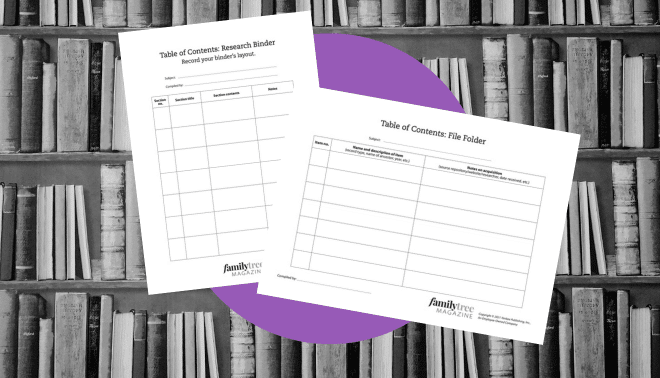
Although categorizing your files by surname and record type will easily organize everything and help you quickly find needed documents, there’s an added step that allows you to retrieve documents within seconds. Yes — seconds. It’s called a Table of Contents, or TOC. Each file has its own TOC page. It’s similar to a research log, and you can easily create it on your computer and keep it there, or print it to put in the file:
- Open a blank document in a word processing program such as Microsoft Word. In the upper left corner, put the surname for that file, and in the upper right, the type of record. (This information corresponds to the file’s label.)
- Create a table with five columns labeled Date, Name, Type of Search, Location and Page Number. When you make a photocopy, download a record or take notes, update the TOC with the date you made the search; the name of the ancestor you searched for; the type of search (for example, the Web site name and URL, or the title, author and publication information of a book or microfilm); then the location where you found the record (such as a library or courthouse), unless you were searching online.
- Now give some record you’re filing a page number and write it somewhere on the front of the document. It doesn’t matter where, as long as you number all your documents in the same place. Enter the page number on the TOC. Finally, file the record numerically in your file folder.
Each document you file gets the next consecutive page number. Then when you want to find that obituary for Richard Simmons, you simply go to your SIMMONS: Obituaries file and find his name in the TOC (or if it’s on your computer, press Control-F or Command-F to search on his name). The results will tell you whether you have that record and its page number in your files.
If you have a document that pertains to two surnames, the easiest approach is to make a copy for each file and enter both on the TOC for each file. The record may get a different page number in each file.
4. The Married Couple Genealogy Filing System
Spousal support helps with any downsizing effort, and it’s true for genealogy, too. This file organization tactic coordinates your files for all the couples listed on your pedigree chart. But first you’ll need a family group sheet for every married couple on your pedigree chart.
If you use genealogy software, you can generate charts that show the data you’ve entered. Otherwise, download and copy the blank family group sheet.
How to Put This System to Work
To adhere to this plan, follow these pointers:
- Every couple on your pedigree chart gets a file folder.
- Label the folder with the names of the couple (use the wife’s maiden name), such as “Jack LALANNE and Jenny CRAIG.”
- Optionally for quick reference, list the names of the couple’s children on the outside of the file folder.
- File everything you find on this couple and their children in this folder.
- When a child marries, begin a folder for that couple. If a child never marries, his or her documents stay in his parents’ file.
- If the child remarries, he gets a new folder for the new marriage and children of that relationship.
- File the folders alphabetically by the husband’s name.
- To ease organizing and finding documents within folders, use colored paper to separate different types of records, as for the Basic Plan. You also can make a TOC for each folder.
- If you find a document with more than one couple on it (say, Jack and Jenny live with their nephew and his wife), make a copy for the other couple’s file.
5. The Unusual Documents and Resources Genealogy Filing System
The same rules for reduction can’t cover every situation. No matter what filing system you use, some items don’t neatly fit into the system.
How to Put This System to Work
Here’s how to handle those other pieces of paper you’ll need to fit somewhere:
- Use ½-inch or 1-inch binders to file research how-tos by state. In them, put the Family Tree Magazine State Research Guide for that state, photocopies of maps with county boundaries marked, magazine and Internet articles about the history of the state, and information on the state archives and other research repositories.
- Create separate file folders for unusual resources, such as oral history interview transcripts, letters from modern relatives, or a relative’s memoir. Ideally, you should place original, one-of-a-kind items in acid-free file folders or boxes. You usually can find these at stores with scrapbooking supplies and online (do a Google search on “archival products”).
- The climb up every family tree leads to printouts and copies relating to “possible ancestors”: people you think might tie in to your genealogy, but you aren’t sure if or how. Keep these in a file bearing the name of the family you think is related — for example, “ORNISH: Questionable Kin” — so it’s clear these individuals might not connect with your lineage.
- Special care and handling is needed for family photographs. Scan them to create working copies, then store the originals in archival-quality albums, folders or boxes.
- The organization of files on your hard drive should match your paper filing system, using the same filing plan and categories.
Not sure which system would suit you best in reducing your bloated piles of paper and conquering the battle of the bulge? Do some of the plans seem a little, er, strict? Similar to slimming your waistline, there’s no single right way to file your genealogy paperwork, as long as the method you choose works for you.
Try out one of the plans on one branch of your family tree, and another on another branch. Since each family presents its own research challenges and data, sometimes I find that one system might work well for, say, the Atkins family, while another is better for the Craigs. Or use a combination of filing methods. Once you take those first steps toward controlling the extra paper weight that’s been dragging down your research, you’ll start feeling energetic and ready to tackle the next family tree challenge.
Share this slideshow with your genealogy group!
Related Reads


A version of this article appeared in the March 2008 edition of Family Tree Magazine.
ADVERTISEMENT