Sign up for the Family Tree Newsletter Plus, you’ll receive our 10 Essential Genealogy Research Forms PDF as a special thank you!
Get Your Free Genealogy Forms
"*" indicates required fields
Anyone on “image overload” can learn a few things from professional photographers who work with images every day. A successful wedding photographer, for example, captures hundreds of images for an event and selects only the best shots to show the couple. Favorites are edited and assembled into the final product: the wedding album. The entire process from image capture to final product is called the photographer’s workflow. Repeating the steps over and over makes the routine so familiar, he can do it almost without thinking.
You probably have a workflow, too, although it might not feel productive if you’re drowning in digital images. My new book How to Archive Family Photos (Family Tree Books) helps you keep your images organized, identified, secure, and accessible for the next generation to admire. In this excerpt, I’ll break down what efficient digital image management looks like, and suggest three sample workflows to help you corral your digital photo chaos.
Managing Your Digital Assets
A comprehensive system for capturing, importing, renaming, editing, resizing, tagging, captioning, archiving, backing up, and exporting image files is called digital asset management, or DAM. Pros take time to study and understand each step in the DAM process to develop their own efficient and personalized workflow. Family photographers and family historians can benefit from a simplified DAM system focusing on their most typical assets—photos and video files.
Effective DAM involves more than a tidy file folder system and meaningful file names, but the benefits are greater, too. DAM harnesses the power of your computer for better access and identification with labels and tags. Good DAM lets you organize your images in a way that makes sense, guides you through all steps from image capture to sharing, offers data security with backups and archival protocol, and provides tools for collaboration and future users. Before you set up your DAM system, you’ll need to:
1. Choose a master storage location. Your master image collection—I call it a Photo Library—should be consolidated and managed in a central location, preferably your computer or external hard drive.
2. Set up your Photo Library. Navigate to your Master Storage Location and create a folder named Photo Library. Inside this folder, create a folder for the year and inside it, one for the month of the images you’re ready to import.
When you’re ready to begin using your DAM workflow, start with new photos and work forward. Select a Digital Photo Birthday on an easy-to-remember date, such as your birthday or a major holiday. From that day forward, manage all images with your new system. As you have time, move old photos into the system. Don’t try to do it all at once or you’ll be overwhelmed.
DAM Workflow
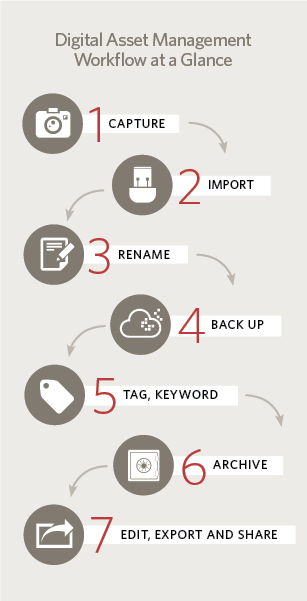
In its simplest form, DAM is all about capturing, storing, and accessing your images. Each step of the workflow refines these tasks so you can easily locate images for editing and sharing the end product, and be confident that your photo collection is secure.
1. Image capture: This includes whatever method you use to acquire an image—typically, a camera. You might also scan documents and download historical photos from the Internet. Digital images are usually captured to hard drives, memory cards, flash drives or a device’s internal memory.
2. Image import: The next step is moving images from the capture device or temporary storage location into long-term storage. You may be able to automate this with photo-management software such as Adobe’s Lightroom or Photoshop Elements.
3. Renaming: Rename images from their generic camera-generated file names to something meaningful. It should reference people, dates, places and events depicted, such as TomSchmidt-birthday1972. Photo-management software can make this easier with batch file-naming features.
4. Backing up: Regularly back up your image collection on another kind of media, such as on an external hard drive or with an online backup service such as Backblaze or Shutterfly’s ThisLife. After a session spent editing or transferring photos, I back up my own photo collection to my “Image Vault” on an external hard drive in my home.
5. Tagging: Labels, keywords and other information added to an image file are known as metadata. They add historical context to an image, make it easy to find, identify people and places, and help you designate favorite photos. This is an often-overlooked step, but an important one for a family historian. Fortunately, your camera adds the most important metadata, the date, automatically.
6. Archiving: This takes your regular backups a step further to preserve your digital photos for the long term. You’ll rarely access this Photo Archive. Keep it on physical media such as DVDs or another external hard drive, and migrate it to new media as needed to avoid obsolescence. You can save time with backup software configured to update only edited and new files.
7. Editing and sharing: Your images might as well be in a shoebox if you don’t export them into a shareable format so family and friends can enjoy them. These files need different handling from your archival and working digital files, such as resizing, cropping or other editing.
Workflow is just another way of talking about a habit, something you’ve learned to do that now comes effortlessly. You want your digital photo workflow to be as seamless as driving a car. It’ll take practice and repetition, but eventually, you won’t even have to think about it. Time to hit the road.
Three Sample DAM Workflows
DAM Workflow for Multiple Cameras and Smartphones
If your family takes photos with multiple cameras and smartphones, you need a strategy that makes it easy to gather all the images into one collection. Designate a computer to hold your photo library and set up everyone’s smartphone to auto-sync photos to a cloud service. You can save time by using photo-management software such as Lightroom, or Apple Photos for OS X.
1. Use your digital camera to capture photos on a memory card. Wi-Fi-enabled Eyefi Mobi SD cards instantly upload images to your computer. Configure your smartphone to auto-sync images to a cloud service such as Backblaze, Dropbox or Google Drive.
2. Import images from memory cards and cloud accounts to your family photo library.
3. Rename the images and add tags using photo-management software, or by using the Finder window (Mac) or Windows Explorer (Windows) folder.
4. Back up folders and image files to an external hard drive.
5. Burn image folders to archival DVDs and store off-site.
6. Share photos.
DAM Workflow for the Mobile Genealogist
Genealogy research at a library or cemetery might yield digital images on cameras, smartphones, mobile scanners and repository computers. You’ll need to access the images for later analysis, adding source information and adding to your online tree.
1. Set up your smartphone and tablet to automatically upload photos to a cloud storage service. Consider using an Eyefi Mobi SD card in your camera and portable scanner, and in repository equipment if possible, to transfer photos to your computer. You might use a smartphone app such as CamScanner to “scan” documents.
2. Share selected images via email and social media from your phone or wi-fi-enabled camera. View documents scanned on your smartphone on the larger screen of your tablet or computer.
3. At home, transfer all images to your Photo Library folder.
4. Rename, tag, and add metadata.
5. Back up images to your Image Vault.
6. Include your photos in your regular Photo Archive routine.
DAM Workflow for the Overcommitted
Something is better than nothing. Try this system, which at least ensures your photos are backed up, if you take pictures exclusively with a mobile device, but you don’t want to think about managing a digital photo collection.
1. Set up a cloud storage account with Dropbox, Google Drive, Backblaze or ThisLife.
2. Set up your smartphone and tablet to auto-sync with the cloud storage service.
3. Regularly order archival DVDs of your photo library, if possible.
Tip: If you use photo-management software, make all changes to file names or folders within the software. If you use Windows Explorer or the Mac Finder window to move or rename files, the software won’t be able to locate the image.
A version of this article appeared in the July/August 2015 issue of Family Tree Magazine.


FamilyTreeMagazine.com is a participant in the Amazon Associates Program, an affiliate advertising program. It provides a means for this site to earn advertising fees, by advertising and linking to Amazon and affiliated websites.
ADVERTISEMENT