Sign up for the Family Tree Newsletter Plus, you’ll receive our 10 Essential Genealogy Research Forms PDF as a special thank you!
Get Your Free Genealogy Forms
"*" indicates required fields
We often equate picture-taking with special occasions and family milestones — births, weddings, graduations, reunions. Your family album’s probably filled with photos of such memorable moments. But when you’re creating a scrapbook of your family’s history, the more “mundane” memories — images of relatives’ day-to-day activities — are just as important. Those highlights of everyday life, captured on film, help you tell the whole story. Perhaps you have a snapshot of your great-grandmother sewing a quilt or your grandfather tinkering away on his car engine. Including those photos in your heritage album will give future generations a better sense of their ancestors’ lives and personalities.
Those slice-of-life photos can be the most rewarding — and fun — to scrapbook. So how do you turn pictures of ordinary activities into extraordinary layouts for your heritage album? For inspiration, look to these 17 projects designed around photos of everyday life. We’ve provided step-by-step instructions for each layout, so you can achieve the same effects on your own pages — even if you’re a scrapbooking novice, Or combine the techniques to create your own designs. As you assemble your album, don’t forget the basics of safe scrapbooking: Never paste or crop your original photos or mementos — use color photocopies (or doubles) instead. And use only acid-free, lignin-free papers and embellishments in your layouts. You’ll find details on the scrapbooking suppliers mentioned here in our preservation resource directory (page 60).
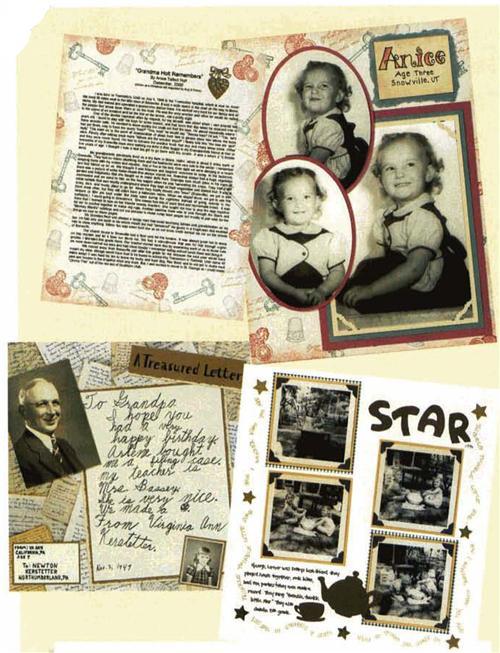
Ask a relative to record memories.
For Christmas one year, Angi Holt of St. George, Utah, and her husband requested written childhood memories from their parents and grandparents. The results provided ideal scrapbook journaling, which Holt printed on ivory cardstock (top left). To achieve the soft, subtle effect around the edges of the cardstock, apply chalk and stamp around the border with Stampin’ Up!’s Antique Collectibles rubber stamps. To make the heart-locket stamp stand out, you can use a stamping technique called heat embossing, in which you stamp a design in ink, apply embossing powder to the wet ink, then heat the powder until it melts into a raised pattern of the original stamp (see <www.gracefulbee.com/howto/HeatEmboss.html> for detailed instructions on this technique). For the photo page, apply chalk and stamps around the edges, just as you did for the journaling page. Write the title, and color it in with colored pencils. Double-mat the largest photo on pale-green and rose cardstock. To create the decorative photo corners that outline the dominant photo, punch the cream-colored mat with an Aaron’s Arch photo-corner slot punch from Emagination Crafts. Cut the two smaller photos into oval shapes, and mat them on rose cardstock.
treasure hunting
You may not have a huge box of old photos or memorabilia, but with a bit of ingenuity, you can get your hands on enough pieces to create a beautiful heritage album. Try these tips to amass a collection of family ephemera:
? Take a look around your house. Do you have old pictures hanging on the walls or in frames on the bookshelf? Take them down and have copies made for your album.
? Contact relatives and ask for copies of their photos.
? Include the official records of important life events, such as marriage, birth or military service, in your book.
? Take new photos if you don’t have old ones. Tote your camera to an ancestral cemetery and snap photos of headstones. Travel to a town where your family used to live. Photocopy pictures from old newspapers that show the town way back when. Take modern photos of the same locations from the same angles. Journal about the changes you observe.
? Gather information about the time period you’re including in your scrapbook. Write about the era’s important events, and describe a typical lifestyle for your relative’s contemporaries.
Preserve a childhood letter.
Virginia Butler of Milton, Pa., designed a page around a letter she wrote to her grandfather in 1949 (far left). You, too, can preserve a youngster’s handwriting and priceless childhood memories: Photocopy a letter at a reduced size onto acid-free paper. Mat the letter and title with brown cardstock cut with deckle-edged (scalloped) scissors. Place a cream-colored cardstock mat behind the brown mat. Write the title and address information with a black pen. Mount the letter, photos, title and envelope on this patterned background paper from Hot Off The Press, or a similar design.
Remember a neighborhood friend.
Jean Guernsey of Brookfield, Conn., captured memories of her mother’s girlhood friend and the song they recorded as children (“Star,” above left). Mat the photographs on Creative Memories’ mustard-yellow cardstock and patterned paper. Then, decorate the images with black photo corners from Canson. Draw letters, a teapot and a cup on brown textured paper from Keeping Memories Alive. Add journaling in black pen and song lyrics in gold pen. Accent the page with star stickers from Mrs. Grossman’s Paper Co.
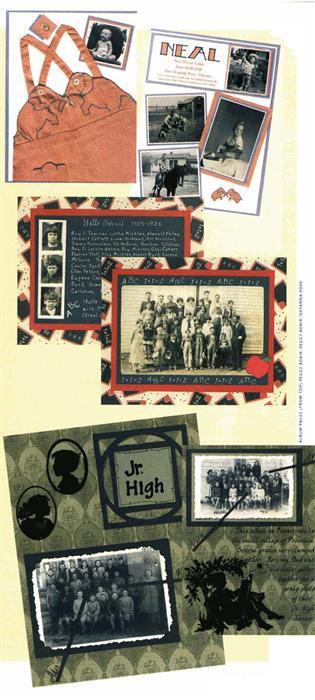
Preserve a homemade heirloom.
When Peggy Adair of Fort Smith, Ark., couldn’t find just the right paper for her layout (top right), she made her own by scanning and printing 50-year-old clothing. To achieve this creative look, begin by placing white cardstock on blue cardstock (be sure to leave a thin border). Print the title and journaling onto white cardstock. Cut out the title letters, and place a scanned image of the sun suit behind the title, so the pattern shows through. Outline the title with blue marker, then mat the title block on blue cardstock. Mount the photos on blue and white cardstock, and mount the scanned image of the sun suit. Scan the elephant accent at a reduced size and adhere it to the bottom corner of the title page. On the opposite page, layer squares from blue cardstock and the scanned image, and place a burton on top for the finishing touch.
Highlight family members in a group photo.
For a school-photo layout (middle right), Adair enlarged parts of a group photo to feature people important to her family. Identifying the children in the picture was easy: Her father could name every member of his grade-school class after 77 years! Craft this nostalgic page by scanning a group photo and enlarging family members’ faces. Cut out close-ups, and mat them on ivory cardstock. Double-mat the group photo and the strip of close-ups on green and red cardstock. Mount all photos on patterned paper such as this theme from The Paper Patch. Add journaling with white pen. Use an apple punch from EK Success to create the accent for the group photo. Cut a stem and leaf from brown and green card-stock. Shade the apple with colored pencils.
Identify relatives within a group.
Oksanna Pope of Los Gatos, Calif., used simple lines to point out her father and his sister in old class pictures (bottom right). Single out your family members by creating a nostalgic page similar to this one. Print journaling directly on Fiskars’ patterned background paper. Trim the photos with deckle-edged scissors. Use olive-green cardstock to mat one photo, and black cardstock for the other. For the title, adhere letter stickers from C-Thru Ruler Co. to an olive-green cardstock square. Mat the title block on a black cardstock frame cut from an EZ2Cut M1 matting template. Adhere velvet silhouette accents, available from Sew Easy Industries. Cut the identification lines out of black cardstock, and finish with handwritten names and detailing on the title block.
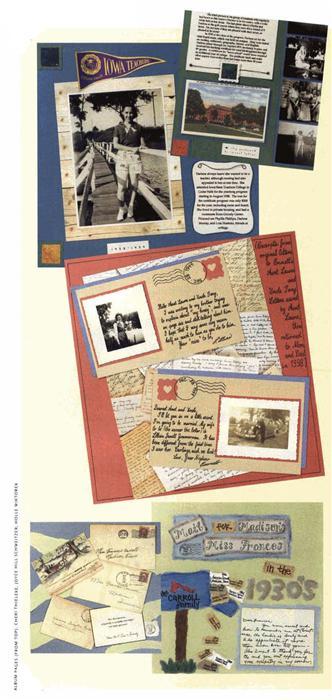
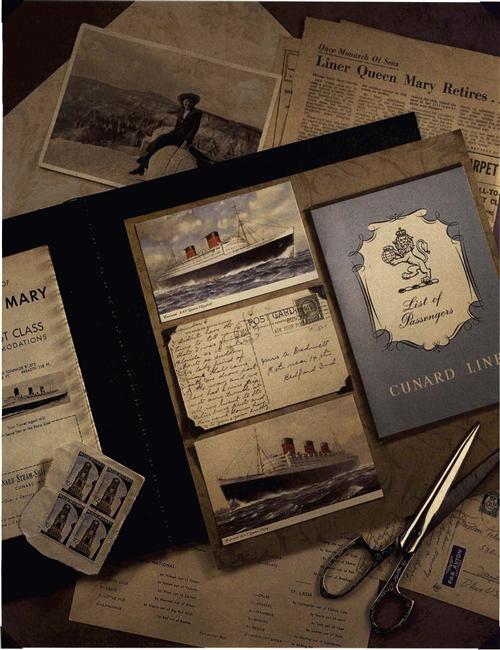
Preserve both sides of a postcard.
With an altered portrait sleeve, Cheri Thieleke of Ames, Iowa, made both sides of a postcard easy to read. For this spread (top left), use patterned paper from Hot Off The Press to mat the large photo. Mat the smaller photos with green and blue cardstock. Embellish journaling with wire and eyelets. Print the date the photo was taken and instructions for reading the postcard on gray cardstock. Create corner accents by matting Colorbok stickers on punched 1 ¼-inch decorative squares. Cut a hole the size of the postcard in the page protector, so the card can be opened and read. Trim a portrait sleeve to fit the postcard, but leave a ½-inch flap on the sleeve. Use two-sided clear tape to hold it in place. Adhere the flap of the postcard sleeve to the area between the journaling block and the blue mat.
Re-create cherished correspondence.
Joyce Hill Schweitzer of Greensboro, NC, drew inspiration from the letters her parents wrote during World War II. Emulate her heritage page (middle left) by journaling excerpts from old letters or family stories passed down through the years. First, draw a black-pen border around the edge of rust-colored cardstock. Then, mount printed paper on the cardstock background. Cut postcard-sized rectangles from tan cardstock and mat them (slightly offset) on blue cardstock. Trim photos and mount them on deckle-cut white cardstock. Next, mount the photos on rust-colored cardstock, and adhere them to your handmade postcards. Make the rust-colored stamp squares by cutting them from cardstock with Fiskars’ jigsaw scissors.
Highlight family letters with a torn-paper mailbox.
Holle Wiktorek of Fayetteville, NC, created a mailbox to hold numerous old letters and envelopes (bottom left). Assemble a mailbox, envelopes, wooden post and grass from torn paper. Give the torn title blocks a feathered appearance by adding chalk to the edge of the paper. Then, mat the postcard on light-blue cardstock with torn edges. Add journaling to the small envelopes, and draw the postmark on the title block with black ink. Trace the title letters from an EK Success template, and color them in with chalk. For the second page, adhere torn strips of lime-green cardstock to blue cardstock in a random pattern. Layer the envelopes and postcards over the lime-green strips.
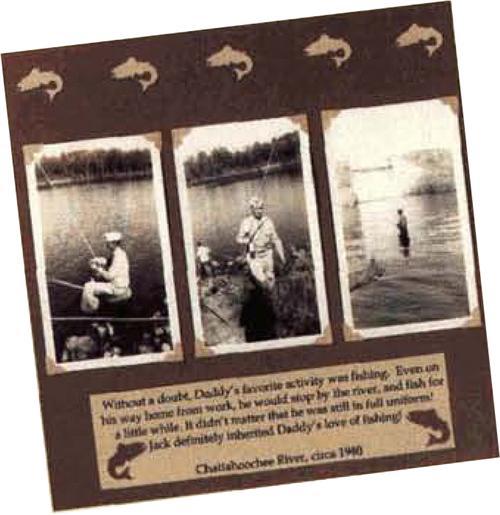
Capture a fond fishing memory.
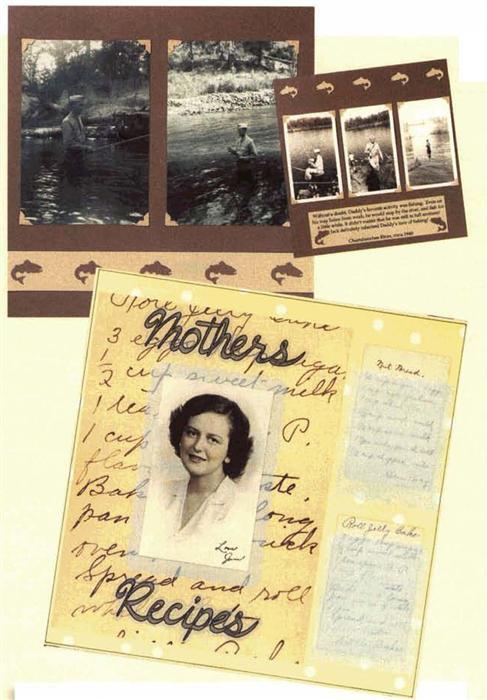
In her heritage album, Carol Tingley of Ocoee, Fla., featured pictures of her father fishing in his military uniform at the Chattahoochee River (top right). You can replicate this simple layout by mounting photos with tan photo corners on brown card-stock. Print journaling on tan cardstock. Use a McGill punch to create the fish cutouts.
Preserve handwritten recipes.
The sweet smell of bread baking can bring back fond memories of loved ones. Remember the person and the recipe with a scrapbook page like this one (right) by Erikia Ghumm of Brighton, Colo. Enlarge and make a color photocopy of the recipe on an 8½×11-inch piece of paper. Adhere the copy to Making Memories’ background paper. Cut vellum to fit the recipe cards, and trim the top edge with Fiskars’ cloud scissors. Attach the bottom and sides of the vellum to the background paper to form recipe pockets. Handwrite the title on vellum and outline it in black. Cut the vellum with decorative scissors and mount the photo.
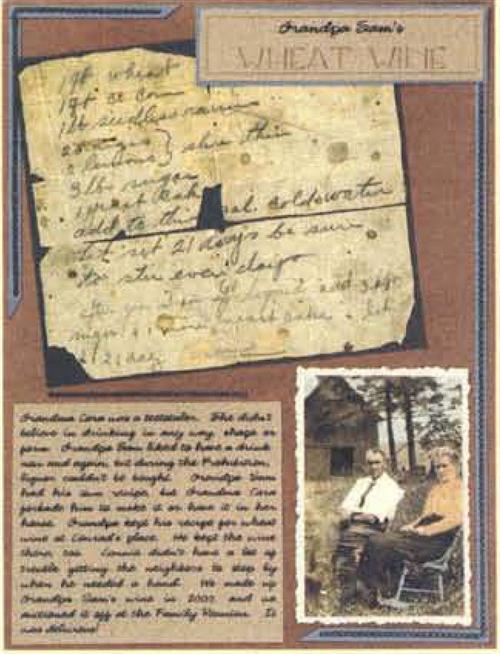
Save a secret recipe.
Knowing that her grandmother was a teetotaler, Juli Pomainville of Canton, NY, thought her grandfather’s wine recipe (above) would make an amusing anecdote for her heritage album. To create a similar page, cut the border from light-blue cardstock and add beaded-line stickers from Me & My Big Ideas for an accent. Make a color copy of the recipe and photo, and brighten up the photo with tinting pens. Create a mat for the recipe out of brown cardstock. Place the photo on deckle-cut white cardstock. Print the title and journaling on tan cardstock. Mat the title on blue cardstock.
tell it like it was
An old photograph can be a window to the past. Take time to research the people or events displayed in your pictures. Descriptions and stories turn the two-dimensional images in your heritage album into compelling tales. Consider these questions:
? Who’s in the photo?
? How old is the person in the photo?
? When and where was the photo taken?
? Who took the photo and why?
? What’s happening in the photo?
? What do you know about the person’s life?
? Where was the person in the picture born?
? Do you know anything about the photo subject’s special interests or hobbies?
? What historical events occurred during the person’s life?
? What memories do you have of this person?
? How do others remember and describe this person?
? What characteristics do you share with this person?
? What are the major differences between life then and life now?
? What feelings does this photo evoke in you?
shot pursuit
Creating a complete heritage album may involve asking for photos or documents from distant relatives or family members who are reluctant to part with their beloved treasures. The fastest and easiest way to get copies of the photos you need is to visit the owner. During your visit, ask if you may take the photos to be duplicated. Offer to drop them off, pick them up and return them safely within a certain time frame. While visiting, show off your other work. Once family members see your dedication and the care you’ve taken of your own photos, they may be more willing to allow you to use their collection. If your relatives are too far to visit, or they’re Still reticent about loaning out their pictures, these strategies might help:
? Tell them about your heritage-album project. Describe the process of preserving photos safely. As an incentive, offer to send them a copy of the album when you’re finished.
? Offer them copies of your photos.
? Enlist the aid of another family member who’s closer to the owners of the photos and who may be able to help facilitate the loan.
? Offer to pay for copying, packaging and postage.
? Promise to credit the photos’ owners in your album.
Once you have all the photos you need, scan the entire collection, so your family members can have copies. Creating this kind of personal e-library also ensures that you’ll be able to print more copies if anything happens to your photos.
Frame your memories.
Paula DeReamer of Alexandria, Minn., created a visual focal point with her torn-paper frame (above). Mat the photo on forest-green paper. Tear out the center of a 5×6 l/2-inch piece of sea-foam-green paper and place it over the matted photo. Fasten heart brads from Hyglo-American Pin to the photo corners and apply a leaf accent in the lower right corner of the frame. Attach the matted photo and frame to Northern Spy’s striped background paper. Adhere the second photo to sea-foam-green cardstock with trimmed comers. Choose a script font for the title, and print it on clear vellum. Mat the title on torn sea-foam-green paper. Print out the journaling on clear vellum. To create the page’s comer accents, cut two l ½-inch sea-foam-green squares in half for four triangles. Use multicolored metallic thread to attach green buttons to each page corner.
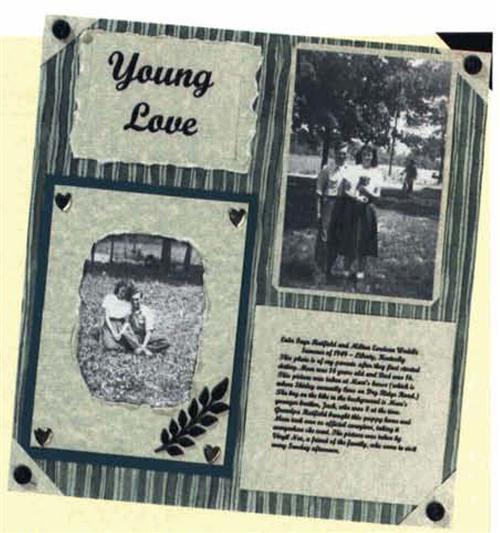
Tell the story of wartime romance.
Cheri Thieleke used delicate colors and chalk shading to draw attention to her journaling (left). To achieve the elegance of this page, place gray card-stock on a black background page (be sure to leave a thin border). Print the journaling and title on tan cardstock. Shade the edges of the cardstock with chalk, and color in the title with colored pencils. Mat the journaling section on a 4×11-inch strip of black cardstock. Embellish the journaling section with Me & My Big Ideas’ heritage stickers. Cut a 1 -inch strip of K & Co. patterned paper to make a border. Mat the photo with black cardstock, vellum and patterned paper. Mount the photo over black cardstock and silver metallic paper positioned at an angle. Attach stickers and eyelets from Stamp Doctor to the corners of the mat. Mat the handwritten initial monogram and name on black card-stock and patterned paper.
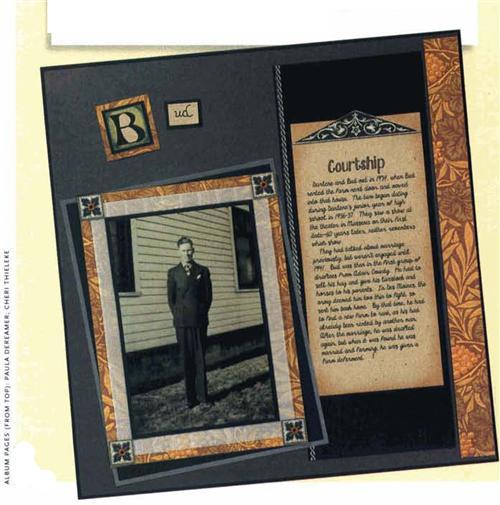
Record the story of a loving courtship.
Victoria Severson of Arlington Heights, 111., made the story of her in-laws’ courtship the topic of her page (top right) with a few endearing photos and simple accents. Print journaling on gray speckled cardstock from Club Scrap. Place silver photo corners around the photos and mat them on purple cardstock. Adorn the pages with Club Scrap’s swirl stamps. Cover the swirls with silver embossing powder and heat emboss.
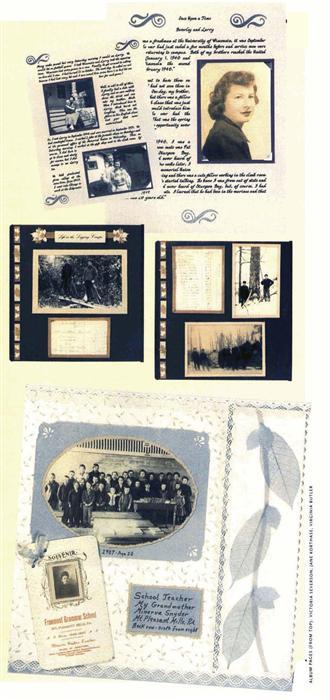
Document the good old days.
Jane Korthase of Boyne City, Mich., scanned and printed an old logging-camp ledger to record the 1915 prices for typical camping supplies. Fashion your scrapbook page after hers (middle right) to show how times have changed. Frame the photos and ledger copy with strips of wood veneer, and mount them on black cardstock. Cut ½×1 ½-inch wood veneer strips, and line them up along the left sides of the pages. Layer the border strips with punched leaves — Emagination Crafts’ oak leaf, Scrapbook Studio’s small maple leaf and Family Treasures’ ash leaf. Print the title on vellum, and mat the vellum on white cardstock for legibility. Adhere the title block to a wood veneer strip, and layer the strip with more punched leaves, including Family Treasures’ large maple leaves.
Feature priceless memorabilia.
A booklet listing the names of her grandmother’s pupils inspired Virginia Butler to produce this elegant page (bottom right). Mount an 8 ½×11-inch sheet of patterned Frances Meyer paper to the left side of pale-blue cardstock, and a 3×11-inch strip of Amscan’s patterned paper to the right side. To create the small leaves on the right side of the page, use a McGill punch. Layer the handcut stem, punched birch leaves and Graphic Products skeletal leaves over the paper strip. Mount printed vellum over the leaves. Crop the photo with deckle scissors and mat it on brown cardstock. Mat the photo again on pale-blue cardstock. Trim the pale-blue cardstock with a shell corner punch. Write the year and age in brown ink under the photograph. Write a brief journal entry in brown ink on pale-blue cardstock. Frame the page with Mrs. Grossman’s Paper Co.’s lace border stickers. Adhere memorabilia for the final touch.
From Family Tree Magazine‘s September 2003 Preserving Your Memories.
ADVERTISEMENT
