Sign up for the Family Tree Newsletter Plus, you’ll receive our 10 Essential Genealogy Research Forms PDF as a special thank you!
Nothing says more about our ancestors than their own words. Whether it’s a daily diary, memento-filled scrapbook or series of eloquent letters home, the written word can breathe life into the past. But such writings are hard to share. A book’s cover may come loose from handling. Pages might be torn, and mementos affixed to them go missing. And of course, there’s the possibility a treasure could become lost altogether as it’s passed around.
That might explain why you hovered a bit too much when you displayed Great-grandma’s scrapbook at the last family gathering. If you got on everyone’s nerves with your admonitions to “Be careful!” and your gasps when cousin Debbie’s sticky-fingered toddler ventured near, rest assured: There’s a better way.
Modern technology makes sharing family treasures such as diaries, letters and scrapbooks easy and safe. Creating a reproduction of the original heirloom means every family member—no matter how grubby his or her paws—can hold, own or view it on a computer. Best of all, you’ll have what archivists call a preservation copy in case something happens to your original. Just follow these steps.
1. Choose an heirloom.
Diaries, journals, photo albums and scrapbooks are great candidates for reproduction projects. But look beyond these for other possibilities, including Great-grandma’s cookbook, Mom’s baby book, an autograph album or garden journal. You also could reproduce in bound form your third-great-grandfather’s Civil War letters home or a stack of family recipe cards.
Not every family book merits the time and expense of producing a facsimile. You’ll have to be the judge of whether relatives will want a copy of Granddad’s auto service record—your car-enthusiast nephew might think it’s a treasure.
Some items are easier to work with than others. Select books or documents that fit comfortably on the screen of your flatbed scanner. Make sure the items can stand up to home scanning. Leave fragile books and papers to a professional conservator. If you’re new to online photo service sites, consider starting with a project of 20 to 40 pages—long enough to learn the process but not overwhelming. Take into account your budget, too: Most services charge a set fee for books of 20 or so pages, with an additional cost per page. Keep in mind you could create a complete version for online viewing and choose select pages for a shorter book to purchase.
You Will Need:
- old diary, album, letters or other book or documents
- scanner
-
computer with internet connection
- archival book storage box
2. Select a photo book service.
Creating a reproduction book is similar to making a photo book of vacation pictures, but simpler. The design work has already been done for you, so all you have to do is copy your book page by page.
You may already have a favorite site for ordering and sharing photos. You’re already familiar with its features, so check out the photo book options there before looking elsewhere. See the Picture Books section below for a list of photo services I like, and consider these options in selecting the right service for you:
- Your internet connection: If you have a dial-up connection, sites with free desktop software, such as SmileBooks and Blurb, will let you work offline.
- Price: Costs vary widely by site. Many services offer a 8×8-inch 26-page hardcover book for under $40. To save money, you could create a book and then wait for a sale (especially frequent around gift-giving occasions) to pull the trigger. “Like” the Facebook pages and subscribe to the newsletters of services you’re considering to stay abreast of deals. Also look for special offers on sites such as Groupon.
- Sharing: Building a book for family members to purchase? Seek a service with built-in sharing so relatives can view and order their own copies. You even may be able to open your book to the public or share it on Facebook. Check out books I’ve made on various sites using the links at www.thefamilycurator.com/heirloom-books.
3. Add context.
Aunt Fanny’s Foods Notebook is a fun look at 1940s home economics, and it’ll be more meaningful to relatives with photos and a short version of Fanny’s life story added at the beginning. I also could annotate recipes with equivalent measurements or notes on ingredients. Here are a few ideas for adding context to your reproduction book:
- Write an introduction with a photo of the author at the time the book was written and a short biography.
- Compile a timeline of the author’s life and add dates from the book, such as “Nov. 5, 1902: Grandma records her first diary entry.”
- Add a family tree generated from your genealogy software program.
- Create a map with markers highlighting places mentioned in the book.
- Include an appendix listing who’s who in the book and how they’re related to the author.
- Insert an index to people, places and events mentioned in the book.
- Enhance relevant pages with photos or news clippings related to the writings.
- Transcribe hard-to-read passages.
Many of these suggestions don’t require special writing skills; you can use information from your genealogy research. Find more ideas for personalizing family books in The Future of Memories by blogger Denise Barrett Olson (self-published; www.moultriecreek.us/gazette/?p=3941), a digital idea book filled with examples and how-tos. Just remember to keep your focus on the original work as you add context.
4. Scan your book.
Now it’s time to digitize the content of your book. Give yourself plenty of scanning space. Some books are bound so tightly they’re difficult to lay flat on a scanner, so you might need to use a large table where you have room to support one side of the book as you scan each page. Clean your scanner glass with a soft cloth and wash your hands.
Next, adjust the scanner settings, which vary by model. If yours has a professional mode, use the settings for Reflective Document (not film) and Target Original Size. Also choose color (24-bit if you get the option) and 300 dpi resolution. For books containing newspaper clippings, check the scanning option for Descreening when you get to those pages. Choose the JPG setting, which is required by most photo book sites. If you want digital files to archive, scan in TIFF format and make JPG copies.
You’ll save time by hitting the Preview button before your final scan. This lets you set the marquee tool to the size of the object you’re scanning.
Scan pages in the order you’ll want them to appear in the reproduction. For a book, scan the cover and each page in order. For letters scan in chronological order. Give each scan a unique name, for example, cookbook_001, cookbook_002 and so on. Place the image files in a folder on your desktop.
Use photo-editing software to clean up any cropping errors and make desired enhancements. I err on the side of fewer adjustments so the book will be true to the original—torn pages, stains and all.
5. Create the reproduction.
Once you log onto the service and navigate to photo books, you’ll be prompted to select a book size, cover style and design theme. From there, the process differs by site (and sites do occasionally change up how their services work), but most are pretty intuitive and easy to use. Here’s how it works on
Shutterfly:
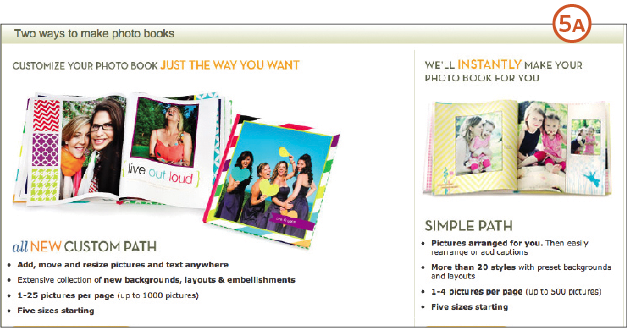
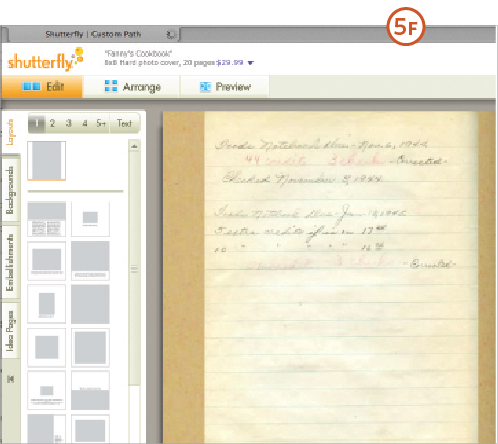
A. Pick a path. Shutterfly offers a Custom Path to design books with personalization options, and a Simple Path with more predesigned elements. Choose Custom Path to match the original book as closely as possible.
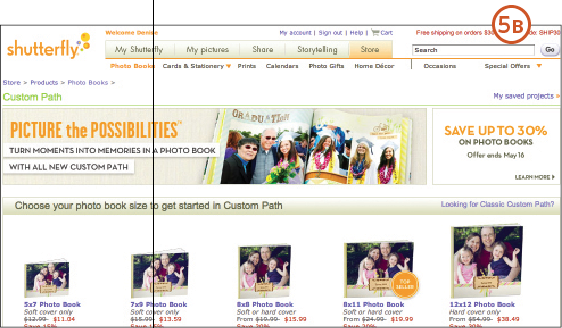
B. Select a book size. Measure your original and find a size that closely matches or uses the same proportions. You also want the same orientation as your original—horizontal or vertical—if possible. My aunt’s school cookbook measures 7×8.5 inches; an 8×8-inch book fits each page plus a margin on each side.
C. Choose a style. You can add suitable backgrounds to any style and switch page layouts, but it’s easier to start with a style similar to your original. For my cookbook, I chose Natural Neutrals.
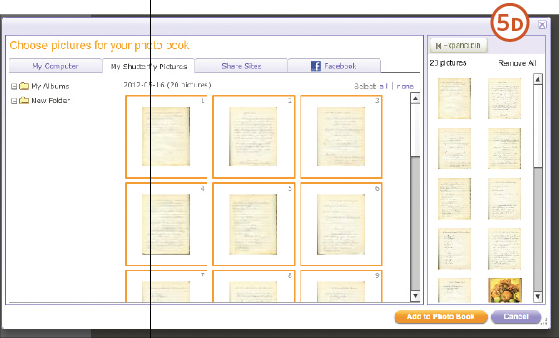
D. Upload photos. A new window lets you either choose photos from those you might’ve already uploaded to Shutterfly (My Shutterfly Pictures), or upload pictures from your computer. If you haven’t already uploaded your photos, click the My Computer tab, then Get Pictures. Select the photos in the folder on your desktop and click Open to upload them. This may take some time depending on your internet connection speed and number of images. The uploaded photos will appear in the window. Select the photos you want in your book, or choose Select All. Click Add to Photo Book, and the images appear in the Picture Strip at the bottom of the page.
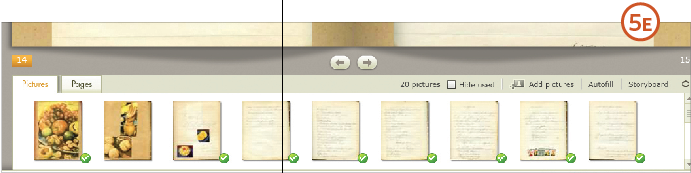
E. Add photos to your book. You can either click Autofill (just above the Picture Strip) to automatically place the images in the order they were scanned, or drag photos onto the pages yourself. If you scanned the pages in order, it’s simpler to use Autofill and rearrange images later if needed.
F. Adjust your layout and background. The book style you chose will offer several page layouts and backgrounds. Click the Layout tab on the left to choose a layout. I matched the look of my original book with one image per page. You can choose a layout with two or more photos to place multiple images on a page. Click Get More Layouts at the bottom for more choices. Click the Background tab to choose a background; click Get More Backgrounds to see additional options.
To apply the selected layout and background to all the pages at once, click the arrow next to the Pages option at the top and select Apply to Other Pages. Next, check Layout and Background. The Pages Strip at the bottom of the window may not display your changes immediately, but you can see the new design in the Preview mode.
G. Add finishing touches. Include any of the contextual elements you created in step 3. Add pages to the book by clicking the Pages option at the top and selecting Add Page. You must already be on the page you want to add the new page before or after. Choose a layout with photos and/or text for that page, and add your content. You may need to add an extra page so that facing pages in your original book are also facing in the reproduction. Click Cover at the top to design the cover. Depending on the binding you chose, you might be able to place the image of your book cover on the cover of the reproduction; otherwise, place the cover image on page one.
6. Order, share and preserve.
You may want copies of the book for gifts or your family archive. When you’ve carefully reviewed your book, click Order. Be sure to enter a discount code at checkout if you have one.
If your photo book service lets you invite others—family, friends, your genealogy group and more—to view and order your book, do so. You can see how this works with Franny’s Cookbook at
www.thefamilycurator.shutterfly.com.
When you’re finished working with your original book, place it in archival storage. Use an adjustable book box (such as those at
Hollinger Metal Edge) to protect the book, and keep it in an archival box stored in a temperate location (see page 50 for more information on ideal storage conditions).
Picture Books
Start your search for an online photo book service with these sites. You also can create books on the websites of many stores with photo departments, including
Target and
Walgreens.
* * *
From the January/February 2013 issue of Family Tree Magazine