Sign up for the Family Tree Newsletter Plus, you’ll receive our 10 Essential Genealogy Research Forms PDF as a special thank you!
Get Your Free Genealogy Forms
"*" indicates required fields
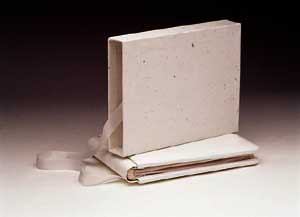
A slipcase protects your album — and the photos in it — from those photographic archenemies: light, dust and pollutants. But don’t despair if your scrapbook didn’t come with a slipcase. It’s easy and inexpensive to make one yourself:
- Adjust the template to the measurements of your album (add 1/8 inch to each number). Transfer it onto acid-free board and cut out using a utility knife and a metal yardstick. Score along the dashed lines.
- Glue a piece of glassine, a shiny transparent paper, onto the board. Trim the glassine 1/2 inch from the edges, fold the excess over and glue it to the back. This will reduce the friction between your album cover and the case.

- Fold the board along the scored lines. Fasten the edges using acid-free hinging tape or strips of acid-free paper coated with spray mount. Secure with rubber bands until dry.
- Glue a satin ribbon that’s double the width of the album plus a few inches to the inside edge of the opening. You’ll remove the album by tugging on the ribbon rather than pulling on the binding. To cover the slipcase, wrap a large piece of acid-free decorative paper around it and glue the edges inside the opening, then cut a separate piece for the back.
ADVERTISEMENT
