Sign up for the Family Tree Newsletter Plus, you’ll receive our 10 Essential Genealogy Research Forms PDF as a special thank you!
Get Your Free Genealogy Forms
"*" indicates required fields
Step 1: Rough it out.
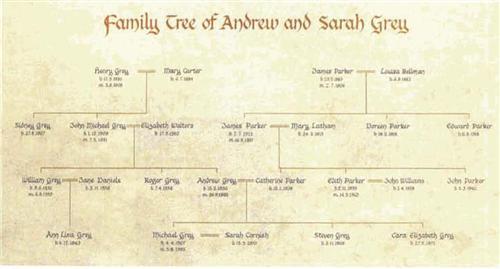
Referring to your five-generation pedigree chart, sketch a pleasing drop-line chart on scrap paper. Write the names (no need to be super-neat yet) and link individuals with connecting lines. Researchers typically use the following “codes” to show relationships clearly: Place the names of a married couple side by side (the husband on the left and the wife on the right), with a long equal sign (=) between them. Drop a line from the equal sign to that couple’s children. Write their names left to right in birth order, and draw a horizontal line above their names to connect them. From the horizontal connecting line, drop a short line to each child’s name.
If a person remarried, place subsequent spouses on the opposite side of the name from the first spouse. Use a plus sign (+) to indicate unmarried partners, and omit the equal sign in a single-parent family. Instead, drop a line to the children from beneath the patent’s name.
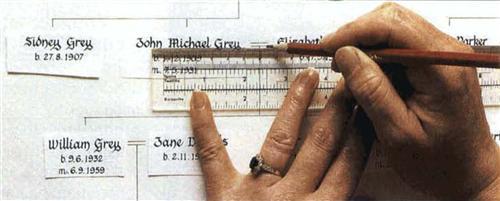
Create a life-size draft on a large sheet of paper. Use a pencil and ruler to rule the paper for the number of generations you’re including. Draw rules to guide your placement of the horizontal connecting lines and all the names in that generation.
On a separate sheet of paper, use your calligraphy pen to write the names, and add birth and death dates (if you wish) in smaller lettering below each name. Write marriage dates below the husbands’ names.
Cut out the names and place them on the draft, moving them until you find the best placement. Tape them in place. Draw the connecting lines using a straightedge, and center a large title across the top of the page.
Step 3: Pen your pedigree.
Choose a large sheet of heavy, acid-free paper from the art store. Very lightly rule it as you did your draft and mark the position of each name.
Then draw the connecting lines with a fine-tip pigment-ink pen (the ink should be water-resistant and lightfast for maximum longevity). Take your time adding the names and vital information with a calligraphy pen. To make the writing stand out, you may wish to use a color different from the lines. Let the ink dry thoroughly, then gently erase the pencil marks. (See the finished tree above.)
Have your wall tree matted and framed with archival-quality materials. Don’t be bashful about displaying it, but do keep it away from direct sunlight.
ADVERTISEMENT
