Sign up for the Family Tree Newsletter Plus, you’ll receive our 10 Essential Genealogy Research Forms PDF as a special thank you!
Get Your Free Genealogy Forms
"*" indicates required fields
Walk into any antique store or flea market and you’ll find boxes of old photographs. These “instant ancestors,” as they’re sometimes called, have been abandoned for lack of interest and because they’re unidentified. It’s sad to think they will end up as anonymous wall decorations instead of being cherished by a family for generations.
Most of us have mysterious old photographs in our own collections. They may have been given to you because of your interest in family history or because the executor of an estate didn’t want to just throw them away. Maybe some photos have a first name but not a date, or there’s partial information passed on from family lore. But most such images haunt us with their lack of identifying information.
All too often these pictures end up in the trash — or at the flea market — because photo identification is seen as a difficult if not an impossible task. Not true! While some photos defy efforts to completely identify them, most images have a story to tell if you know how to discover it.
Here are 10 simple steps to get you started solving your own photographic mysteries:
1 ASK QUESTIONS The first step in any investigation is to ask questions; your research will try to determine the answers. Do you have any relatives who might be able to supply additional material or stories related to the photo? Try to record their recollections in case you need to refer to them again later, by transcribing their memories or by using a tape or video recorder. Make sure you keep track of full contact information for anyone you interview. You will want to show them the photograph several times during the identification process in case some new information jogs their memory.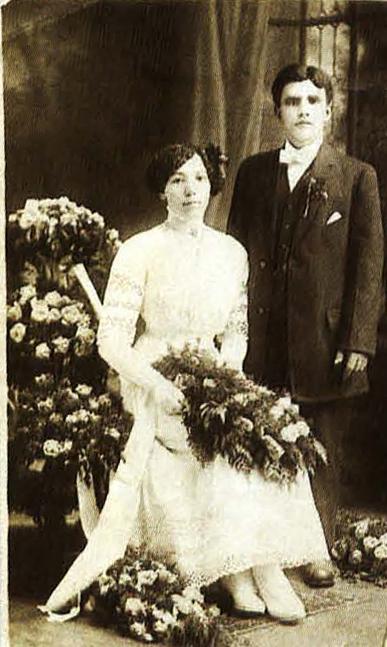
Here are some sample questions you can ask:
- What do you know about the image?
- Who was its previous owner?
- How did it come to be in your possession?
- Is it part of a larger collection?
- Are there any stories associated with it?
- Do you know why it was taken?
- Do you know when it was taken?
- Do you know any of the people in the picture?
- Did a family member supply the identification?
2 KEEP TRACK OF YOUR RESEARCH In order to draw conclusions based on your inquiries, document your research using a worksheet. This will also help you develop a research plan. You’ll want to include such basic information as:
Owner’s name: Your name or the person who currently owns the image.
Address and telephone number: Any contact information that may prove helpful.
Condition: Is the photograph difficult to read because of mold damage or fading?
Type of image: Make sure of the photographic process before you fill in this information (see step 4).
Size: Measure in inches, height × width
Mounting: Is it on a backing such as thin cardboard?
Original: Is it an original, copy image or digitized?
Photographer’s imprint: Does the name of the photographer appear anywhere on the image, front or back? Do you know the name of the photographer because family legend has it that your family always frequented the same studio?
Props/background: What other elements are visible in the photograph?
Style of dress: Write a short description of the type of clothing shown in the picture. Be sure to include hairstyle, jewelry and hats — it’s often the accessories that add the final piece of documentation.
When you date wedding photographs, make sure that all the clues in the image agree: The bride could be wearing her mother’s dress. Here, the dress fits the image’s timeframe.
Contact the expert
Stumped by a family photo puzzle? You can submit one of your unidentified photographs to be featured in a regular online column by author and old-photo expert Maureen Taylor. For information on how to submit your photos and to see Taylor’s columns, go to <www.familytreemagazine.com/photos/photohelp.htm>.
Taylor would also like to hear from you for her next book. Do you have questions about caring for your family photographs? Have you developed a system for organizing your pictures? If you’d be willing to share your concerns and experiences, please contact her at mtaylor@ancestralconnections.com.
3 GET READY TO RESEARCH By listing what you know and don’t know on a worksheet, you’re one step closer to finding out when the picture was taken and who is in it. Once you’ve filled out the worksheet you may discover that you know more than you thought about that unidentified image.
Since you’ll be showing your picture to relatives and taking it with you to libraries, you should make either a same-size photocopy of both sides of the photograph or a copy print so that you aren’t carrying an irreplaceable original. Make multiple copies so you can send them to relatives who may have similar photographs in their collections. Most photo labs now have the ability to make direct positive prints from the original and many can make digital prints. Get the best possible copy that your budget allows so that the details remain visible.
Now that you have a worksheet and a copy image, you can begin to fill in the blanks. There are four basic ways to identify a photograph: You’re looking for information on the photographer, clues to the type of photograph, visible elements such as signage, and clothing features. By researching each detail of the image you’ll get closer to drawing a conclusion — it’s the sum total of your research that leads to a date or identification. (Keep in mind that not all photographs necessarily have multiple points to research. For instance, a photographer’s name isn’t present on all images.)
Find it on the web
PHOTO REUNION SITES
Please be aware that not all of these sites are nonprofit:
• Ancestors’ Lost & Found
<www.rootsweb.com/~neresour/ancestors/>: Part of the Nebraska GenWeb project, this site allows individuals to post photographs they’ve found as well as photographs that need identification. Photographs must be Nebraska related.
• Ancestral Photos
<pw1.netcom.com/~cityslic/photos.htrn>: This site lists photographs found at auctions and in antique stores. Each caption contains a brief description of the items. Most sell for $10 each.
• Civil War Family Photographs
<members.tripod.com/~cwphotos/>: Site for sharing your photographs of Civil War participants.
• Collected Visions
<cvisions.cat.nyu.edu/mantle/info.html>: Submit images to an archive of family photos and write an essay to accompany them.
• “Fallen Leaves” Lost Leaves Photos
<www.agcig.org/leaves.htm>: The purpose of this site is to reconnect individuals with family photos found at antique shops and auctions. You can claim photographs or add identifications.
• Ford and Nagle
<users.erinet.com/31363/fordand.htm>: Family photographs can be searched by surname and then purchased.
• Granny’s Lost & Found
<www.geocities.com/~grannys_attic/lostfoun.html>: This site lists lost and found items and images.
• Lenore Frost’s Dating Family Photos Homepage
<www.alphalink.com.au/~lfrost/Homepage/>: If you have any Australian roots you’ll want to look at her list of found photographs.
• Photo Find Searchable Database
<www.everton.com/photofind/phfind.html>: Search the database or add a surname to their card file. Copies of these images are available for purchase.
• Your Past Connections
<www.pastconnect.com/>: Search their collections or submit a request.
MESSAGE BOARDS
Post an inquiry about your family photographs on a surname message board. You may be able to meet new relatives and discover additional family photos.
• Ancestry.com
<Ancestry.com >
• Genealogy.com
OTHER HELPFUL SITES
• George Eastman House
<www.eastman.org>: If you need to know more about a particular photographer, you can search their database. The site also features a timeline of photographic history.
• Wallace Library Guides
<wally.rit.edu/pubs/guides/photobio.html>: Learn more about photo history by consulting bibliographies of 19th-century photographic processes.
4 WHAT TYPE OF PHOTOGRAPH IS IT? List the photo’s physical characteristics on your worksheet. Is it on metal? Does it look like a mirror? Is it a paper print or on glass? What is its exact size? By answering these questions you’re eliminating possibilities. For example, the earliest type of photographic image, the daguerreotype, was on a shiny metal surface. It actually needs to be held at a particular angle in order to see the image. It was used for a relatively brief 20-year period. But another type of metal image, the tintype, was introduced in 1856 and remained popular until the early 20th century. Creating a checklist of characteristics will help you narrow your choices.
5 WHO IS THE PHOTOGRAPHER? The presence of a photographer’s name, also known as an imprint, can be a shortcut to deciding on a time frame. In the 19th and early 20th century photographers could order cards preprinted with their name and address on either the front or the back. They would then mount photographs on the cards. The resulting combination provided a sturdy support for the image and advertising for the photographer. You can discover a photography studio’s dates of operation by searching city directories (found in libraries) of the area in which the photographer lived, contacting the local historical society or consulting a published directory of photographers for that locale.
6 WHAT ARE THEY WEARING? One of the most important details in the dating process involves clothing. In many cases determining the type of photographic process and a photographer’s dates of operation will still leave you with too broad a time frame for genealogical identification. Clothing elements become key to narrowing down the date. In general, fashion changes are most notable in the accessories of a woman’s costume such as hats, hairstyle and jewelry. Costume encyclopedias and fashion magazines (check your local public or academic library for these resources) can help you trace when certain styles of dress were fashionable.
Stick to a step-by-step process as you try to develop a theory about the photograph — don’t skip ahead to a wrong conclusion. In one case, a woman decided a photograph of a couple was her great-grandparents on their wedding day. While the woman’s wedding dress suggested she was right, the groom’s suit was of a different time period. By figuring out the photographic process and comparing those dates to the costume clues, it became apparent that the photograph actually showed her grandmother, probably wearing her mother’s wedding dress. In this instance each clothing detail had to be carefully examined and compared to other known factors. By making a quick assumption based on just one feature, the dress, it would have been easy to misunderstand the photograph and assign a wrong date.
7 WHERE ARE THEY STANDING? Are there any other clues in the image? In outdoor scenes you can identify a season or establish a list of features. Signage in an image can provide information about a business; city directories can then help you pinpoint a date. Examine each section of the photograph for details. Did the photographer use props? While you probably can’t determine a date based solely on the photographic elements, it can help you create a relationship between other photographs in your collection. Photographers generally used similar props in their images. By grouping photographs together that have similar internal details you may discover that you have a number of images taken by the same photographer around the same time. Combining that with other information may lead you to conclude that these individuals form a family group.
ancestors on the air
This summer, you can get more family-photo tips from expert Maureen Taylor without even leaving your sofa. Tune your TV set to PBS, where Taylor will appear in the network’s “Ancestors” series, which began its second season in June.
She shares her family-photo know-how in the season’s final episode, “Writing a Family History.” The episode tells the story of Taylor McDonald, who set out to write a family history and discovered that the “legends” about his grandfather taming the Wild West — even riding with Poncho Villa — were true. Maureen Taylor and other experts explain how to write, publish and share your family history — including photos, of course.
This “how-to” approach is what distinguishes the “Ancestors” sequel from the original. The first series, which aired in 1997, aimed to motivate people to search for their roots (and helped spark the current genealogy boom). This year’s 13 30-minute episodes focus on family history records, with instruction from genealogists across the country. Besides Taylor, you’ll see fellow family Tree Magazine contributor Kathleen W. Hinckley, author of Locating Lost Family Members & friends (Betterway Books, $18.99), who wrote “Playing Detective” in our April issue, and many other experts.
Each episode combines expert instruction with true family history stories such as McDonald’s. If you enjoy these real-life genealogy tales, you’ll find more of them in the “Ancestors” companion book, In Search of Our Ancestors: 101 Inspiring Stories of Serendipity and Connections in Rediscovering Our Family History (Adams Media) by the series’ lead researcher, Megan Smolenyak. Smolenyak’s own story is chronicled in the “Genealogy and Technology” episode.
In addition to Smolenyak’s book, the series will be accompanied by an online teacher’s guide, Web courses and another book, Ancestors: A Guide to Discovery — Key Principles of Family History Research (Everton Publishers).
You can find more information about the new season of “Ancestors” at <www.kbyu.org/ancestors>. Check local listings for dates and times. — Allison Stacy
 8 DON’T FORGET ORAL TRADITIONS Sometimes a family knows who is in the image but would like additional information or proof. One person was certain that the photograph in her possession was of her grandmother because of stories she’d heard when she was a child, but she wanted confirmation. The image had no identifying information. Her worksheet quickly showed that very little additional research could be done. The lack of a photographer’s imprint and the long time span for the photographic method meant that costume was the only way to assign a date. Since the owner had corroborating identifying data from several family members, she was comfortable with dating the image based solely on costume. The fashion information agreed with the life dates of her grandmother, as the oral tradition had suggested.
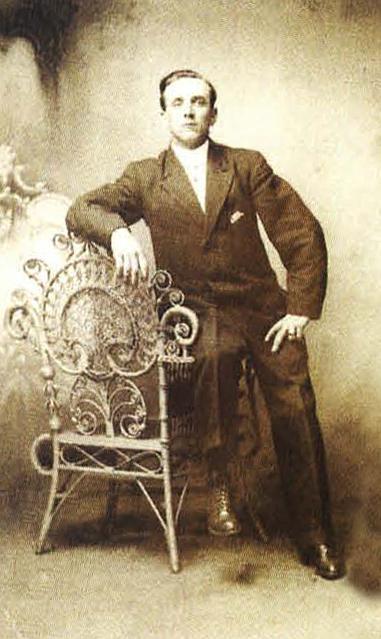
9 PUT IT ALL TOGETHER Let’s look at how all the previous steps can come together to date a photograph. The owner of a picture of a young couple (page 17) was trying to determine a time frame for the image. A worksheet helped determine that the size of the picture, the photographer’s imprint and the couple’s clothing were all clues.
The photograph was mounted on a 4 ½×6 ½-inch card. Consulting a timeline of paper prints helped identify this as a standard size for a type of photograph known as a Cabinet Card. They were introduced in 1866 and were popular into the early 1900s.
In this case, the photographer, “Bonell,” chose to advertise on the front of the card. By consulting a directory of Western photographers it was determined that a Bonell (listed as “Bonnell”) was active in Eau Claire and Chippewa Falls, Wisc, from 1875-1890.
The details in the woman’s dress and her accessories narrowed that 15-year span. The tight sleeves and high puffed shoulder seams were examples of a sleeve style that was in fashion only very briefly about 1890. By 1893, sleeves were fuller on the upper arm. The rest of her appearance, including her short, frizzed bangs and a bun at the nape of her neck, agree with that circa-1890 date.
The young man’s clothing was a little harder to date since men’s fashion changes are not as dramatic. But his basic black sack suit with buttoned vest, white shirt and silk tie would fit with the late 1880s and early 1890s. By putting all the pieces together, the photo’s owner could confidently date the mystery photo at circa 1890.
10 USE YOUR GENEALOGICAL DATA After completing your photo research, compare what you know to your genealogical material. It may surprise you to discover you can now place a name with a face. You may also decide that your initial tentative identification was incorrect.
In one family there was an image of a woman that lacked positive identification. Using genealogical data alone, the owner surmised that the portrait was of Mary (Sparks) Munn, who died in 1852. By talking with other relatives he discovered an identical picture — except this one included the name of the photographer. By researching the photographer, closely examining the clothing clues and scrutinizing his genealogical material, he realized that he had the wrong woman. In fact, it was more likely a portrait of Mary Louise (Munn) Tyrell, the woman’s daughter.
WHAT IF IT’S STILL A MYSTERY?
What happens if all your efforts to identify the image fail? Go back and look at the photograph again. Do you notice anything you missed the first time around? Examine the faces for expressions and features. Is there a purpose behind the photograph? Is it documentation of an event?
When you re-examine the photograph, look to see how the individuals are posed. The intimacy in the way a young couple is seated together may suggest they are sitting for either an engagement photograph or, more likely, a wedding portrait. In a group portrait, the central figure may be the oldest member of the family or the most successful. Photographers carefully positioned individuals within a picture and included props that suggested a context. For instance, a photograph as a prop usually refers to someone not included in the image because of death or absence.
Are there any similar photographs in your collection? In the Munn family, once the whole collection was laid out on a clean surface it became apparent that a series of portraits had been taken at the same time, probably by the same photographer. The four images were the same size and used the same photographic process, and the poses were similar. Additional research proved that the costume dates agreed with that assumption. Once one photograph was tentatively identified, it was possible to also assign names to the rest of the portraits.
Still stumped? Try these additional steps:
• Show the picture to as many relatives as possible. You never know when someone might have an identical copy or similar image.
• Post it on your Web site or someone else’s. A number of sites reconnect people with lost family photographs (see page 18). You might discover answers or other family pictures.
• Place a request for information on a message board or in a query column. While you can’t add a photograph to your message or query, you can verbally describe the picture and express an interest in seeing possibly related images.
• Re-examine your genealogical data. Are you sure you didn’t miss a likely suspect?
It may take several attempts to identify the most challenging images in your collection. Don’t despair! The more people who see your picture and the more you learn, the better your chances of identifying it.
Don’t let your ancestors wind up in a flea market, to become someone else’s “instant ancestors.” With the right steps and a little patience, you can put names and dates to those faces from the past.
Find it on the web
FAMILY PAGES & ONLINE ALBUMS
Create a family Web site and share your photographs online with relatives with the help of these sites:
• Ecircles.com <www.ecircles.com>
• FamilyBuzz.com <www.familybuzz.com>
• Family Point <www.familypoint.com>
• Family Shoebox <www.familyshoebox.com>
• CatherRound.com <www.gatherround.com>
• Genealogy.com <www.genealogy.com>
• Homestead <www.homestead.com>
ADVERTISEMENT
