Sign up for the Family Tree Newsletter Plus, you’ll receive our 10 Essential Genealogy Research Forms PDF as a special thank you!
Get Your Free Genealogy Forms
"*" indicates required fields
As you gear up for the holiday season, here’s an idea to cut down on gift-giving stress and make the clan gathering more fun: Create a family history movie. All it takes is free software and the digital photos or videos you already have. Just pick a theme—such as ancestor photos, special events, vacations or a genealogy trip—and follow these easy steps in Windows Movie Maker.
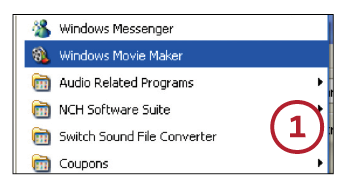
1. Most PCs come with Windows Movie Maker. If you don’t have it, download it free from Microsoft <www.microsoft.com/windowsxp/downloads/updates/moviemaker2.mspx> or <explore.live.com/windows-live-movie-maker>.
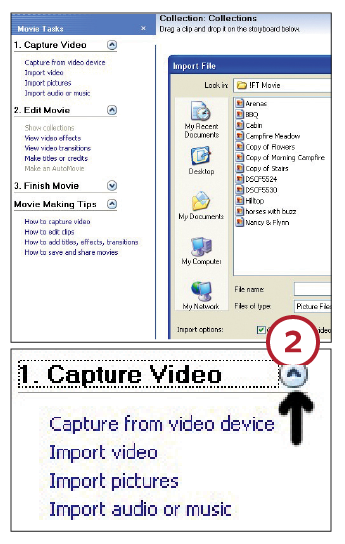
2. Launch Movie Maker. From the Task Pane (the menu at left), import any media you want to include in the movie—supported media include photos, video, audio and music. When you click import, a dialog box will open, asking which images you want to include. Simply follow the prompts. (Hint: If you don’t see the import options under Capture Video, click the button to expand the menu, as shown.)
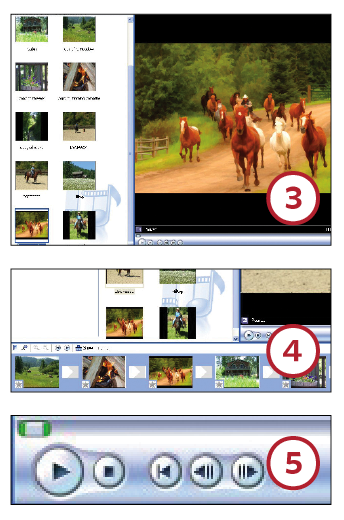
3. Once you’ve imported your video or images, thumbnails of each will display in the Collections Pane. Click on an image and a full-size version will appear in the Preview Pane on the right side.
4. Now the movie making begins. If you want to go the super easy route, Windows Movie Maker has an option that creates the movie for you. Simply click AutoMovie in the Task Pane, add a title and music and let Movie Maker do the rest.
Adding your own narration, effects and transitions takes only a few extra steps, though—and it’s fun. At the bottom of the screen is an area called the Storyboard. To build your movie, just drag and drop your video clips or images into the blank squares in the Storyboard, placing them in the order you want them to appear. If you insert an item in the wrong slot, just drag and drop it to a new location. Or if you decide a picture doesn’t fit after you’ve added it, right-click the image in the Storyboard and choose Delete.
5. At any time during the movie-making process, you can preview your creation by clicking the Play button under the Preview Pane.
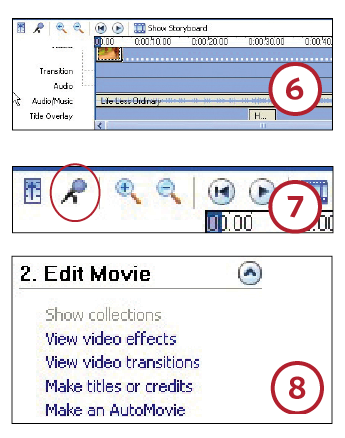
6. What sound do you want your movie to have? If you’d like to include music, click the Import Audio or Music button. This will launch a dialog box to locate the file on your computer. Import the music file into the Collections Pane. Next, click Show Timeline (located on the top of the Storyboard). Once the Timeline is open, you’ll see a “track” labeled Audio/Music. Drag and drop your music file onto this track, then click the Play button to preview. Right-click the audio timeline for the option to fade in and out.
7. To add your own narration, click the microphone icon at the top of the Storyboard. This will open a Narrate Timeline box, with instructions on setting the audio level and a button to begin narration. As you speak, you’ll see your movie in real time in the Preview Pane; this makes it easy to time what you want to say about each image or video clip. The program’s default is set to five seconds per image or clip, but you can change this easily via the Tools/Options menu.
8. How about adding some fun transitions now? A transition is how your movie plays from one clip or image to the next. Types of transitions include fades, dissolves, page curls, bars, diamonds and other shapes. Access the transitions menu from the Task Pane. This is optional, but a well-chosen transition can make your movie look more professional. Drag and drop your transition between clips or images.
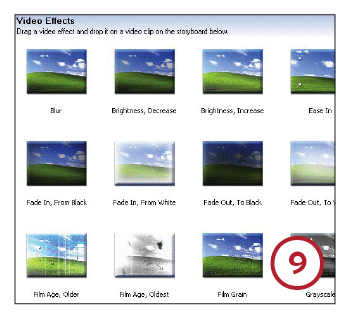
9. You can make your movie even more slick with video effects (also found in Task Pane), which are special effects added to the entire movie. Find the effect you want (you can test them in the Preview Pane), then drag it into the star icon at the bottom of each image in the Storyboard. Effects include a fade in and out, various hues, and even one that makes your video look like it was taken with a 1950s movie camera.
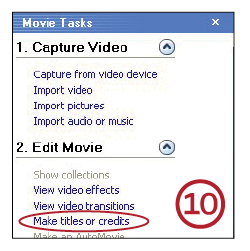
10. Add a title image before the movie, at the end or even between images or video clips. Just click Make Titles or Credits in the Task Pane, then select where you want the title to play. This will launch a title box, with options to change the title animation, font and background colors. Take some time and experiment with the animation options until you settle on a favorite.

11. Finally, expand the Finish Movie menu and select the option for saving. If you save the movie to your computer’s hard drive, you can use the DVD-burning software of your choice to create copies for all your relatives.
Tip: Mac users can use iMovie to build a similar project. See <www.ehow.com/how_2100519_create-imovie-slideshow.html> for instructions.
From the December 2010 issue of Family Tree Magazine
More great genealogy resources from Family Tree Magazine:
ADVERTISEMENT