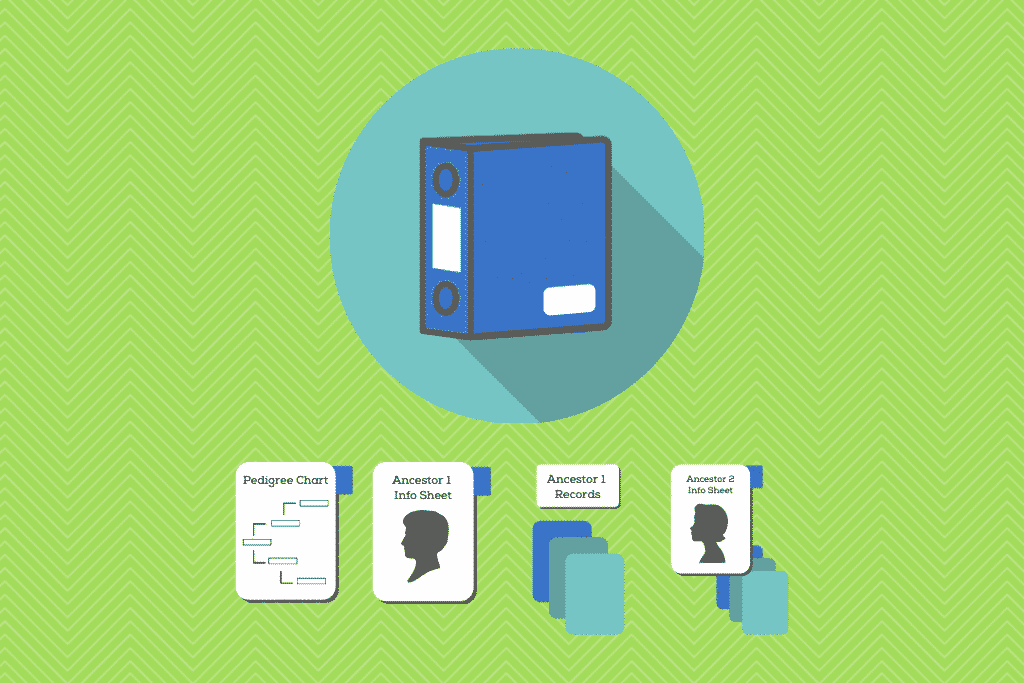
Binders are a great tool for organizing and sharing family history research. Not only can they can help you organize information for your own reference, but they are also a great way to share your discoveries in a portable, easy-to-understand format that other family members can flip through and enjoy.


Gather Your Supplies
If your binder is meant to be passed around and shared, you may want to opt for more durable materials, whereas if you intend on storing and archiving your binder you might consider archival-grade materials.
The amount and type of materials you will need depends on the goal and scale of your specific project, so you should determine those things first before buying supplies.
Set apart research materials (photocopies, printouts, written notes) relating to a single family line. Plan up to 100 pages of office-grade paper per 1-inch ring size, or 30 to 40 pages if using sheet protectors.
Here is a basic list of what you’ll need to begin your project:
- 3-ring binder
- document sleeves or sheet protectors
- tabs or dividers
- blank templates
Of course, you’ll also need to gather your research together and make sure you have all the information and photos you’ll want to include in your binder.
More Resources
MARGOT NOTE CONSULTING LLC
CYNDI’S LIST
GENEALOGY BARGAINS

Choose Your Organizational Method
This is the trickiest part! The best organizational method will depend on your goal and your unique family. Here are five filing systems we recommend:

Beginner’s Basic System
First, let’s start with a tried-and-true basic filing system: organizing around a single family line. This system uses one binder for each surname. Each binder begins with a pedigree chart, then is followed by a section for each ancestor in that chart. In each section are all the records for that particular ancestor, organized chronologically.
We’ll dive more into this system later. Let’s take a look at some other organizational systems:

Geographic Area Method
If you tend to sample a few records in this state and a few more in that country, try this trim, aerodynamic filing system. You store documents according to surname and geographic locality, then subdivide them by record group.
Surname Method
Here, you’ll sort the contents of your bulging surname files by making separate sections for the surname and type of record, such as “SIMMONS: Census,” “SIMMONS: Naturalization Records,” “SIMMONS: Passenger Lists.” Arrange these folders alphabetically by surname, then by type of record.

Married Couple Method
This file organization tactic coordinates your files for all the couples listed on your pedigree chart. But first you’ll need a family group sheet for every married couple on your pedigree chart.

Unusual Documents and Resources
Create separate sections for unusual resources, such as oral history interview transcripts, letters from modern relatives, or a relative’s memoir. Ideally, you should place original, one-of-a-kind items in acid-free file folders or boxes.
More Resources
MARIA’S FAMILY ARCHIVES
DO AS I’M DOING

Fill out a Pedigree Chart
If you’re following the beginner’s basic system, the first step is to fill out a pedigree chart. If your ancestors aren’t numbered, give them a number starting with the most recent and methodically working back. Also be sure to note second marriages, if applicable.
Step One: Write surnames in capital letters.
The all-caps approach lets you (or someone reading your charts) immediately distinguish last names from first and middle names.
Step Two: If you know middle names, spell them out.
Naturally, this helps you distinguish Grandpa William Randolph Reynolds from Grandpa William Robert Reynolds.
Step Three: Always record nicknames, denoting them in quotations.
Again, you want to show your ancestors’ full identities, so you can match up family history to the right relative.
Step Four: List women’s maiden names, not their married names.
Since you’re recording your female ancestors right next to their husbands, including their married names is redundant.
Step Five: Format dates as day, month, full year.
For consistency, genealogists write dates European-style, flip-flopping the American convention of month, day, year. To avoid any potential confusion, they also use the month’s abbreviation in capital letters instead of a numeral.
More Resources
SMARTDRAW
ROOTS TO BRANCHES
LUCIDCHART

Ancestor Information Sections
After you’ve completed your pedigree chart, it’s time to create the sections for your binder. Remember, in our example we’re creating a section for each ancestor. It is helpful to begin each section with some sort of fact sheet or bio that includes basic, at-a-glance information about that ancestor. Here are a few ideas to consider:
Ancestor Fact Sheets
Create a basic ancestor form that lists vital stats, marriages, children, and maybe a photo if you have one!
Short Ancestor Biography
Write a short synopsis of your ancestor’s life. Make sure that you use a consistent length and style, and include all the genealogically relevant information that you can.
Family Group Sheet
Depending on how your binder is organized, it may make more sense for you to being each section with a family group sheet. This form will track specific information on an ancestor and his or her nuclear family, including spouse and children. It will also help you keep track of details about relatives who aren’t direct ancestors — siblings, aunts, uncles, etc. — and assemble your full genealogy.
More Resources
CARDSTOCK SHOP
FAMILY HISTORY DAILY
ORGANIZE YOUR FAMILY HISTORY

Personal Record Inventory
Once you have gathered facts and biographical information for each ancestor, it’s time to create a personal record inventory. The purpose of this is to create a detailed list of each family member’s personal genealogy records. Include photocopies of any and all records you have for that ancestor in chronological order. Not only can you keep track of the records you have for each ancestor (and where you found them), but you can also notate if originals are stored elsewhere.
Be sure to follow the same system for all following sections. If you’d like, you can also include a list of what records are included at the beginning of each section along with the ancestor fact sheet.
Ask the Archivist: Organizing a Personal Record Inventory
Q: What kinds of physical materials do genealogical researchers collect?
A: It depends on the family. You might get original items handed down—actual wills or papers, letters, photos, programs, correspondence.
Q: Can we just three-hole punch papers and throw them in a binder?
A: You can, and some people do. But original materials such as documents and letters should be placed in archival storage conditions. Also, you don’t want to three-hole punch certain things—you might punch through the birth date on a vital record. Remember not to use staples or glue, either: When you alter an item, you risk changing the information on it.
Q: How do you work with research materials in different places, such as archival storage boxes, binders and a hard drive?
A: I do like to have everything in one place, so I digitize everything. It makes my research materials easily accessible. I have files for surnames and individuals. I create a personal inventory document on each individual so I know what I have on him or her—for example, a birth certificate, yearbook photo or letters. With everything in one place, I can see what I have, so I can write the family history story I want to write. And I still keep the papers stored away, but they don’t get handled.
Q: What if I don’t want to digitize everything?
A: There’s no reason you can’t do the same thing on paper. Just print out a personal inventory form for each person. You might be able to keep original documents in drop-in archival sleeves in a binder with your other research materials; it depends on what you have and what your preference is. Even if you keep originals separately in archival storage, you can place copies of them with your other research materials so all the content is together.
Q: What tips do you have for labeling research materials with source citation information?
A: If I digitize a document, I save it as a two-page PDF. Information on what it is and where I got it is on the second page. You can’t really separate the two pages, so the information won’t get lost. Also, my computer file names contain a lot of the source information. For photos, I can right-click to add information (in Windows, click on Properties, then Details, then add title, subject, tags and comments; with a Mac, use iPhoto software). With paper, if I have an article or something photocopied, I put it in a sleeve and then put a note on the back of the sleeve.
Q: What about backups of your research materials?
A: You do want to have a second copy of your research materials somewhere else—on a hard drive in another location, or online in “the cloud.” That way, you don’t worry about fires or floods. The same thing applies for paper copies: Keep an extra set in a separate location.
Amy Coffin
More Resources
VERNON AREA PUBLIC LIBRARY
NATIONAL INSTITUTE FOR GENEALOGICAL STUDIES
FAMILYSEARCH

Assemble Your Binder
Step One: Set apart research materials (photocopies, printouts, written notes) relating to a single family line. Plan up to 100 pages of office-grade paper per 1-inch ring size, or 30 to 40 pages if using sheet protectors.
Step Two: Place a pedigree chart in the front of the binder.
Step Three: Label tabbed dividers by ancestor (or family group, depending on what system you’re using).
Step Four: Sort your documents into tabbed sections. Consider placing materials related to an ancestor’s childhood in his or her parents’ family group, and putting materials related to marriage and later in the ancestor’s grown-up family group.
Step Five: Place family group sheets at the front of each section, along with personal inventory pages listing records you have for each person.
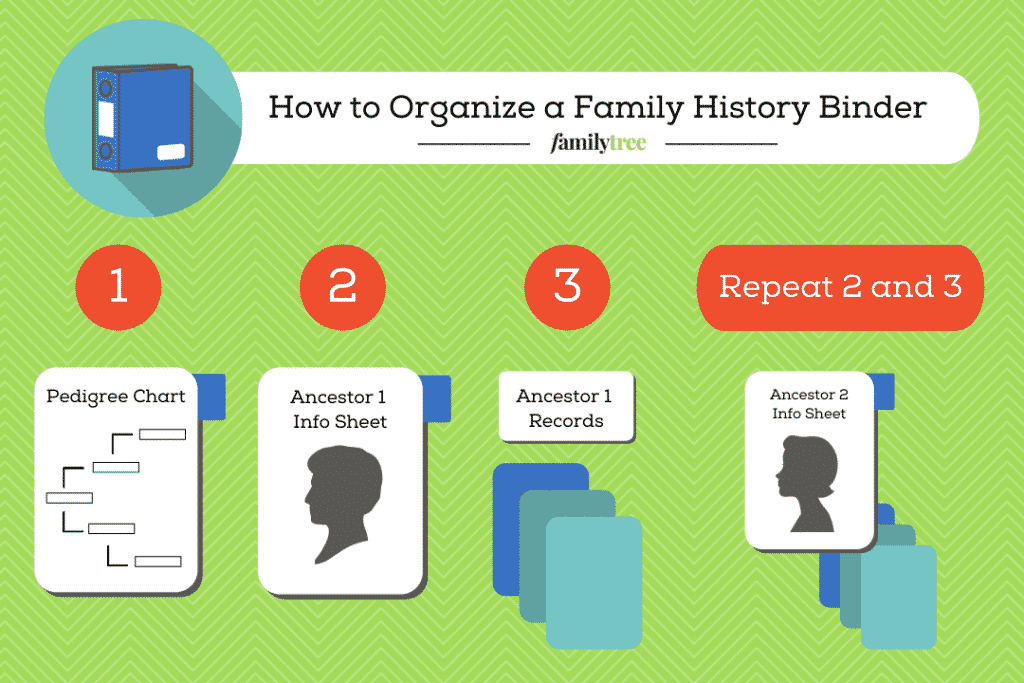
Step Six: Repeat steps 2 – 3 with all following ancestors in your pedigree chart.
Step Seven: Build out additional sections (you can see suggestions below for other sections and elements you can include).
Step Eight: Consider keeping sturdy original documents (8½x11 inches or smaller) in archival sheet protectors in a binder. For oversized or fragile documents, keep copies in a binder and originals in separate archival storage. (Note the location of originals on your personal inventory pages).
Step Nine: Save space and supplies by filing multiple-page or related documents in the same sheet protector. But don’t file fragile originals or materials of different types (such as photos and newsprint) together.
Step Ten: Make high-quality photocopies of deteriorating originals to preserve their content. Extra-dark or color copies may best capture fading handwriting or type.
Step Eleven: Label the binder spine with the family name.
Here are a few ideas for additional sections and elements you can include:
- a personal message from you
- a notes section
- a photos section
- maps
- timelines
And there you have it! Now you can proudly show off your completed project at the next holiday gathering or family reunion.
Sunny Jane Morton
More Resources
ORGANIZED FOR LIFE
THE FAMILY CURATOR
Four Tried and True Systems for Organizing Genealogy Research
FAMILY HISTORY IS FUN
Last updated: February 2021
FamilyTreeMagazine.com is a participant in the Amazon Services LLC Associates Program, an affiliate advertising program designed to provide a means for sites to earn advertising fees by advertising and linking to Amazon.com and affiliated websites.
Pin It!