Sign up for the Family Tree Newsletter Plus, you’ll receive our 10 Essential Genealogy Research Forms PDF as a special thank you!
Get Your Free Genealogy Forms
"*" indicates required fields
Sometimes figuring out who’s captured in your old black-and-white photos, and when and where those pictures were taken, is like playing a game of chance. Try to recall what Grandma said about it, guess at a year—and the photo might or might not be Great-grandma Clara and her sister, Imogene.
Mystery photos—the ones with no names, places, dates or events to go with the faces—inspire all kinds of questions. Who are those people, when were they alive and what can they tell you about your family history? Today’s your lucky day: Heed these 13 hints to match up the faces in your photographs with the people, places and dates on your family tree.
1. Gather tools of the trade.
The following basic gear will ease the ID process and protect your photos.
? Measuring tape: Compare your photo’s measurements to common sizes for various photographic processes. You’ll find size charts in my book Uncovering Your Ancestry Through Family Photographs, 2nd edition (Family Tree Books).
? Pens and pencils: Buy the right kind for marking names and dates on images—pens that are quick-drying, permanent and odorless when dry for plastic-coated prints, and soft lead artist’s pencils for others. Write only on the backs of photos.
? Scanner: This device enables you to easily enlarge photographs, copy them, and share them with relatives. For help buying the best scanner for your needs, see Rhonda R. McClure’s Digitizing Your Family History (Betterway Books).
? Worksheets: Use a photo-identification worksheet—you’ll find several in Uncovering Your Ancestry Through Family Photographs and the May 2005 Trace Your Family History (get this special issue of Family Tree Magazine at <www.familytreemagazine.com>)—to record your research, measurements and observations about each photo.
? Storage supplies: Protective sleeves, photo albums and storage containers should be made of polypropylene, Mylar or acid-and lignin-free papers. Stay away from “magnetic” albums with adhesive-coated pages.
? Cotton gloves: No matter how clean you think your hands are, wear gloves when you handle your photos to protect them from dirt and oils.
2. Ask questions.
If you don’t know who’s in an old portrait, maybe someone else does. Take your photos and a list of questions with you when you visit relatives. Though you should start with older family members whose memories go back furthest, be sure to visit several people. Information may have been passed down, and everyone remembers events differently.
Inquire about names, dates and places, but also talk about the occasion and the people in the photo—that’s how you’ll get the best stories. Ask to see your relative’s albums, too. Your second cousin Martha may have already-identified photos of the same people, or even duplicates of your pictures. Take along good-quality copies of your photos to leave behind, and consider a follow-up visit to tease out memories that surface after you leave.
3. Determine the method.
Photography evolved quickly after its introduction to the United States in 1839, so the type of image you have can give you a date range. Here’s a quick rundown.
? Daguerreotypes (1839 to 1860): These cased metal photographs have reflective surfaces; you have to hold the picture at an angle to see the image.
? Ambrotype (1854 to 1860s): You’ll usually find these glass images in a case. Sometimes part of the backing is missing, creating a hole in the image.
? Tintype (1856 to mid-1900s): This type of picture is printed on iron, so you may see rusty spots.
? Paper prints (1855 to the present): These photos have endured the longest and come in a range of sizes and hues. For dating help, see Care and Identification of 19th-Century Photographic Prints by James M. Reilly (Sterling Publishing Co., out of print).
4. Get on the case.
Fragile daguerreotypes and ambrotypes required protective cases, but you’ll likely see the durable tintype in a case, too, for decoration. The style of your case may help date the picture inside. Besides the photo itself, cased images consisted of a cover glass, a brass mat and a brass preserver strip that held everything together.
In the 1840s, cases had wooden frames and embossed leather, usually with a hook-and-eye clasp. Inside, a velvet liner was sometimes embossed with the photographer’s name and address. Papier mache cases, often inlaid with mother of pearl, also were popular at the time. Greek-and Roman-inspired designs such as the lyre were common, as were natural elements such as fruit, birds, marine life and flowers.
Samuel Peck patented the more durable union case, made of gum shellac and woody fibers, in 1854. It could be molded and dyed, and was available in a variety of shapes. Most surviving union cases are black or brown, but they also were manufactured in red, green, tan and orange. The pre-Civil War rise in Catholic immigration popularized cases with religious scenes. Patriotic designs increased during the war, and the availability of post-mortem photography gave rise to death-related themes. You also may see family depictions such as couples playing chess, and decorations based on famous paintings.
The brass mats changed, too. They could be fire-gilt, engraved or stamped; with frosted, marked, pebbled or sand-textured, then lacquered, surfaces. An octagonal shape was popular in the 1840s. In the 1850s, mats became more elaborate, with elliptical, nonpareil, double-elliptical, ornate-elliptical, oval and intricately bordered styles. Learn more about your cased images by comparing them to the descriptions in books such as Floyd Rinhart’s American Miniature Case Art (A.S. Barnes, out of print).
5. Get into positions.
The placement of people in a portrait can reveal their relationships. The dominant member of the family usually sits or stands in the center. Traditionally, this is the father or mother, but not always—it could be the person who arranged for the portrait, or the most successful family member.
Look at your portrait and consider the following questions: Who’s standing in the back? Are the children arranged in birth order? Is anyone absent? The answers can lead to an identification. For example, you may know the name of one child in a family portrait but not the rest. But if the children are posed in birth order, you might be able to identify them based on the people recorded on your family group sheets.
Positioning can help you date the image, too, since different poses were popular at different times. Vignettes from 1860 to 1870 were head shots, which showed the head and sometimes the shoulders of a subject. During other eras, portraits more often showed the whole subject. Cartes de Visite in Nineteenth Century Photography by William C. Darrah (Stan Clarke Military Books, out of print) is a good guide to photographic posing.
6. Go on a date.
On Aug. 1, 1864, the US government levied a tax on photographs. For the next two years, a photographer had to affix a revenue stamp to the back of every image. The law also required him to hand cancel each stamp with his name or initials and the sale date (though many professional shutterbugs didn’t comply with this law). If your family photo was taken during this period—hooray for you! Compile a list of ancestors who lived in the photographer’s hometown at the time, and note their birth dates. Anyone who’s the right sex and age when the photo was taken is a good candidate for your mystery subject.
Pay attention to postage stamps, cancellations and addresses on picture postcards (popular during the first half of the 20th century) and photo-mailing envelopes, too. Since a photo may have been mailed long after it was taken, compare the date to clues from clothing and props. Use stamp-collecting guides to date postage.
7. Investigate imprints.
An imprint usually identifies the studio, photographer or publisher of the image by name. Use the information to trace when and where the picture-taker was in business, and you have a time frame and location. Sometimes imprints include the business address, a list of services offered, awards received, a patent date or a logo. The imprint might be scratched into a cased photograph’s glass plate or brass mat, or embossed into the velvet liner. It may be stamped, embossed or handwritten on the mat of a paper print. A card photograph can bear an imprint on the front or back of the card.
Look up the photographer in local city or business directories, newspapers, almanacs, mug or booster books (biographical encyclopedias of important community members), photography magazines and census records. If the imprint includes the address and a business name, rather than the photographer’s name, use a house directory to get the name of the studio owner. Listings are arranged by street name, followed by house or building number and the occupants’ names. Your local public library probably has directories and newspapers for your city or town; large libraries often have directories for several cities.
Regional directories of photographers can save you some time and effort. You’ll often find these at historical society libraries, or consult the worldwide bibliography of published photographer lists in Photographers: A Sourcebook for Historical Research, 2nd edition, edited by Peter Palmquist (Carl Mautz Publishing). Also try the Web site Finding Photographers <www.findingphotographers.com>. Keep in mind an imprint doesn’t always refer to a photographer—it can be the name of a publisher or distributor of a mass-market print.
8. Get a clothing clue.
Fashion is always changing, and our ancestors’ desire to keep up with the times makes their attire one of your handiest photo-dating tools. The basic elements of women’s clothing remained the same during the 19th and early 20th centuries, regardless of economic status. Women almost always wore dresses. Look at details—the bodice, neckline, sleeves, and skirt—as well as accessories such as gloves, jewelry and bonnets or hats. Graduation photos of young women show them dressed entirely in white, including their shoes. During pregnancy or while doing housework, women wore loose dresses called wrappers. Black crepe on a woman’s collars and cuffs indicated she was in mourning. Recent widows wore all black, while those in extended mourning could sport light accessories with black dresses.
During the same time period, a man’s dress outfit generally consisted of coat, shirt, trousers, tie and maybe a vest. For work, a man usually wore a collarless shirt, no tie, pants, suspenders and sometimes a vest. Study the style of hats and vests, as well as color and patterns of shirts.
Children’s clothing, for the most part, resembled adults’ outfits. Babies of both sexes wore long dresses; toddlers’ dresses were short enough to permit movement. You can tell little boys and girls apart by their hairstyles: Girls usually wore their hair parted in the middle, and boys’ was parted on the side. A girl’s skirt became gradually longer as she approached adulthood. Once they passed toddlerhood, boys wore short pants until they were teenagers.
Immigrants often abandoned ethnic dress upon arrival to look less like newcomers. But they might have retained details to remind them of their homeland. Look for examples in Augustus F. Sherman: Ellis Island Portraits, 1904-1920 by Sherman and Peter Mesenholler (Aperture Books).
For more details on your ancestors’ clothing styles, see the August 2004 Family Tree Magazine, as well as Joan L. Severa’s Dressed for the Photographer: Ordinary Americans and Fashion, 1840-1900 (Kent State University Press). Get more help from historical fashion Web sites, including the Costume Society of America <www.costumesocietyamerica.com> and Past Patterns <www.pastpatterns.com>.
9. March to military resources.
Uniform details and insignia can tell you when your military ancestor served, as well as his branch, unit, rank and campaigns he participated in. Although he may have missed major conflicts, most men either volunteered or were drafted for significant wars, including the American Revolution (1775 to 1783), War of 1812 (1812 to 1815), Mexican War (1846 to 1848), Civil War (1861 to 1865), Spanish-American War (1898), World War I (1917 to 1918), World War II (1941 to 1945), and modern conflicts such as Korea and Vietnam. (For a timeline of US military engagements, see the September 2005 Family Tree Sourcebook, a special issue of Family Tree Magazine—order it at <www.familytreemagazine.com>.) The American Revolution and the War of 1812 predate the advent of photography, but you might have images of veterans in uniform.
By the way, don’t rule out photographs of women. They served as wartime nurses and formed groups such as the Civil War-era Soldier’s Aid Society. You might have albums showing your grandmother during World War I, when she served doughnuts to soldiers with the Red Cross.
Uniform changes over the years can make photo-dating a challenge. During the Civil War, many Union volunteers wore belt buckles emblazoned with the state of enlistment. Confederate soldiers’ buckles could be engraved with CSA for Confederate States of America. Keep an eye out for the following costume details.
• Headgear: Long-crowned kepis (hats) dominated Civil War uniforms. By the mid-1880s, hats were smaller and tilted. Plumed, spiked helmets were part of dress uniforms from 1872 to 1904, as you’ll learn in A Guide Book to U.S. Army Dress Helmets, 1872-1904 by Mark Kasal and Don Moore (North Cape Publications). WWI soldiers wore government-issued “overseas caps.”
• Shirts and pants: Reuse can make it difficult to pinpoint dates for Civil War-era uniforms. Compare your pictures to images in reference books and add up all the clues—type of image, photographers’ dates and family information—to see if they agree.
• Decoration: A full-dress uniform includes medals, braids, ribbons and sashes, depending on the time period. Chevrons on sleeves and shoulders, and insignia on the collar or headgear, signified rank. Starting in 1863, badges or pins worn on the headgear identified the soldier’s corps. In the Navy, hash marks (cloth stripes) on the sleeves show years of service.
• Weapons and equipment: If the soldier posed with his gear, look carefully at the type of sword or firearm in addition to everyday equipment, such as canteens. A man carrying a carbine—a light shoulder rifle with a short barrel—was probably part of the cavalry, while a pistol could indicate an officer.
• Veterans group insignia: Examine your photograph with a magnifying glass and you might see a lapel pin for a veterans group such as the Grand Army of the Republic or Veterans of Foreign Wars. A group portrait with Mount Vernon in the background could be a Grand Army of the Republic reunion picture—many Civil War veterans groups visited George Washington’s home.
Libraries are full of uniform reference guides such as Military Fashion: A Comparative History of the Uniforms of the Great Armies from the 17th Century to the First World War by John Mollo (Barrie and Jenkins, out of print). You also can contact a chapter of the Company of Military Historians <www.military-historians.org>—its members study US military equipment and uniforms.
10. Find a family resemblance.
Some clans have a “family chin” or unique nose. Those who inherited the protruding ears might not be thrilled—but you’ll be, since those are clues to who’s related in your photos. Distinguishing people by facial characteristics can be difficult, since appearance changes with age and weight gain or loss, but it is possible. Inspect the faces in your photographs and create a table of unique features—a cleft chin, high forehead, square jaw—with the names and family branch of people possessing each characteristic. Trace a photocopy of a family portrait and reduce the tracing to the scale of the photo you’re trying to identify. Then compare the shapes of jaws, ears, noses and foreheads to see whether the mystery person resembles a particular family.
If you have a few suspects in mind for your unidentified image, compare it to known images of those people. Look especially at the shapes of eyes, noses and mouths, which change relatively little over time. Notice eye color, too—even in a black-and-white photo, you can tell if a person has blue or brown eyes.
11. Prop up your evidence.
Studio photographers placed customers in settings using backdrops and props, such as toys, books, flowers, drapery and columns. People also could bring their own props—a woman posed in mourning clothes with a man’s photograph may be a widow; a child holding a rosary may have just celebrated his first communion. Or an ancestor might have posed with his or her occupational implements, such as a doctor’s bag or milkmaid’s bucket.
Photography studios began employing artists to paint backdrops (similar to ones used in theaters) in the 1840s, coinciding with the popularity of the daguerreotype. Frontier scenes, landscapes and architecture were popular backdrops in 19th-century images.
Study backgrounds for buildings and objects that can help date and place your photograph. Look for the same features in your own and relatives’ photo albums. Learn when various architectural details were popular by consulting local histories and books such as A Visual Dictionary of Architecture by Francis D.K. Ching (Wiley), and by comparing your photo to those in historical society collections. For advice on investigating buildings, see Sally Light’s House Histories: A Guide to Tracing the Genealogy of Your Home (Golden Hill Press) or visit <www.pbs.org/opb/historydetectives/diy/building.html>.
Cars, toys and appliances—with their changing styles—can help you estimate a date. Check out manufacturers’ Web sites and look for antiques manuals. Learn more about props in books such as Treasures in Your Attic by Joe L. Rosson and Helaine Fendelman (HarperResource) and Ralph and Terry Kovel’s Know Your Collectibles (Random House Reference).
12. Consider a merger.
The stereotypical portrait of a bride and groom doesn’t always exist for weddings in the 19th and early 20th century—the style, importance and look of wedding photographs were different for our forebears. That means you may have wedding pictures in your family collection and not recognize them for what they are. Try to match up the post-1839 marriages on your ancestor charts with photographs in your collection, and you may learn a mystery couple’s identity.
Don’t rely on clothing to tell you what’s a wedding photo, since purchasing a white dress to wear just once was too expensive. Many couples simply donned their best outfits. Queen Victoria popularized the white wedding dress when she married Prince Albert in 1840, but it wasn’t commonplace until after the turn of the century. Colors varied from blue, signifying fidelity, to purple, a memorial to Civil War dead. In the 1870s and 1880s, fashion-conscious brides selected colors of the new synthetic dyes, such as brown. Frugal Victorian brides who chose white often altered their wedding dresses later for special occasions, so look for the same dress in other images.
Brides usually sported certain accessories, such as veils, flowers and bows, regardless of their dress selection. According to a 1901 etiquette book, a young woman could wear her first tiara at her wedding. Orange blossoms remained popular for decades after Queen Victoria carried them down the aisle. Even grooms attached small sprigs of flowers to their coats.
The tradition of a bride taking the plunge in her mother’s or grandmother’s wedding dress is long-standing, so be careful when estimating dates. I once saw a photograph showing the groom in a 1930s suit, but his bride’s gown dated to the late 19th century. She’d updated her look with a new veil. Examine each element of a bride’s outfit to see whether her dress and her accessories date from the same time period. Consult fashion books such as Severa’s and compare your wedding photographs to other images from the same era. You can find examples of well-dressed bridal parties in magazines such as Godey’s Lady’s Book (1830 to 1898) and Brides (1934 to the present), which are at many libraries.
13. Seek outside assistance.
Pay a visit to a library, historical society or museum in your ancestor’s hometown. Those organizations probably have photo collections, early newspapers and magazines, and county histories that can add context to your pictures and help you identify places. For example, do you have a shot with a particular building or street in the background? The local historical society might have images of the same location—with identifying captions. Is some kind of festival happening in your photo? Look for newspaper articles on town celebrations. If your portrait bears a photographer’s imprint, read up on his business and find out whether the library has other prints from the same studio. You may discover pictures of your ancestors they opted not to purchase.
If your ancestor was a Mason, railroad worker, student or member of an organization, use a Web search engine (such as Google <www.google.com>) to find related museums or societies that have photo collections. The National Railroad Museum <www.nationalrrmuseum.org> in Green Bay, Wis., for instance, has pictures showing railroad equipment and employees. Live too far away? Search for online image collections such as the Wisconsin Historical Society’s <www.wisconsinhistory.org/whi> and the Library of Congress’ <memory.loc.gov/ammem>.
Photo-reunion sites such as DeadFred <www.deadfred.com> and Ancient Faces <www.ancientfaces.com> are full of photos that researchers want to identify, return to their rightful owners or simply show off. Cyndi’s List links to such sites at <www.cyndislist.com/photos.htm#lost>; visit any related to surnames or places you’re researching, or groups an ancestor belonged to. Search the auction site eBay <ebay.com> for family names and places, too—what turns up might surprise you.
Visit message boards and sign up for mailing lists dedicated to your surname and ancestral locales. You may be able to post a mystery image; at the very least, you can inquire about a local photographer or ask whether anyone has photos of your relatives. Find boards and lists at GenForum <genforum.com>, Ancestry.com <boards.ancestry.com> and similar sites.

After you’ve studied your photo, keep our 13 tips in mind and compare what you’ve learned to the information on your family group sheets. In this case, you’d look for a young woman who lived—and was married, possibly—in Rhode Island during the early 1900s.
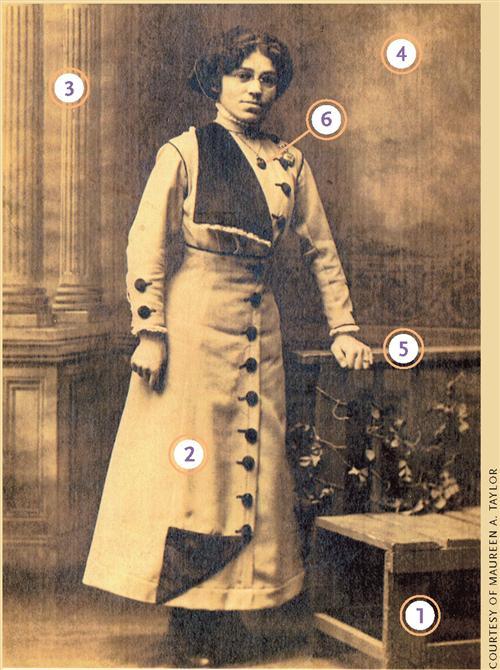
1. City directories reveal the studio named in the imprint (not visible here) was open from 1903 to 1940.
2. The fitted dress with a high neckline, ankle-length skirt and large buttons dates between 1910 and 1916.
3. Photographers began using painted backdrops after 1840.
4. Photographic postcards such as this one became available at the beginning of the 20th century.
5. A pose emphasizing the woman’s ring suggests this is a wedding portrait.
6. A relative might recognize—or even own—this locket.
Just in Case
If your mystery image comes in a case, don’t study just what’s in the photo-cases such as this one bear important dating clues, too.
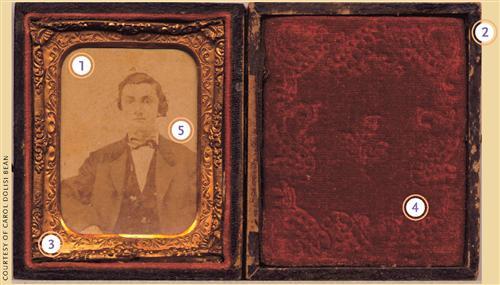
1. Since this case is missing a glass cover, it’s easy to tell the photo is a paper print.
2. Wood-framed cases such as this one were popular in the 1840s and 1850s.
3. This elaborately decorated brass mat is typical of 1850s cases.
4. Velvet liners occasionally bear photographers’ imprints. This one is embossed with a scroll pattern, but lacks an imprint.
5. This man’s loose-fitting sack coat with a velvet collar, patterned vest and white shirt are from the late 1850s. The date agreement suggests this photo is original to the case.
ADVERTISEMENT
