How to Put Your Photos and Family Tree on Famberry
By David A. Fryxell Premium
Sign up for the Family Tree Newsletter Plus, you’ll receive our 10 Essential Genealogy Research Forms PDF as a special thank you!
Get Your Free Genealogy Forms
"*" indicates required fields
You don’t have to be British to sign up for the new Famberry family-sharing site, but if 2GB of free photo storage appeals to you, it might become one of your “favourites.” A hybrid of family tree hosting, social media sharing and online storage, Famberry works best for connecting current kin.
But a little fiddling can make Famberry do basic family tree tasks even as you’re filling up those gigabytes. Under Options, a Famberry Search lets you enter a name or surname to find possible matches in others’ trees. Info on hits includes last name, number of occurrences, birth year, location and family tree. Free basic accounts get up to 50 searches, but contacting others about matches costs $5 each. Premium membership ($67 a year) gives you unlimited searches and free contacts, plus lets you create up to 16 different trees. Here’s how to get started.
1. To sign up, click the Get Started button at the upper left of Famberry’s welcome screen, then supply your name, email address and a password. The name you use will be at the base of every tree you create. Once you verify your email address, you can start filling in facts and uploading photos. To just take advantage of the free storage, click the Photos icon at the bottom left and choose Add Album.
To build a family tree, choose Import GEDCOM File under Admin. Be aware, though, that Famberry is finicky about its GEDCOM file formats and may reject what your genealogy software produces. Once you’ve started a tree, you’ll also look under Admin to export a GEDCOM file and set permissions for each tree—so, say, Cousin Ethel can view your tree but not mess it up.
2. If you don’t have a GEDCOM, start adding family members manually. Hovering over an individual on your tree brings up options to modify the person’s details, upload a photo or add related people. You also can click on the individual to view and modify information. (For ancestors entered as “partners”—Famberry doesn’t call them spouses or require that they be of a different gender—this is the only way to modify details or add life events.)
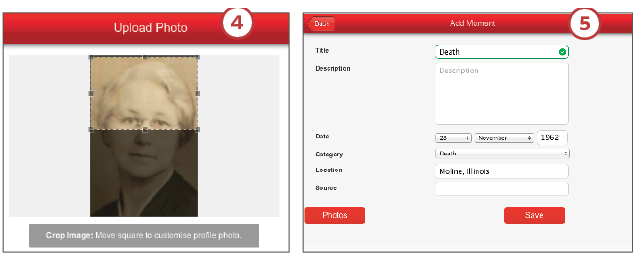
3. To illustrate an ancestor’s spot on the tree with a photo, select Upload Photo from the floating menu (you can replace the current image by checking Reset Photo from the profile screen). Then either drag and drop the photo file or click the Photos button to select one that’s on your computer.
4. You’ll have to position a crop box to select the best part of your ancestor’s face to display on Famberry’s trees, which use horizontal images (even though portraits are usually vertical). Clicking the Photos link at the bottom of an ancestor’s profile screen lets you create an album for that person with more photos.
5. It takes an extra step to enter standard genealogical information about an ancestor beyond his or her birth date and place. From the profile screen that shows when you click on an ancestor, click the Timeline button at the bottom and then select New at the upper right to create an event. Famberry’s softer storytelling focus comes through here in the initial suggested event, “First day at school.” But the Category dropdown includes such standard options as marriage, immigration, census and death, and you can fill in location, date (using a dropdown for day and month) and description. Events entered this way show up on the person’s timeline, and death dates are added to the main profile screen.
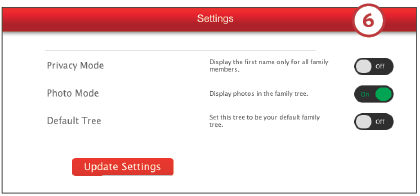
6. The Settings menu has a Privacy Mode to display only first names of those on your tree, as well as a Photo Mode that allows for images. Famberry’s handling of marriages means there’s no way to add Mom’s own ancestry to your tree for Dad. (Nor was there any way at press time to deal with multiple spouses, though Famberry says it will have fixed that by the time you read this. GEDCOMs with multiple spouses import correctly, in any case.) The workaround? You’ll need to look under Family Tree and select Show Family Trees (which, confusingly, displays only the trees other than the one you’re currently viewing). Click the New Tree button. You’ll again be at the bottom of the new tree—and can’t be removed. Click on the automatic Father and Mother buttons to switch their genders (filling in their names while you’re at it), as the person on the left (Father by default) is the one who can have ancestors added; the “partner” on the right is a genealogical dead end.
Once you’ve created some trees and uploaded photos, it’s time to get the rest of the family involved. You can send an invitation to any relative for whom you’ve supplied an email address by clicking on his or her profile screen. (My effort to invite my late grandfather using “victor@heaven.com” failed, however, so this feature may still need some work.) You also can message individual family members or the whole clan using the talk-bubble link at bottom left—perfect for keeping folks informed about your latest genealogy discoveries or planning that family reunion. If you find yourself messaging about what color the reunion invitations should be, you’ve really gotten into the Famberry spirit.