Sign up for the Family Tree Newsletter Plus, you’ll receive our 10 Essential Genealogy Research Forms PDF as a special thank you!
Get Your Free Genealogy Forms
"*" indicates required fields

At a recent genealogy conference, a gentleman walked up to me after my Google Earth for Genealogy class and declared, “You know, 20 years ago we had to have security clearance to use this technology!”
His statement reconfirmed my belief that Google Earth Pro offers powerful tools that we, as genealogists, need to harness. Geography and genealogy go hand in hand, and Google Earth has some of the answers to the challenges we face in our research.
Here’s how Google Earth Pro can help you solve three pesky genealogical problems. To prepare for liftoff, start by downloading the program at Google Earth Pro.
1. How can I locate an ancestral home today when so much has changed over time?
Solution: When working with the census, city directories and other genealogical records, you’ll often find the address of a home where your ancestor lived.
Take flight to that location by simply typing the address into the Fly To box in the Google Earth Search Panel. But what if you discover, upon arrival, that the house has been replaced by a parking lot?
Google Earth offers a treasure trove of historical maps buried in the Layers Panel. You can overlay these historical maps onto the present-day map, providing a glimpse into the past. For example, according to a 1905 San Francisco city directory, my great-grandparents lived at 1144 Kentucky St. But when I typed the address into the Search Panel’s Fly To box, the closest result was 20 miles south — confirming that Kentucky Street either no longer exists or has been renamed.
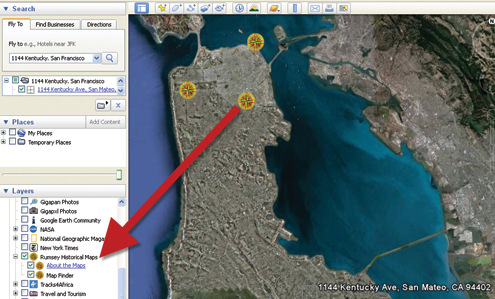
To travel back in time, genealogists can tap into the Rumsey Historical Maps overlay, located in the Gallery of the Layers Panel. Click to select the Rumsey Historical Maps box, and navigation icons will appear on the map if historical maps are available for that location.
Hover your mouse over the icon to reveal the date of the map. In this case three maps are available. I selected the 1915 San Francisco Map overlay because it was map dated closest to 1905.
Clicking on the icon brings up a pop-up window with an image and details about the historic map. To overlay the map on Google Earth, I just clicked on the map thumbnail image.
Close inspection of the 1915 map revealed that many streets on the western side of the city were named for states. And sure enough, Kentucky Street was among them. To identify the current street name for the road that was once Kentucky Street, I clicked the check box to activate the Roads layer in the Layers panel.
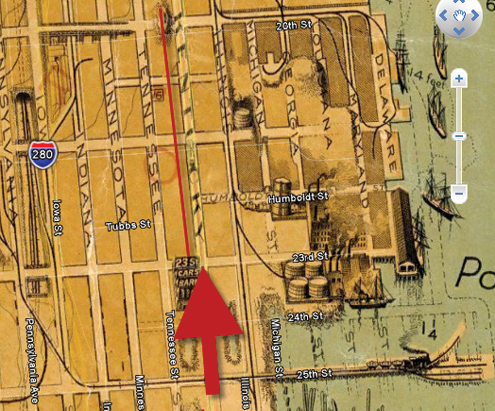
The modern map merged with the 1915 map to show me the location of my great-grandparents’ home today: Third Street near Potrero Point, an industrial area.
2. How can I tell where a family photo was taken?
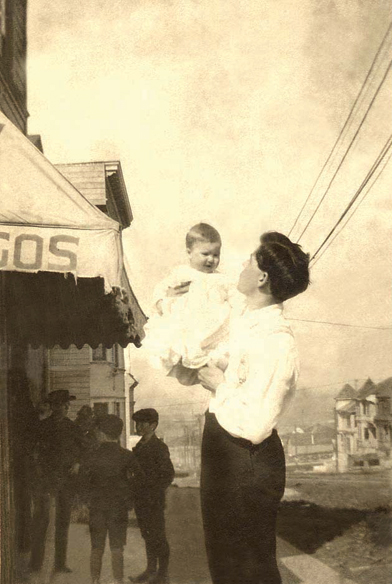
Solution: Every genealogist has at least one photograph in his or her collection that can’t be fully identified. In my case, it was the image of my great-grandfather holding my grandfather (see the opposite page). Though I knew who the people are, I didn’t know where exactly the photo was taken. Here’s how I used Google Earth’s Street View to find my great-grandparents’ home and identify this vintage photo:
A: Note the known facts about the family and where they lived.
In this case, I know:
- The family lived on 1144 Kentucky St. in 1905.
- The Great San Francisco Earthquake and subsequent fire occurred April 18, 1906.
- My grandfather was born June 29, 1906.
- The family lived on 288 Connecticut St. in 1910.
B: Make educated guesses about the photograph:
- The baby looks about 6 months old, dating this photograph to around January 1907.
- The family may have moved due to the earthquake.
- Considering their attire, this photograph may have been taken outside the family home.
C: Fly to each known address using Google Earth.
We’ve already identified Kentucky Street as an industrial area, even back in 1915, and this photograph looks more like a residential neighborhood. A quick search for 288 Connecticut Street shows that it fills the bill.
D: Shift into Street View by opening the Layers Panel and clicking Street View.
If Street View images are available, small camera icons will appear. If they don’t appear at first, zoom in closer. I selected the icon that would most likely offer me the same vantage point as the original photo. Zoom in and the icon will become a bubble representing 360-degree photographs taken at that location. Double-click the bubble and Google Earth virtually zooms inside of the bubble into Street View.
Within Street View, click and grab the image and spin around to see everything from that position — as if you were standing there yourself. You may notice other camera icons along the street. To view the street from any of those positions, double click on an icon and you’ll be transported to that location. The address of the viewing location will appear in the upper right corner of the viewer.
E: Look for uniqueness.
Search for unique identifying characteristics that coincide with the photograph. Is there an empty lot next door? Unique architecture on a building? A house number?
In my photograph, I notice that the street slopes down into the distance. A quick review of Connecticut Street in Street View showed clearly that in one direction the street slopes upward, and the other downward, identifying the side of Connecticut to focus on.
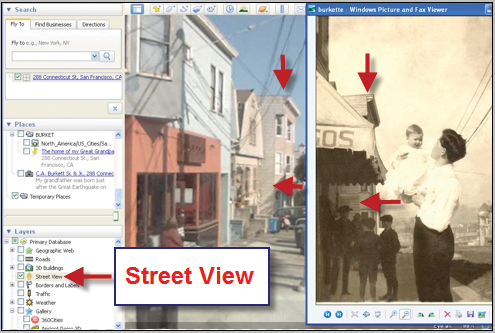
Using the photo as my guide, I looked down the left side of the street, keeping an eye out for distinguishing building elements. It didn’t take long to notice a tall building with a similar roof overhang as the one in the photo. Soon I was able to match up several points on each of the images and confirm it was the same location.
3. It’s hard to visualize the “big picture” when researching your family.
Solution: Maps can reveal patterns, terrain and other key factors that can give you a better understanding of your ancestors’ lives and provide clues to the next place to look for them. By combining documented information about an ancestor with Google Earth, you can create what I call a Family History Tour Map that includes:
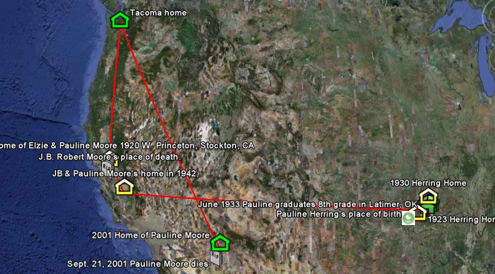
- icons representing life events such as births, school, marriage, residences, ports of immigration, deaths
- photographs of the family
- stories about them and where they lived
- paths of their movements over time
- overlays of historical maps and images
All of the elements of your tour map will be saved to one folder within your Places panel. Here’s how to create a Family History Tour Map folder:
- Open the Places Panel.
- Click on My Places.
- Right click on My Places and select ADD — Folder.
- Name the folder.
- Type additional details into the Description box.
- Click OK. The folder now resides in your My Places folder, and the box next to it will be checked, indicating that each step from this point will be saved to this folder.
Next, you’ll add life event icons for your family to the tour map folder. Here’s how:
- Fly to the location where the life event occurred.
- Click the Placemark icon on the toolbar.
- A New Placemark box will appear.
- Type a name for the event in the Name field.
- Enter a detailed description of the event or a story related to the location in the Description tab.
- Click the icon button in the top right corner of the box to reveal an assortment of icons.
- Click the icon that best represents the life event, or add your own icon to the Custom Icon Gallery.
- Adjust the color, scale and opacity of the icon if desired
- Click OK. The life event now appears in the Family History Tour Map folder, located in your My Places folder in the Places Panel.
The simplest way to add a photo to a life event icon on your map is to host your photos on a photo-sharing website such as PhotoBucket, which automatically generates the HTML code you will need. Follow these steps to add photos:
- Upload your photo to PhotoBucket.
- Hover your mouse over the image to review the dropdown box.
- Click the HTML code field and the code will automatically be copied.
- Open your map in Google Earth.
- Right click the icon that you want to associate the photograph with to open the Edit Placemark box. On a Mac press Control and click on the icon to open the box.
- Paste the HTML code into the Description field.
- Add additional text or story if desired.
- Click OK.
- Click on the icon and the image and text will appear in a viewing box.
Next time you’re looking for family history answers, consider using tools outside the “made for genealogy” universe. Genealogy’s geographical problems can make your head spin, but Google Earth can help you keep your feet on the ground.
Tip: An invalid address doesn’t necessarily mean the building you’re looking for has been demolished. The street it’s on may simply have been renamed. Finding the street on a historical map can help you identify its current name.
A version of this article appeared in the January 2011 issue of Family Tree Magazine.
Related Reads


ADVERTISEMENT