Sign up for the Family Tree Newsletter Plus, you’ll receive our 10 Essential Genealogy Research Forms PDF as a special thank you!
Get Your Free Genealogy Forms
"*" indicates required fields
Part 2: 5 Elements to Include in Your Photo Book
Family history photo books are an inexpensive, crowd-pleasing way to share your family history. They also don’t require a huge amount of effort. A weekend’s worth of gathering, organizing and formatting can produce a gorgeous, professional-looking book. In fact, within a matter of days, you could have several copies of a priceless family keepsake to give as holiday gifts—or the perfect conversation piece to keep on your coffee table.
Photo books that share your family history contain five basic elements:
But before describing each individual element, it’s worth briefly addressing copyright protection, which may apply to images, maps, book text and other materials you may hope to use in your photo book. Another article you can read, “How to choose high-quality images for your book,” addresses copyright for images in more detail. I also recommend you read “Understanding Website Copyright Laws,” and the other articles to which it links. These will help give you an understanding of what you can appropriately download or copy for your own book.
1. Photos
Since you’re making a photo book, images are paramount, so it makes sense to talk about them first. Hopefully, you have images of the relatives you’re writing about, if they lived during or after the Civil War (during which time photographs of people became much more common).
Here are other photo subjects to consider, if they’re available from relatives or online:
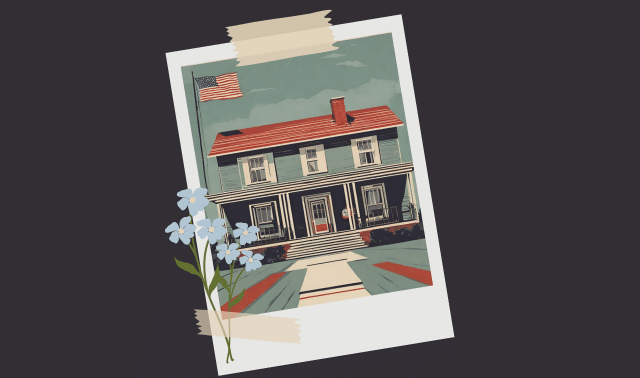
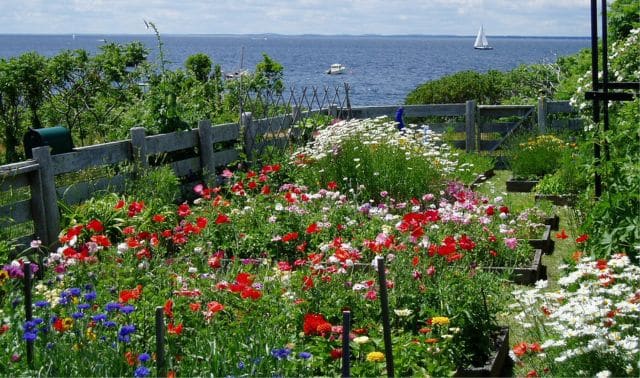
- Family homes, outbuildings and acreage;
- Family burial grounds or tombstones (be sure you have written permission to use any images you’ve found online);
- Businesses, churches, schools, military sites or other significant institutions or places with which your family was connected;
- Photos of family memorabilia or artifacts, such as clothing, quilts, handcrafted items, a family Bible, medals or trophies, or other items that have been passed down;
- Photos you find online of vintage items the family owned, used, or loved: a vehicle, type of livestock, sewing machine or other household appliance, household goods, etc. (Ancestry.com has digitized the old Sears Catalogs from which our U.S. ancestors shopped; these catalogs are a great resource for product images.)
If you’re short on images—and many people are—Google is a wonderful resource for finding them. Start by entering search terms relating to the images you hope to find. You could try looking for images of a relative who may have been well-known or well-documented. More likely, you’ll have better luck looking for places or institutions. For example, Maureen Taylor wrote a short but inspiring article on finding an image of the ships on which her ancestor served during the Civil War. Or simply Google the name of an ancestral locale and add the word history.
How to Search for Photos on Google
- Type the search terms and hit Enter.
- Choose Images to limit your results to thumbnails of images, as shown above.
- If you’d like to further refine your search, click Tools. Then:
- Under Usage rights, select Labeled for reuse if you only want to see items that have been earmarked as not copyright-protected (although you’ll want to confirm this yourself).
- Under Full color, select Black and white to limit your search results to black and white images, which are likely to be older.
If you don’t already have good digital copies of images, scan them with a flatbed or portable scanner. For best results, scan them at 300 dpi or higher. Use a higher resolution for images that you may want to enlarge or crop on a photo book page, and if you are creating archival-quality photo files you’ll want to use in the future. Save these archival-quality files as TIFFs, if you can, since they better preserve your data over time and repeated use of the files.
For creating photo books, though, your images will likely need to be the more commonly-used JPG file type, so you may need to save a copy of your archival TIFF file as a JPG. Do this by uploading a copy of the file to the free conversion tool at Online-Convert.com.
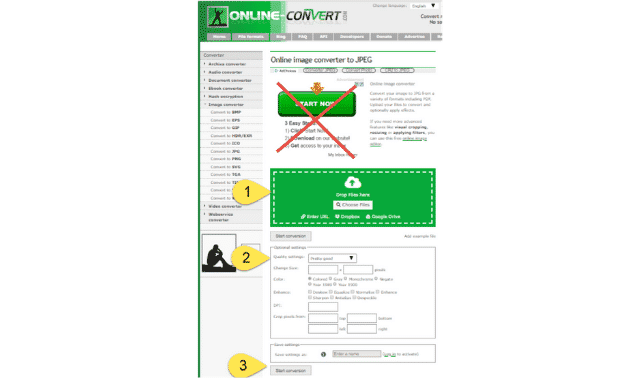
Just be sure to ignore the many free ads on the page that look like the tool itself, like the part that’s crossed out in this screenshot. Then follow these instructions:
- Upload your image or PDF file here that needs to be converted to a JPG.
- Choose the best quality option.
- Click Start conversion.
- Another screen will appear when the conversion is done. Again, ignoring the ads, click Download.
If you don’t have a scanner, call your public library or a local Family History Center to see if they have a scanner you can use. If you’ve got images that are faded, spotted or torn, read this article on how to fix them.
2. Genealogical data
Even the most photo-oriented heritage album benefits from the inclusion of text, and foundational to many books should be genealogical data. Names, places, dates, family names and relationships—all may find a home scattered throughout your book, in photo captions, narratives and other text you write.
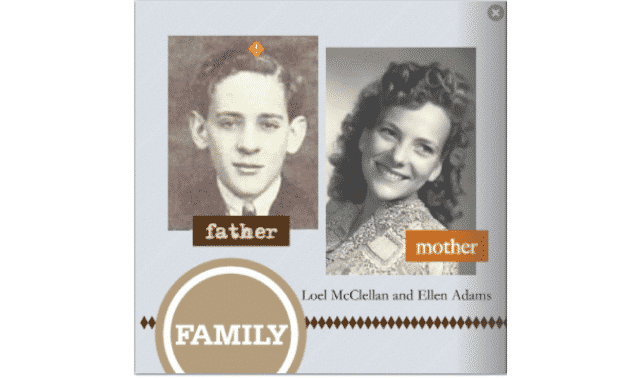
How much genealogical information you include will depend on the size and scope of the book you’re doing—and also on your audience. I found it awkward to insert information on my dad’s birth (and his parents’ births) in a book created for him. He knows that information. But it’s true the project would have more permanent genealogical value if I would have inserted his parents’ birthdates and places (along with their parents’ names) on this page about them:
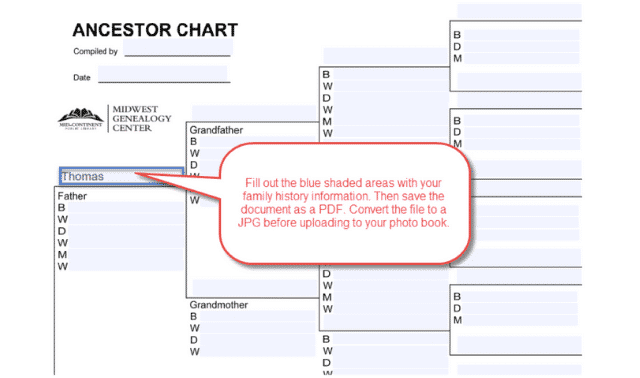
Charts and Family Group Sheets
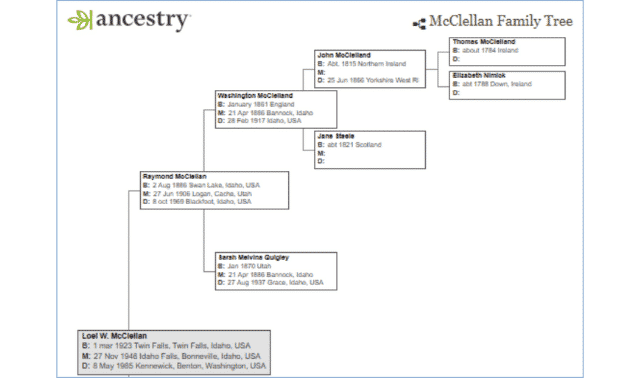
If you want to include pedigree charts or family group sheets in your photo book, your family history software may be able to generate them in PDF format (for example, the full version of RootsMagic software will do this, but not the free version). To convert PDFs to JPGs, making them photo book-ready, use the same free conversion tool at Online-Convert.com. Consider the fact that your image will need to fit on the album page: the smaller type found in your charts may best reproduce at a large album size, such as a 12” x 12.”
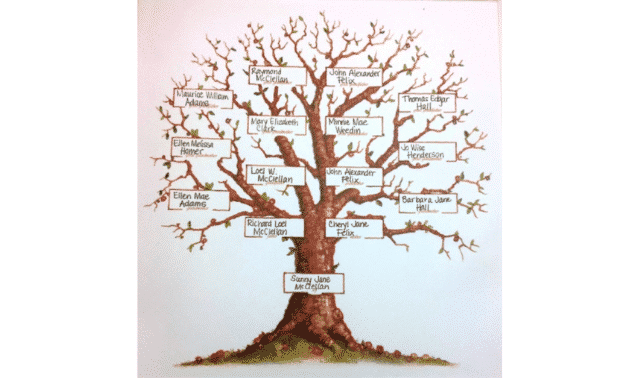
I just wanted a basic family tree display on my paternal line, which I could generate easily from my tree on Ancestry.com. I wanted the tree to begin with Loel McClellan, so I clicked on his profile and then chose View in Tree, then Print. You can also create quick, custom pedigree chart images by finding fillable PDF pedigree forms online.
Ancestor Timelines
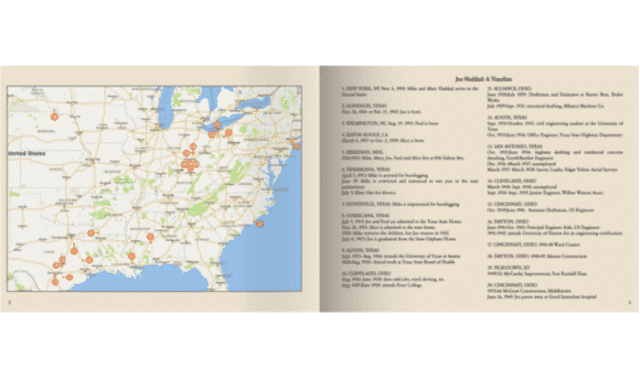
Another way to visually show events in your ancestor’s life is with a timeline. Former Family Tree Magazine Editor Diane Haddad created a photo book about her grandfather’s life. “Timelines organize an ancestor’s or a family’s family tree data—dates, places of residence, jobs, historical events, children’s births—in an orderly fashion. I love them.”
Her grandfather moved around a lot, so she created a map showing his many places of residence (read more on using maps below).
You can create a basic timeline in your word-processing program. Don’t bother with too much formatting, as it likely won’t show up when you copy it into a text box in your photo book. Instead, plan to use simple text formatting tools you’ll find in your photo book creation platform, such as using bold text, a different font or a different font size to set off dates from the text.
Another option is to take a quick screenshot of the timelines automatically generated by your family history software or favorite online tree-builder, such as MyHeritage or Ancestry.
You can also use any number of applications to create a custom timeline. (Just remember to save your work as image files so they are usable for your photo book.) Here are some options:
- Canva, an online freemium resource for customized timelines. The free version includes two folders to organize designs; 1GB storage for photos and assets; access to over 8,000 templates; the ability to upload your own images; and access to millions of photos with a minimal use fee for each.
- Time.Graphics
It’s true that a picture can be worth a thousand words. But those who own old unidentified family photos—those without names or stories attached to them—lament that some pictures aren’t worth much at all without the words that should accompany them.
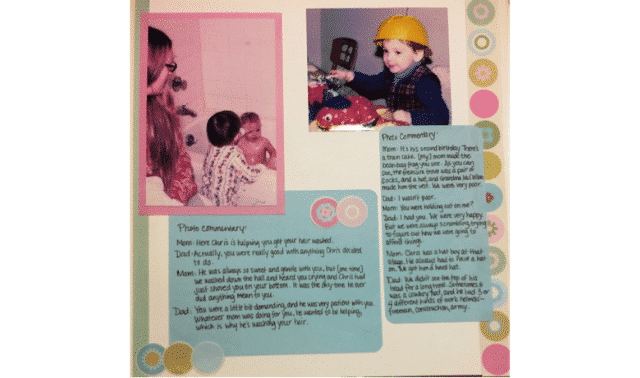
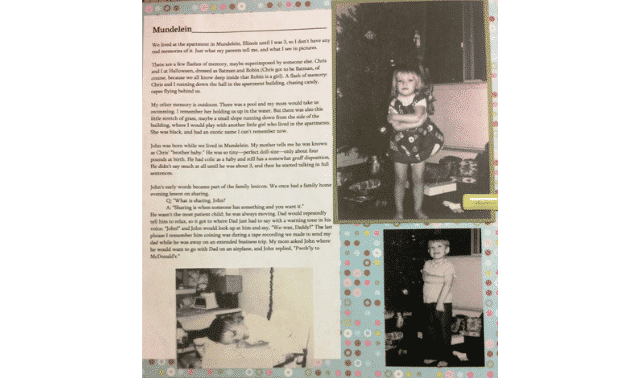
3. Stories
Consider your basic “stories” to be the identification of old photos. Include as much as you know about them: the names of those shown, relationships to each other, the date and place it was taken, the owner of the image, etc.

You want to point out the things you know (but that your audience doesn’t) about the subject and what’s happening. You might add additional details of interest, such as, “The man standing next to Ancestor Al was Jonathan Jones, his lifelong friend. He was a witness at Al’s wedding and they were neighbors in Pennsylvania and later in Iowa. Their grandchildren, Sarah Harvey and Jonah Jones, eventually married each other in Iowa.” It’s those details you should include as text in your photo book, since you won’t always be handy to narrate it yourself.
You can include full pages of text on some pages, if you have longer stories you want to share here. Think about doing a biographical sketch on an ancestor or a couple. Consider adding transcriptions of oral histories, old family letters or even more recent correspondence with relatives and DNA matches (get permission on the latter). Add your memories of visits to that grandparent’s house; your thoughts and feelings about loved ones you’ve lost; and other personal reflections or insights.
Consider writing up longer passages of text ahead of time—before you start actually creating your photo book. Otherwise, you may find yourself getting bogged down in editing or in looking up details when you are ready to design your book. Also, writing up your captions and other text ahead of time helps you realize how much (or little) you have to say. This will affect the layout of your photo book.
4. Documents
Document images add dimension and depth to the stories you’re telling—along with evidence your readers can see for themselves. Review various types of document images that pertain to your family, including everything attached to your ancestors’ profiles in your family history software or online tree.
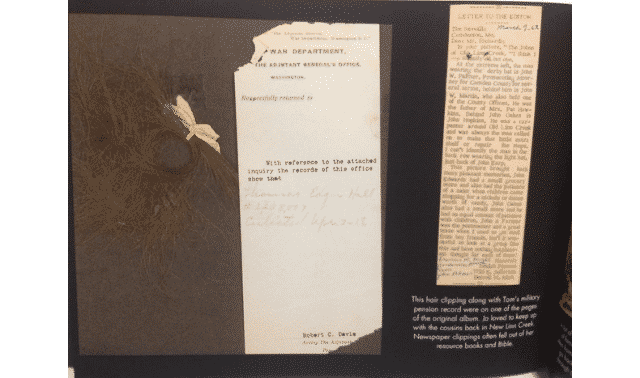
Look for documents that:
- Tell a story, such as a newspaper article or a letter
- Reveal family facts and relationships (especially important, disputed or previously unknown relationships), such as a will and estate inventory, tax records, census entries, vital records, and family Bible entries.
- Are beautiful, unusual, colorful or otherwise interesting to look at
Think “outside the box” with the documents you include, just as you do with photos. What you have will depend on the timeframe and what documents you can access. Perhaps you have a collection of old letters or recipes; use them selectively or make these the basis of an album. You might clip newspaper headlines of major events from a digitized newspaper at a site such as Chronicling America.
Perhaps you can find images of old movie ticket stubs, vintage postcards, advertising memorabilia from a family business, school report cards, buttons or fabric samples, war bonds or ration books, or various other kinds of ephemera (paper scraps) that enrich the story you’re sharing. Even if they don’t directly mention your family, they can provide a nice visual and historical backdrop. Purchase items like these on auction sites such as ebay or use Google Images to find images you have permission to use.
Several years ago, before I started creating digital photo books, I made a scrapbook of my own childhood. Intermingled on the pages are my typed memories, photocopied pages from my mother’s diary and handwritten transcriptions of an oral history interview I did with my parents. You could reproduce the same document elements in a digital album quite easily:
As with images, make sure you have good digital copies of documents. Remember to convert PDFs to JPG files in preparation for uploading them. (You can also open a PDF and use your computer’s screenshotting or snipping tool to capture part of a PDF, then save it as a JPG.)
5. Maps
Well-chosen maps can become powerful illustrations of your ancestors’ lives, especially if they moved around a lot, migrated a long distance, lived in a geographically interesting place or if you simply don’t have many images about their lives. As mentioned earlier, Diane Haddad decided to include a Google map showing her grandfather’s many residences, since he moved around so much. She tried creating her map first in Google Maps, but wasn’t happy with the result,
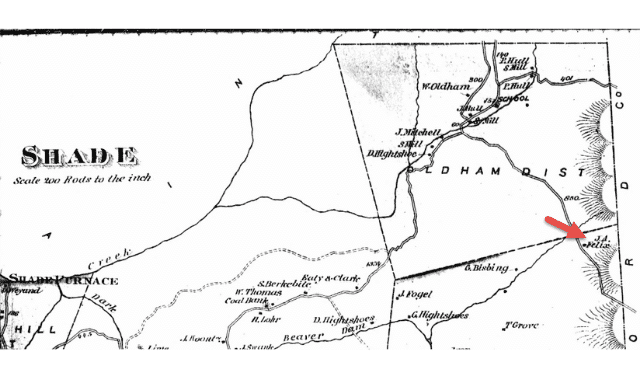
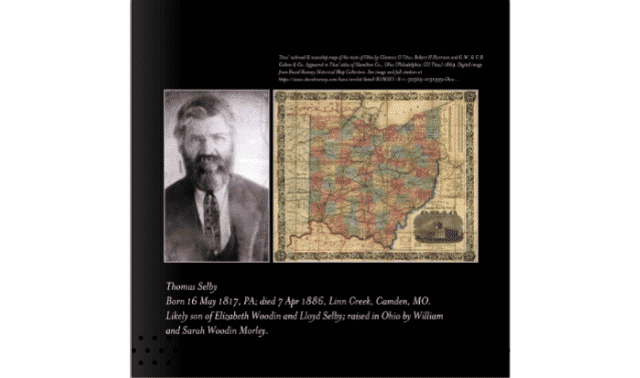
Historical maps of an ancestor’s locale, especially maps that show land ownership, ancestral landmarks and locations (such as schools, mills and roads) are also wonderful. Again, make sure you consult copyright considerations when finding maps online: your best bets are images found on government websites, Wikipedia Commons and on genealogy websites—but read the collection description for any limitations on publishing the images. Also of tremendous value is the David Rumsey Historical Map Collection.
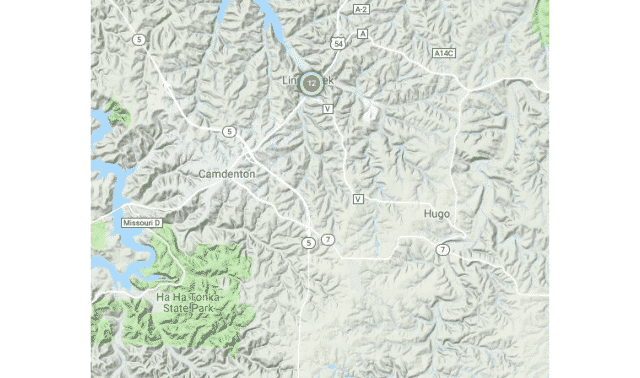
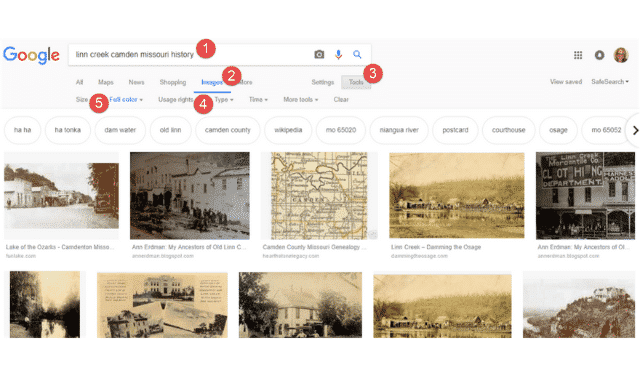
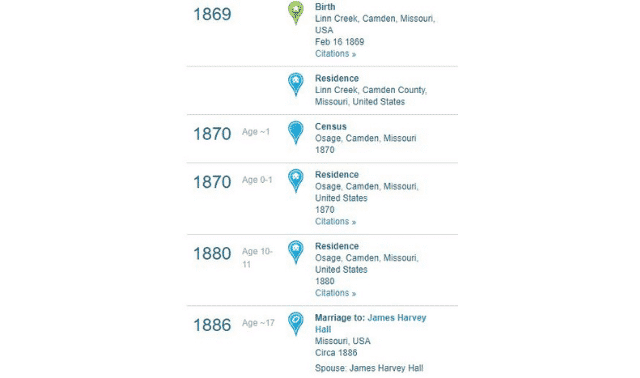
Don’t forget topographical maps, when the geography is worth illustrating. Here’s a screenshot taken from MyHeritage’s new PedigreeMaps feature, which allows you to map out ancestral locations across one person’s life or many. I hadn’t realized that Linn Creek, Missouri, where my ancestor Thomas Selby bought homestead land, was located in such a hilly spot at the fingertip of one part of the Lake of the Ozarks. I also appreciated seeing the distance to Camdenton and Ha Ha Tonka, both of which figure in my family’s story.
Next: Part 3: Making a Page Plan for Your Photo Book
ADVERTISEMENT