Sign up for the Family Tree Newsletter Plus, you’ll receive our 10 Essential Genealogy Research Forms PDF as a special thank you!
Get Your Free Genealogy Forms
"*" indicates required fields

In this article:
Part 1: Choosing Your Photo Book Images: 3 Qualities to Consider
Part 2: 5 Elements to Include in Your Photo Book
Part 3: Making a Page Plan for Your Photo Book
Part 4: Ultimate Family History Photo Book Example
Part 1: How to Choose Photo Book Images
With heritage albums, it’s common to find that your choices for ancestral photos are limited. You may only have a handful of images relevant to their lives. What you have may not show their lives at their most revealing, best angles or clearest focus. You may not even know the identity of every person in a photo or exactly when or why it was taken. So you may feel “stuck” with the images you have.
Others may find they have the opposite problem: how they’re going to cram all their photos into a single album. Even if your chosen photo-book printer allows you to load the book pages with as many images as you like, I don’t necessarily recommend it. Instead, be choosy. Use just the best images to draw your audience’s eye to the history and personalities you most want them to notice.

Whatever your situation, here are three qualities to consider when selecting your photo book images.
1. Most relevant and interesting
Your photo book should have a theme: one person’s life or childhood; biographical profiles of your female ancestors; an illustrated story about an important ancestral place. Selecting a theme will help you plan your page layout, tell a coherent story and, of course, choose relevant images.
Start by pulling out the must-use, obvious choice images: the ones that come to mind immediately when you think about your chosen theme. Then go back and look for additional images that will help flesh out the story or impression you want to convey with the book. Think outside the (photo) box and consider including:
- Digitized genealogical documents—birth certificates, family Bible entries, even census entries—that reveal an important part of the story you’re telling;
- Snapshots of a family artifact, such as a heritage quilt, military memorabilia, artwork or a family diary;
- Modern or historical images you can find online of important ancestral places, institutions or other topics (see below for copyright considerations).
As you sort through the relevant photos, identify the most interesting, expressive ones, or those that communicate the most. Often, these are the ones your eye comes back to most frequently. You can’t help but look at them. These may include an unexpected angle; an especially expressive emotion; body language that communicates a relationship between people in the photo; or hints that the photo was taken on some special occasion.
2. Permission and privacy
It’s crucial that you only print photos that you have the right to print. Just because you own a photographic print, doesn’t mean you own the copyright and therefore have the right to publish it. An example is a professional studio portrait. This article better explains copyright considerations for genealogists.
Look for public domain historical images you can use online at websites such as Wikipedia or Creative Commons. At the latter, read the permissions for each image carefully, as some have restrictions on use. The sample photo book page shown here includes an image credit for a map found on the David Rumsey Historical Maps website, which states, “Images may be reproduced or transmitted, but not for commercial use.” So these may be open for your use, unless you plan to sell your book for a profit. (See the full statement.) The small text above the map is a citation for the map image online.
Photos you find online
What about photos you’ve found on someone else’s online tree or another genealogy website? Reach out to the image contributor or webmaster for written permission to reproduce the photo—and be sure to ascertain that they actually own the image and have the right to give permission. You may have to do some detective work to track down a digital image’s original source or owner and get the permission you need. Include a permission statement in your photo credit caption, such as “Image courtesy of Jane Q. Photographer. Reprinted with permission.”
Don’t share too much
Finally, make sure document images you want to use don’t reveal personal details about living people. Scrutinize recent census images, birth or death certificates, letters and other items about living and recently-living people. If you need to use a document but it has some revealing data, privacy-protect it by covering up the personal information with photo-editing software (or cover the private information by another image in the photo book layout).
3. Best image quality
It’s often easy to tell whether a printed photo is too dark, blurry, or indistinct to reproduce well. But sometimes, a digital image looks just fine on the screen but won’t look good when it’s printed in a photo book. That’s because of the photo’s resolution.
Understanding pixels
Digital photos are made up tiny units called pixels. The more pixels, the higher the resolution, or the larger you can reproduce it without losing too much image quality. A similar concept applies when you crop and enlarge a small area on a photo. When you try to enlarge it, that little area may not have the resolution (or a high enough number of pixels) to print clearly.
Photo resolution
Here’s an important tip: When photos are uploaded to websites such as Facebook, they are often compressed into a lower-resolution format, meaning that photos you retrieve from these sites may not have the resolution you want.
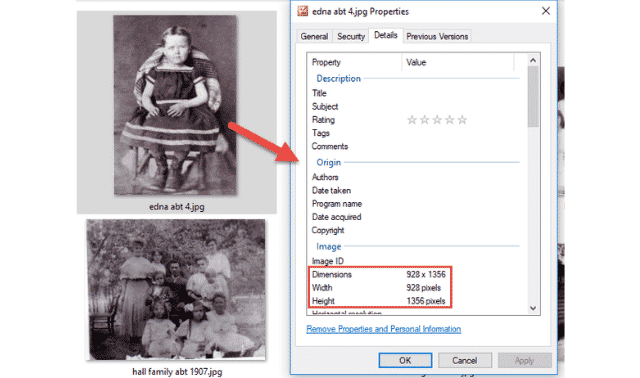
Shutterfly, a leading photo book website, recommends your digital images be at least 1600 (width) x 1200 (height) if you want to them to fill an entire page in a photo book that’s 7” x 9” or 8” x 8” or 8” x 11.” If you want to fill an entire page in a 10” x 10” or 12” x 12” book, your images should be at least 2000 x 1600. Images can be smaller if you’re not going to fill the page with them.
Using low-resolution photos
In a photo book project about my father’s life, the only photo files I had of my father’s childhood were low-resolution. Of course, I wanted to use them anyway.
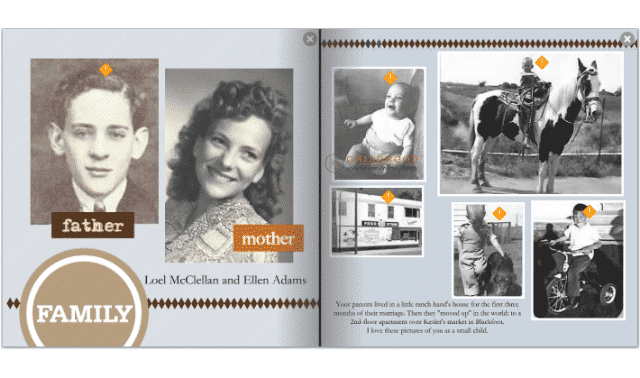
With the exception of the pony photo, I kept them fairly small on the page. I was curious to see how they’d look, so I ordered a draft copy of the book (order these as softbound albums, which are less expensive).
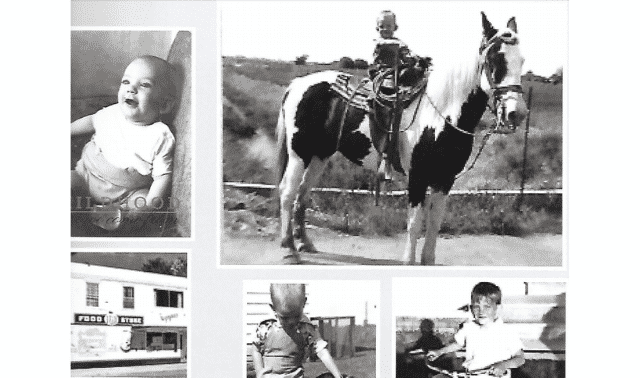
You can certainly see the effects of choosing lower-resolution photos. The biggest picture is the most pixelated, meaning it’s kind of fuzzy. I can see a little pixilation in the baby photo around the eyes and mouth, and you can also see the slight distortion in the bottom right photo of my dad on his tricycle. In printing the final version of this album, I still used all these photos, but I reduced the pony photo quite a bit.
Next: Part 2: 5 Elements to Include in Your Photo Book
ADVERTISEMENT